This article explains how to convert a power bank into a wireless charging power bank. The approach is low cost and relatively simple, suitable for DIY projects. Selecting appropriate components is important before assembly.
Materials
- Battery cells: High-capacity lithium cells; use one or multiple cells and connect in parallel as needed.
- Custom wireless charging PCB (PCBA): homemade wireless charger PCBA.
Technical specifications
- Input interface: micro USB input
- Input voltage: 5 V
- Output voltage: 5 V
- Output current: 5 V / 1 A
- Conversion efficiency: greater than 76%
- Other functions: can output via USB port to charge tablets or other external devices
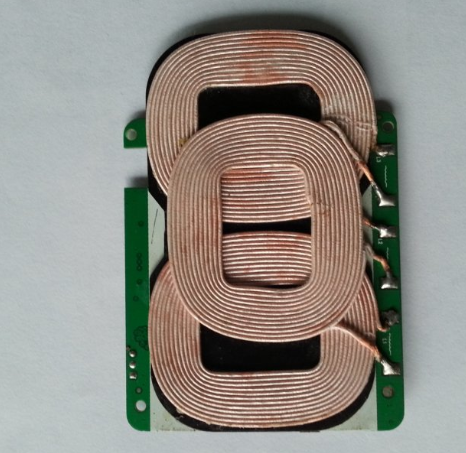
- A5 transmitter coil: A5 transmitter coil compliant with Qi standard
- Battery protection board: protects the battery against overcharge, over-discharge, overcurrent, and short circuit
- Enclosure: a suitable housing is recommended; otherwise assemble using improvised parts. Also prepare tape, scissors, and other basic tools.
Assembly method
If building a 5 V wireless charging power bank for a phone: purchase the required number of lithium cells depending on desired capacity, a boost board with charge/discharge protection (3.7 V to 5 V), and a power bank enclosure. Assemble the cells, protection board, boost board, and wireless charging PCBA into the enclosure.
If building a 19 V wireless charging power bank for a laptop: use multiple lithium cells for the required capacity, an A5 three-transmitter-coil assembly, and a protection board that ideally includes cell balancing so each cell can be fully charged. Without balancing, if cell voltages differ, charging may stop when one cell reaches 4.2 V while others remain undercharged. Add a high-power boost board (step-up from about 16 V to 19 V), preferably rated above 50 W to reduce heat, a suitable enclosure, and a 16.8 V charger. If you need a charge-level display, add a voltage display module. Assemble the components accordingly.