Introduction
Hand soldering is a fundamental skill for electronic hobbyists working on circuit boards and components. Whether assembling a prototype or repairing a device, mastering this technique ensures reliable connections and prevents damage to sensitive parts. However, common soldering errors can lead to poor joints, component failure, or even safety hazards. This guide, crafted for hobbyists, explores hand soldering mistakes to avoid, highlights best practices for hand soldering, and offers practical solutions to achieve optimal results. By understanding the core principles and avoiding frequent pitfalls, you can elevate your skills and create durable, high-quality electronic projects. Let’s dive into the essentials of hand soldering and learn how to sidestep issues that could compromise your work.
What Is Hand Soldering and Why It Matters
Hand soldering involves manually joining electronic components to a printed circuit board using a soldering iron and solder material. This process creates electrical connections by melting solder, a metal alloy, to form a bond between component leads and PCB pads. For hobbyists, hand soldering is often the go-to method for small-scale projects, repairs, or custom builds due to its accessibility and low cost.
The importance of proper hand soldering cannot be overstated. A well-executed solder joint ensures electrical conductivity and mechanical stability, while a poor joint can cause intermittent connections, short circuits, or complete failure. For hobbyists, mastering best practices in hand soldering prevents costly mistakes and builds confidence in tackling complex projects. As projects grow in complexity, avoiding common soldering errors becomes critical to maintaining functionality and safety.
Technical Principles of Hand Soldering
Understanding the basic principles behind hand soldering helps hobbyists avoid mistakes and achieve consistent results. The process relies on heat transfer, wetting, and proper joint formation. A soldering iron heats the component lead and PCB pad simultaneously, allowing solder to melt and flow over the surfaces. This creates a metallurgical bond as the solder cools and solidifies.
Key factors influence the quality of a solder joint. Temperature control is vital, as excessive heat can damage components or lift PCB pads, while insufficient heat results in cold joints that lack proper bonding. Wetting, the ability of solder to spread and adhere to surfaces, depends on clean contact points and appropriate flux use. Flux removes oxidation and enhances solder flow, ensuring a strong connection.
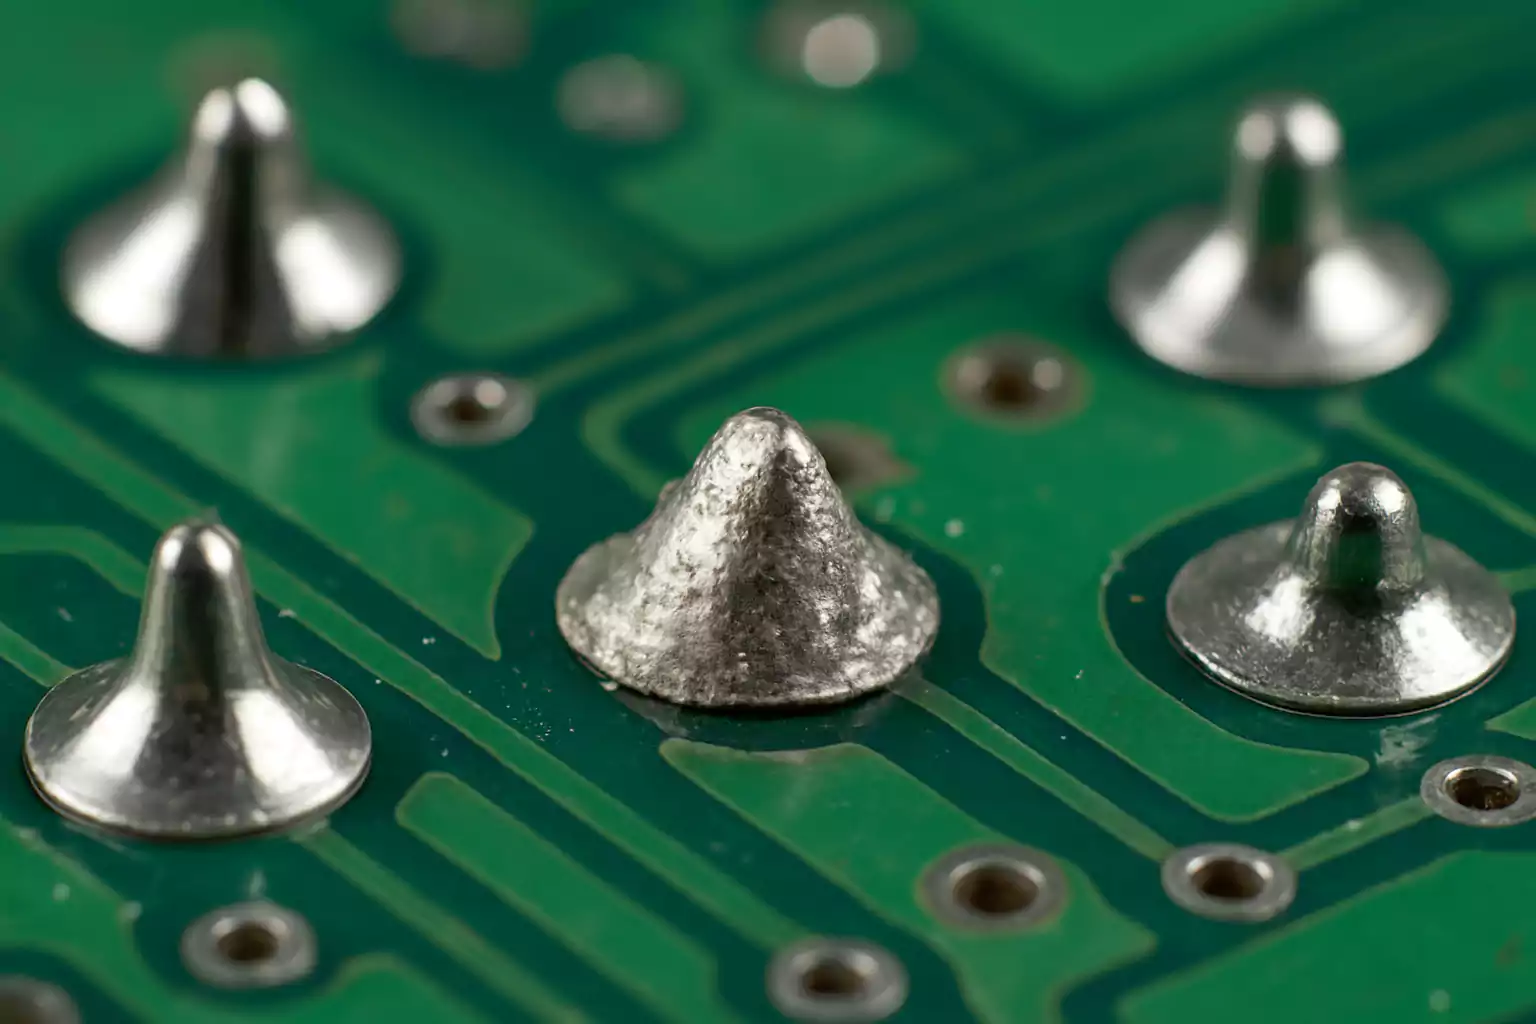
Standards such as IPC-A-610G, Acceptability of Electronic Assemblies, provide guidelines for evaluating solder joint quality. According to this standard, an ideal joint appears shiny, smooth, and concave, fully covering the pad and lead without excess solder buildup. Recognizing these principles helps hobbyists identify common soldering errors early and adjust their technique accordingly.
Suggested Reading: Hand Soldering for Prototyping: Quickly Assembling and Testing Your Electronic Designs
Common Soldering Errors and Hand Soldering Mistakes to Avoid
Hobbyists often encounter recurring issues during hand soldering that can compromise their projects. Identifying these mistakes and understanding their causes is the first step toward improvement. Below are frequent pitfalls to watch for.
Insufficient Heat or Cold Joints
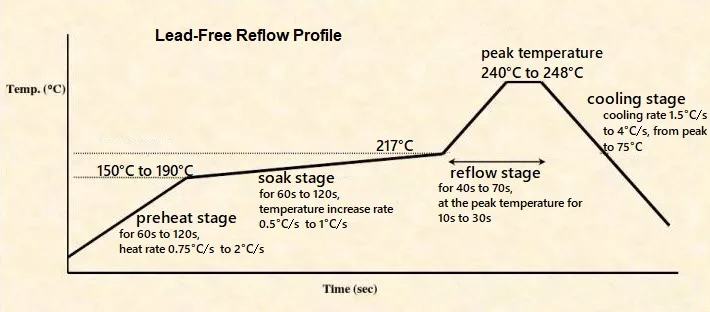
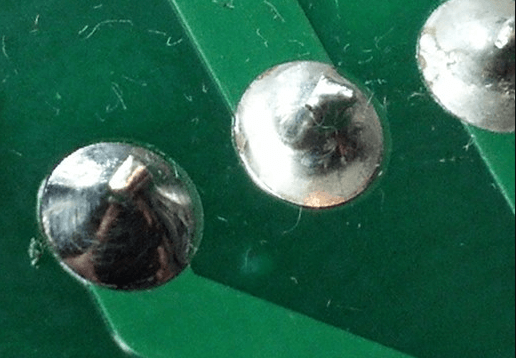
A cold joint occurs when the solder does not fully melt or bond with the surfaces, often due to inadequate heat from the soldering iron. The result is a dull, grainy appearance and a weak connection prone to cracking. This mistake happens when the iron’s temperature is too low or contact time is too short. To avoid this, ensure the iron is set to the appropriate temperature for the solder alloy and components, typically between 260 to 350 degrees Celsius for most hobbyist applications, as guided by general industry practices.
Overheating and Component Damage
Applying too much heat can damage sensitive components or delaminate PCB traces. Overheating often stems from prolonged contact with the soldering iron or using a tool with excessive wattage. To prevent this, use a temperature-controlled iron and limit soldering time to a few seconds per joint. If a joint requires rework, allow it to cool before reheating to minimize thermal stress.
Poor Surface Preparation
Dirty or oxidized surfaces prevent proper solder wetting, leading to weak joints. Failing to clean component leads or PCB pads before soldering is a common error. Always wipe surfaces with isopropyl alcohol and a brush to remove contaminants. Using flux during soldering further aids in cleaning and improves adhesion.
Excessive Solder Application
Adding too much solder creates bulky joints or bridges between adjacent pads, causing short circuits. This mistake often results from a lack of control over solder feed. Apply just enough solder to form a small, concave fillet around the joint, as recommended by standards like IPC-A-610G. If excess solder forms, remove it with a desoldering braid.
Incorrect Iron Tip Selection
Using the wrong tip size or shape can make soldering difficult, especially on small or densely populated boards. A tip too large may overheat surrounding areas, while a tip too small struggles to transfer heat. Match the tip to the task, opting for fine tips for precision work and broader tips for larger components.
Best Practices for Hand Soldering
Achieving reliable solder joints requires adherence to proven techniques and best practices in hand soldering. These guidelines help hobbyists produce consistent, high-quality results while avoiding common pitfalls.
Prepare Your Workspace and Tools
Start with a clean, organized workspace to minimize distractions and hazards. Ensure your soldering iron is in good condition with a properly tinned tip. Tinning involves coating the tip with a thin layer of solder to improve heat transfer and prevent oxidation. Keep essential tools like flux, solder wire, desoldering braid, and cleaning supplies within reach.
Use the Right Equipment
Select a soldering iron with adjustable temperature control to match the requirements of your project. For most hobbyist tasks, a 25 to 40-watt iron suffices. Choose solder with a flux core, typically a 60/40 tin-lead alloy or lead-free alternatives, depending on safety and regulatory preferences. Refer to guidelines in standards like IPC J-STD-006C for solder material selection.
Maintain Proper Technique
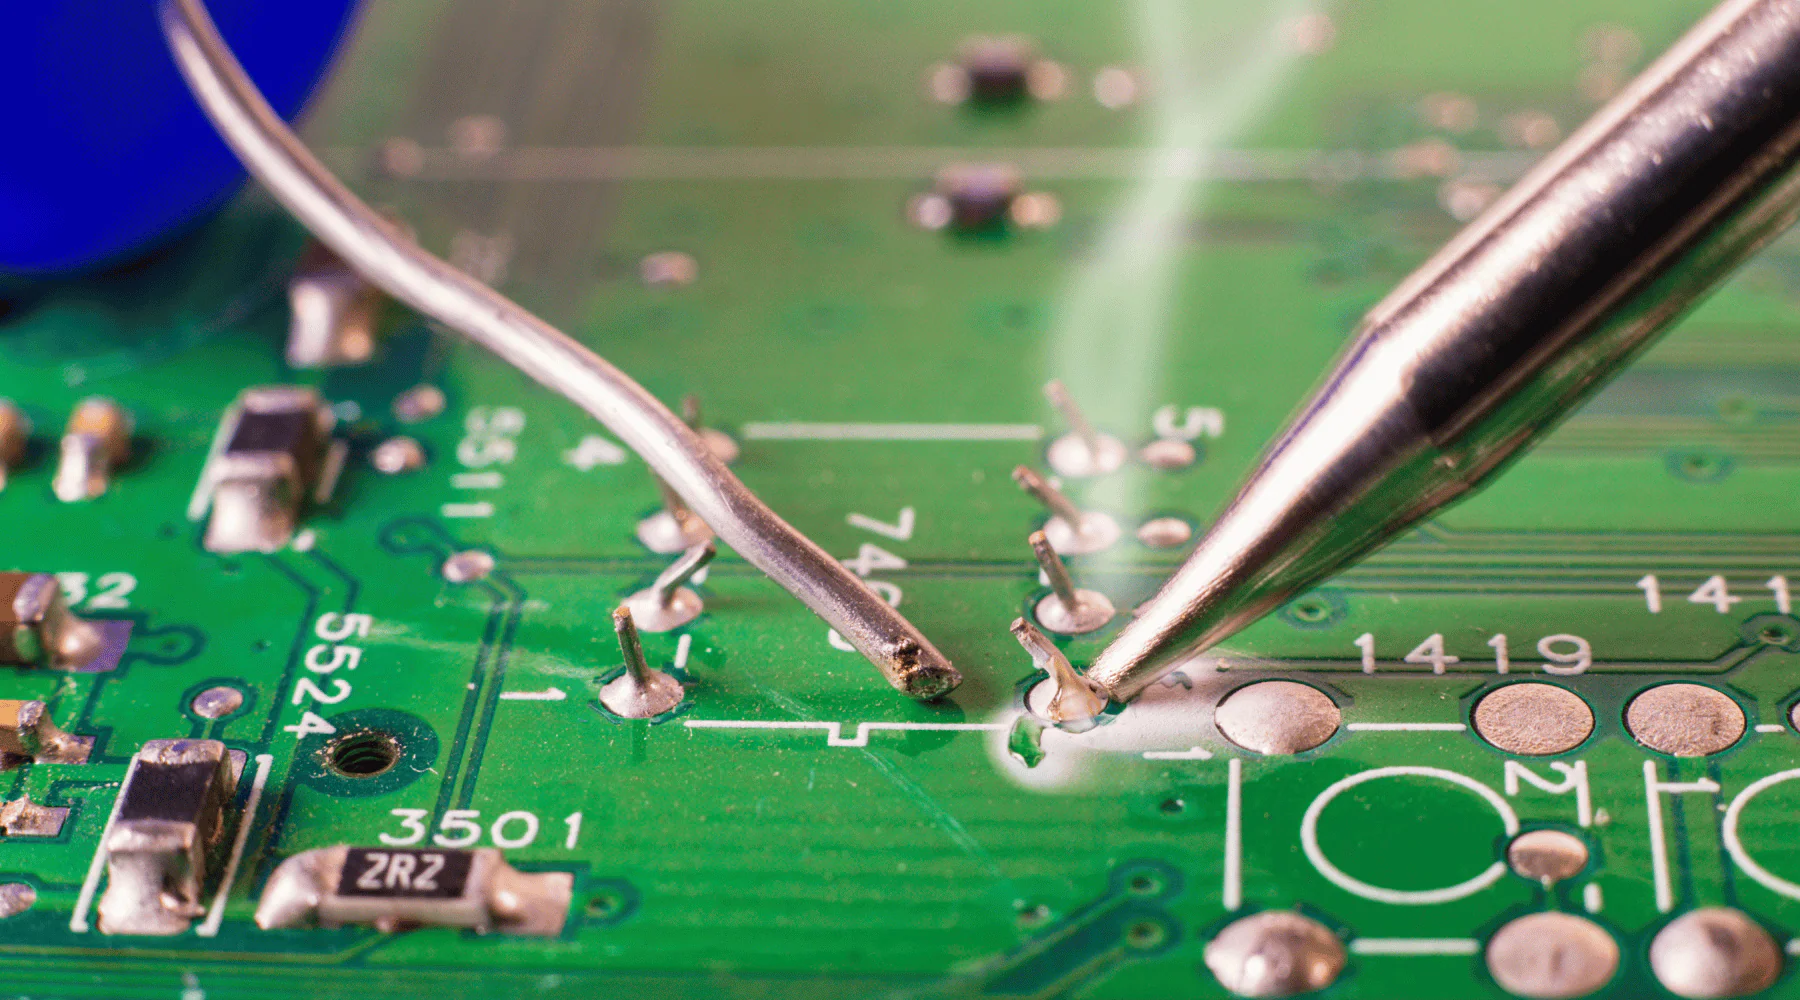
Hold the soldering iron like a pen for better control and place the tip at the junction of the component lead and pad. Heat both surfaces simultaneously for about two seconds before applying solder. Let the solder flow naturally over the joint, then remove the iron and allow cooling without disturbance. Avoid moving the component during solidification to prevent weak joints.
Inspect and Test Joints
After soldering, visually inspect each joint for a smooth, shiny appearance and proper fillet shape, as outlined in IPC-A-610G. Use a multimeter to test continuity and confirm electrical connections. If a joint appears defective, rework it promptly using desoldering tools to avoid further damage.
Prioritize Safety
Soldering involves high temperatures and potentially harmful fumes. Work in a well-ventilated area or use a fume extractor to avoid inhaling flux vapors. Wear safety glasses to protect against solder splashes and handle the iron with care to prevent burns. Always unplug the iron when not in use.
Suggested Reading: Hand Soldering, PCB layout
Troubleshooting Common Soldering Issues
Even with careful technique, issues can arise during hand soldering. Knowing how to address these problems ensures your projects remain on track. Below are practical solutions for frequent challenges.
Fixing Cold Joints
If a joint appears dull or fails continuity testing, reheat it with the soldering iron and add a small amount of fresh solder. Ensure the iron tip makes full contact with both the lead and pad. Apply flux if necessary to improve wetting. Once the solder flows smoothly, remove the heat and let it cool.
Removing Excess Solder
For joints with too much solder or accidental bridges, use a desoldering braid. Place the braid over the excess solder and press it with a heated iron tip. The braid absorbs the molten solder, clearing the area. Clean the pad afterward with alcohol to remove flux residue.
Repairing Lifted Pads
Overheating can cause PCB pads to lift or detach. If this happens, avoid further soldering on the damaged pad. Instead, use a fine wire to create an alternate connection to a nearby trace or pad, securing it with minimal solder. Handle the area gently to prevent additional harm.
Conclusion
Hand soldering is an invaluable skill for electronic hobbyists, enabling the creation and repair of custom circuits with precision. By understanding common soldering errors and adhering to best practices for hand soldering, you can avoid pitfalls that lead to unreliable connections or damaged components. From maintaining proper heat control to preparing surfaces and inspecting joints, each step plays a crucial role in achieving optimal results. Apply the guidance shared here to refine your technique, troubleshoot issues effectively, and build projects that stand the test of time. With practice and attention to detail, hand soldering becomes a rewarding part of your electronics journey.
FAQs
Q1: What are the most frequent hand soldering mistakes to avoid as a hobbyist?
A1: For hobbyists, common mistakes include creating cold joints from insufficient heat, overheating components, and applying too much solder. Poor surface cleaning also leads to weak bonds. Always use the correct iron temperature, limit contact time, and clean surfaces with alcohol or flux. Inspect joints for a shiny, smooth finish to catch issues early.
Q2: How can I improve my technique with best practices for hand soldering?
A2: Enhance your soldering by using a temperature-controlled iron and tinning the tip regularly. Heat both the pad and lead together, apply solder briefly, and let it cool undisturbed. Follow guidelines like those in IPC standards for joint appearance. Practice on scrap boards to build confidence and consistency in your work.
Q3: What causes common soldering errors and how can I prevent them?
A3: Errors often stem from incorrect heat, dirty surfaces, or improper technique. Cold joints result from low temperatures, while overheating damages parts. Prevent these by setting the right iron temperature, cleaning surfaces before soldering, and using flux. Keep soldering time short and check each joint for quality after completion.
Q4: Why do my solder joints fail, and how do I fix these soldering mistakes?
A4: Solder joints fail due to poor wetting, excess solder, or movement during cooling. Fix cold joints by reheating with fresh solder and flux. Remove excess solder with a desoldering braid. Ensure components stay still while cooling. Regular inspection helps spot issues early for quick rework without damage.
References
IPC-A-610G — Acceptability of Electronic Assemblies. IPC, 2017.
IPC J-STD-006C — Requirements for Electronic Grade Solder Alloys and Fluxed and Non-Fluxed Solid Solders for Electronic Soldering Applications. IPC, 2013.