Overview
Installation and commissioning of a PLC control system involve multiple sequential tasks. Each step depends on the previous one; mistakes can delay the schedule or damage equipment. This article summarizes field-proven techniques for PLC system installation and commissioning, and discusses common on-site problems with proposed solutions.
1. System Installation and Commissioning
1.1 Preliminary technical preparation
Thorough technical preparation before installation and commissioning improves efficiency and success. Preparatory tasks include:
- Familiarize yourself with the supplied PLC technical documentation and original design documents. Understand device performance, functions, and operational requirements, and develop operating procedures.
- Study the design documentation and the system process flow. Pay special attention to process control requirements for each production device. On that basis, draw subsystem process flow diagrams, interlock diagrams, system function diagrams, and system logic block diagrams. These deliver a deeper understanding of system logic and are essential preparation.
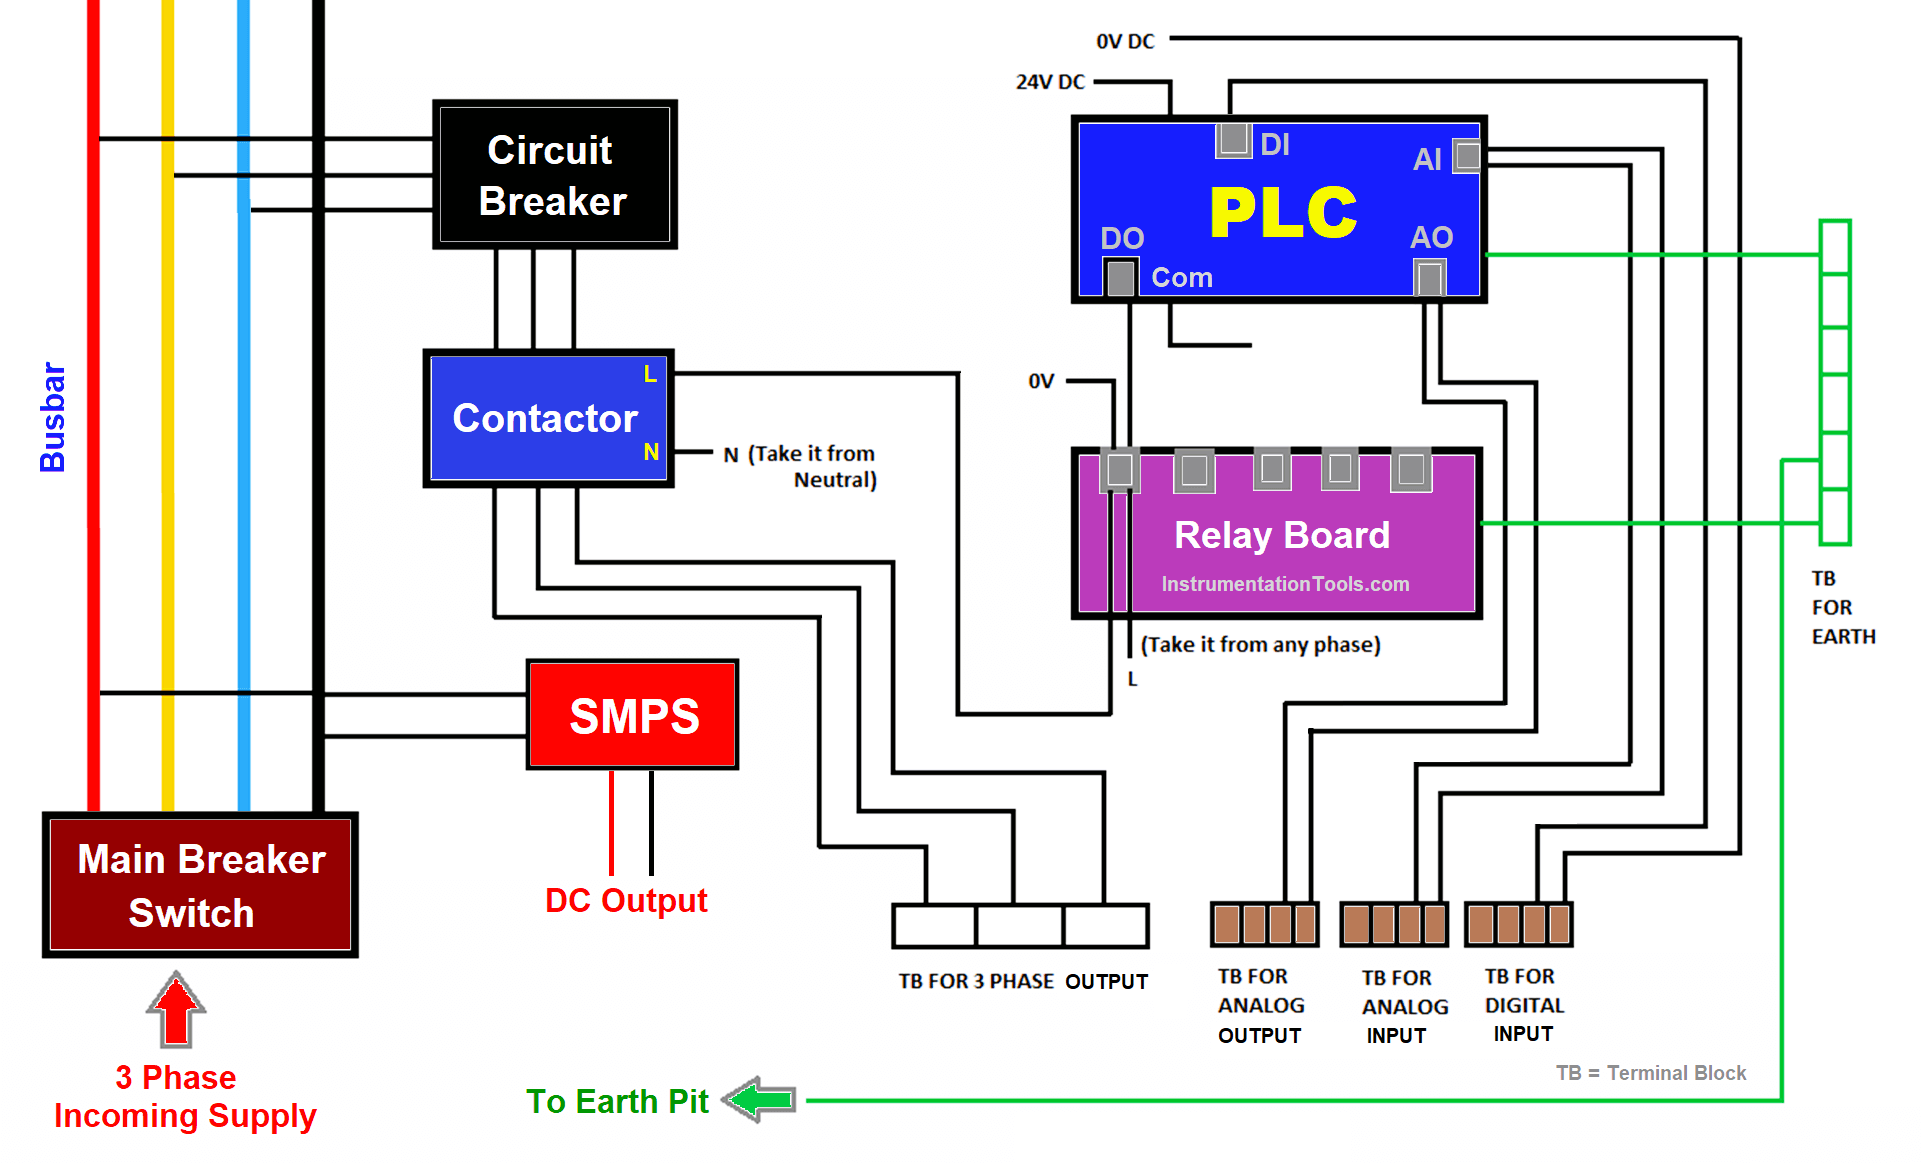
- Understand the performance, design, and installation of each process device, especially control and power wiring diagrams. Compare diagrams with physical equipment to identify and correct errors promptly.
- Based on the design and PLC technical documentation, list PLC I/O point tables, including internal coil overview, I/O locations, corresponding devices, and each I/O point function.
- Study the supplied program. For logically complex parts, draw timing diagrams for inputs and outputs; many design logic errors become apparent when timing is plotted.
- Prepare commissioning plans by subsystem, then consolidate them into a full-system commissioning plan after group review.
1.2 Commercial inspection
Commercial inspection should be conducted jointly by both parties. Confirm models, quantities, specifications, and condition of equipment, spare parts, technical documentation, and accessories. Performance should be validated during laboratory and field commissioning. Record results on a signed exchange list.
1.3 Laboratory commissioning
Perform initial hardware and software checks in the laboratory:
- Install PLC hardware on a metal rack. Mount I/O modules for each workstation and connect each station to the host, programming device, printer, and other peripherals with coaxial or specified cables. Verify wiring, ensure supply voltage matches PLC voltage rating, then follow the power-up procedure and load system configuration and program media. Bring the system online according to operating procedures and run basic functional tests.
- Enter the working program into the PLC.
- Simulate I/O inputs and outputs to validate and modify the program. The goal is to verify that the program logic matches the process interlock requirements and can run through process sequences. If the program does not operate correctly, modify it. This process deepens understanding of the program and helps identify logic flaws for optimization.
Related Reading: Configuring and Programming PWM on S7-1200 PLC
Two common test methods:
- Simulation method: Build a test panel. Use push switches to simulate input nodes and small relays to simulate process relays and contactors. Use auxiliary contacts to simulate device feedback signals. Advantages: realistic simulation that reveals timing and switching speed differences between mechanical contacts and PLC electronic contacts, which may cause false logic actions. Disadvantages: added cost and setup effort.
- Force method: Use PLC force functionality to force mechanical contact states in the program to "on" or "off" to drive the program. Advantages: minimal setup and cost. Disadvantages: incomplete logic verification; forced inputs are manual and can only test segments rather than continuous operation.
Field experience suggests simulating important nodes and forcing less critical ones to combine the strengths of both methods. Maintain a daily commissioning log that records personnel, time, activities, modifications, faults and resolutions, and acceptance signatures. For program modifications, mark the design drawings and consult the original designers to ensure changes accurately reflect design intent.
1.4 Site installation and inspection
After laboratory commissioning and when site conditions permit, move equipment to the field for installation. Installation checks should include:
- Ensure modules and plug-in units are fully seated and bolted.
- Use uniform cable types for communication cables; do not mix types.
- If necessary, measure signal attenuation with instruments; attenuation must not exceed limits specified in technical documentation.
- Measure insulation resistance of the host, I/O cabinets, and connecting cables to earth.
- Measure the grounding resistance of the system ground.
- Check the power supply and record all measurements. Only power-up after confirming all items meet requirements.
1.5 Field device wiring, I/O checks, and adjustments
Verify correctness of control and main circuit wiring for all process equipment. Perform single-machine tests in manual mode. Check every PLC input point (selector switches, pushbuttons, relay and contactor contacts, limit switches, instrument switches, etc.) and their wiring to the PLC input module by repeated operation. Confirm correctness.
Check all relays, contactor coils, and other actuators driven by PLC outputs, and verify wiring to output modules. Measure and record loop resistance and insulation resistance to earth. If required by output voltage ratings, power output loops to ensure no short circuits. A short in an output loop can burn modules when the PLC energizes the output.
If the PLC includes analog I/O modules, check primary detectors or transmitters providing analog inputs and the actuators receiving analog outputs. Inject representative analog signals into detectors and transmitters to verify correct installation and that outputs meet PLC standard ranges. Inject the same analog signal into actuators receiving PLC analog outputs to confirm correct actuator response. With analog I/O modules, the PLC can monitor process parameters and perform control calculations per the design model for process control.
This step is critical. If all external process devices are healthy, external nodes to the PLC are correct, stable, and reliable, wiring is correct, and program logic is validated, then the subsequent interlock commissioning is likely to succeed quickly.
1.6 System simulated interlock no-load test
The purpose is to place the lab-tested PLC and logic into the actual process flow and validate logic using on-site device I/O and wiring. For safety, open the main power circuit of PLC-controlled process equipment (typically power drives) in two phases so devices will not rotate when energized; retain a single phase only for relay control power.
For each subsystem operation mode and other control functions, perform system simulation tests. Confirm correct positions of selector switches and preset switches, then start the system from the PLC. Observe and record relay and contactor operations corresponding to PLC output nodes, including sequence, timing, and signal indications, and confirm conformance with process control logic. Record the operation of other devices as well.
For actuators or input/output nodes that do not respond during the simulated interlock test—such as level switches, limit switches, or instrument digital/analog I/O—or for interlocks with other subsystems, use manual aids, external inputs, or internal forcing as appropriate to simulate signals and assist the PLC in commanding the system according to design logic.
1.7 Single-unit commissioning under PLC control
The goal is to confirm that PLC output circuits can drive relays and contactors to start equipment, and to verify that feedback signals are correctly returned to PLC inputs and that limit switches operate properly.
Method: Force the output node corresponding to a specific process device (motor, actuator, etc.) so its relay or contactor operates and the device runs. Observe and record device operation and verify feedback signals, limit switch operation, and actuator response.
Special precautions: Clearly mark devices that are being forced with a running-hazard notice and assign personnel to watch the device. Only force a device after the on-site attendant issues a start command. Never start equipment by forcing without adequate preparation to ensure safety.
1.8 System no-load interlocked trial run under PLC control
Objective: After successful single-unit no-load tests and system logic validation, confirm that the interconnected system operates correctly to process requirements, and verify signal integrity, reliability, and stability of external nodes. Prepare a system no-load interlock test plan and execute it after review.
Proceed by subsystem interlocks first, using manual aids (node shorting or forcing) for subsystem interlocks, then perform full-system interlock tests. Include all designed start/stop and operating modes, emergency and fault stop scenarios, and required signals. Simulate fault states using forcing where necessary; fault points should be determined by process requirements.
Before the interlocked load trial, perform a comprehensive system check and train operators to maximize the chance of a successful first trial run.
Related Reading: Selecting PLCs to Drive Contactors
2. Discussion of Signal Attenuation
- Maximum allowable signal attenuation from the PLC host to I/O stations is 35 dB. Plan cable routing carefully before installation, and minimize cable length. Signal attenuation increases by 0.8 dB per additional kilometer. Minimize the number of splitters (each splitter attenuates 14 dB) and cable joints (each joint attenuates 1 dB).
- Prefer a single-bus cable routing method: a single communication trunk with branch connectors to I/O stations rather than a star topology. Keep the number of I/O stations and transmission distances similar on both sides of the PLC host to maintain better network impedance matching.
- Place splitters close to I/O stations to reduce interference.
- Terminate the communication cable with a 75 Ω BNC terminator at the cable end and connect it to each I/O cabinet. When removing a cabinet from the network, attach the 75 Ω terminator to the cable head to preserve proper matching.
- Maintain a distance of at least 40 cm per kV between communication cables and high-voltage power cables. If crossing is unavoidable, cross at right angles.
- Avoid parallel routing of communication cables with AC power lines to reduce interference. Also keep communication cables away from large motors, welding machines, and large inductive devices.
- Avoid routing communication cables through high-temperature or chemically corrosive areas.
- When installing cables, allow margin for thermal expansion and contraction, typically 0.05% per °C.
- Ensure all cable joints and splitters are tightly connected and mechanically secured with screws.
- When stripping cable jackets, do not damage the shield. Use proper wire strippers when cutting metal foil and insulation, and avoid nicking the central conductor.
3. Discussion of System Grounding
- Bond the host and upper parts of branch stations with a 10 mm2 braided copper conductor and route them via a single dedicated down conductor to an independent grounding grid. Keep this system ground separate from the low-voltage protective earth to avoid interference. System grounding resistance should be less than 4 Ω. Isolate PLC host, panels, and cabinets from base plates with 3 mm rubber and ensure bolts are insulated.
- Ground the chassis of I/O station equipment with separate conductors to the common grounding grid.
- Connect communication cable shields at the PLC host side, where the I/O handling module is located, to the dedicated system grounding grid; do not ground the shield at the I/O station side. Cable connector shells should be grounded through the shield to the dedicated ground. Never create a two-point ground loop on the cable shield, as this will cause interference.
- Use an isolated power supply where the neutral is floating. If unbalanced currents occur, they should flow into the power supply neutral rather than through protective earth, which could create loops that interfere with PLC operation.
- Connect I/O module grounding to the power supply neutral.
4. Commissioning Considerations
- Before going online, perform system configuration: determine total managed I/O points, number of input registers, holding registers, communication ports and their parameters, I/O station mapping and dispatch method, and user memory usage. Once configuration is confirmed, the system operates under those constraints. Reconfiguring later may render the program incompatible with the new configuration and cause system errors. Therefore, configure carefully at first and leave reasonable headroom for near-term expansion. However, excessive headroom consumes memory, increases scan time, and reduces runtime performance. Do not reconfigure a running system.
- In medium and large PLCs, the CPU scans the program in segments; each segment update refreshes I/O states and improves real-time performance. Improper segmentation can reduce real-time performance or slow execution. Ideally, segments should be balanced in length to avoid long single segments that impact execution time.
5. Conclusion
PLC system installation and commissioning is a methodical engineering process. Careful step-by-step execution is required for success. The procedures described here are field-tested practices used in industrial retrofit projects to shorten schedules and achieve successful commissioning on first trials.