1. Introduction
CentOS 7 supports multiple firewall interfaces running together, mainly firewalld and iptables. By default, CentOS uses firewalld to manage the netfilter subsystem, although the underlying packet-handling is performed by the kernel netfilter framework and can invoke iptables rules.
2. Differences between firewalld and iptables
firewalld can modify individual rules dynamically without requiring a full refresh, unlike iptables, which typically requires reloading rules to take effect after changes.
firewalld is designed to be more user-friendly; many common firewall tasks can be performed without detailed knowledge of tables and chains or deep TCP/IP expertise.
Compared with iptables, firewalld defaults to denying services unless explicitly allowed, so each service usually must be enabled to be permitted. iptables tends to assume services are allowed by default and explicitly blocks what is needed.
firewalld itself does not implement packet filtering in the kernel; like iptables it uses the kernel netfilter subsystem. Both tools maintain rule sets, while the kernel netfilter performs the packet processing. The main differences are structure and usage.
3. Zone management concepts
Zone management
Zones divide the network environment into areas with different trust levels and access policies. For example, the Internet is typically untrusted while an internal LAN is trusted. The security model is initialized when the firewall is installed, when the system first starts, or when the first network connection is established. The model describes the trust level of the host's connected networks and defines how new connections are handled.
Common initialization zones include:
- Block (block): All incoming network packets are rejected.
- Work (work): Trusted network computers that should not harm this host.
- Home (home): Trusted network computers that should not harm this host.
- Public (public): Untrusted network; only explicitly accepted incoming connections are allowed.
- DMZ (dmz): Demilitarized zone; a buffer between internal and external networks. Only explicitly accepted incoming connections are allowed.
- Trusted (trusted): All network connections are accepted.
- Drop (drop): Any incoming network connections are discarded.
- Internal (internal): Trusted network computers; only explicitly accepted incoming connections are allowed.
- External (external): Untrusted network computers; only explicitly accepted incoming connections are allowed.
Note: firewalld's default zone is public.
firewalld ships with zone files such as block.xml, dmz.xml, drop.xml, external.xml, home.xml, internal.xml, public.xml, trusted.xml, work.xml. These are typically stored under /usr/lib/firewalld/zones/.
4. iptables configuration
1. Overview
iptables is the user-space tool for managing the Netfilter framework, which has been part of the Linux kernel since the 2.4 release in 2001.
Netfilter is the kernel framework that provides packet filtering and packet manipulation hooks at various points in the network stack. iptables registers callback functions into these hooks to implement packet operations such as filtering.
In short, Netfilter supplies the framework, and iptables builds firewall functionality on top of it.
2. Basic principle
A rule is a condition defined by the administrator, typically expressed as "if a packet header matches these conditions, take this action." Rules are stored in kernel-space packet filtering tables and specify source/destination addresses, transport protocols (TCP, UDP, ICMP), and service types (HTTP, FTP, SMTP), among others. When a packet matches a rule, iptables processes it according to the rule action, such as ACCEPT, REJECT, or DROP. Firewall configuration involves adding, modifying, and removing these rules.
3. Packet traversal in iptables
When a packet arrives on an interface, it first hits the PREROUTING chain, where the kernel determines whether the packet should be forwarded.
If the packet is destined for the local host, it proceeds to the INPUT chain. Processes running on the host will receive it. Locally generated packets go through the OUTPUT chain and are then processed by POSTROUTING before leaving.
If the packet is to be forwarded and kernel forwarding is allowed, it moves through the FORWARD chain and then to POSTROUTING for output.
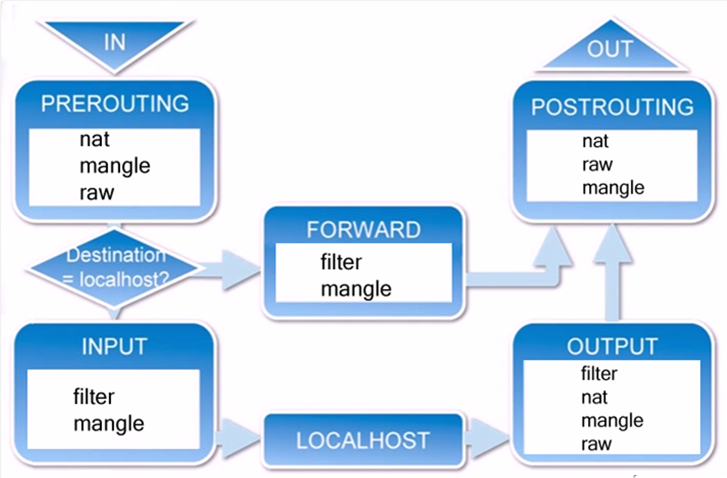
4. iptables tables and chains
Tables:
iptables provides four tables: filter, nat, mangle, and raw. filter is for packet filtering, nat is for network address translation, mangle is for packet alteration and marking, and raw is used before connection tracking.
If the goal is host security, focus on the filter table. For address translation tasks, use NAT. mangle is used for QoS tasks like marking packets for bandwidth allocation.
Chains:
A chain is a sequence of rules that a packet traverses. Each chain contains zero or more rules. When a packet reaches a chain, iptables checks rules in order; if a rule matches, the specified target action is applied. If no rule matches, the chain's default policy is applied.
5. Tables processing priority
Raw -> mangle -> nat -> filter
For the filter table, the important built-in chains are INPUT, OUTPUT, and FORWARD. INPUT applies to packets destined for the local host, OUTPUT to locally generated packets, and FORWARD applies when the host forwards packets between networks.
6. Managing and setting iptables rules
7. Stop firewalld before configuring iptables
CentOS 7 uses firewalld by default. To use iptables, stop and disable firewalld first, then install iptables utilities and services.
[root@localhost ~]# systemctl stop firewalld.service // stop firewalld [root@localhost ~]# systemctl disable firewalld.service // disable firewalld at boot
8. Installing iptables
Check whether iptables is installed:
[root@localhost ~]# rpm –qa | grep iptables
iptables-1.4.21-16.el7.x86_64 // if this appears, iptables is installed
Install iptables and the iptables-services package if needed:
[root@localhost ~]# yum install –y iptables [root@localhost ~]# yum install –y iptables-services
9. Basic iptables syntax
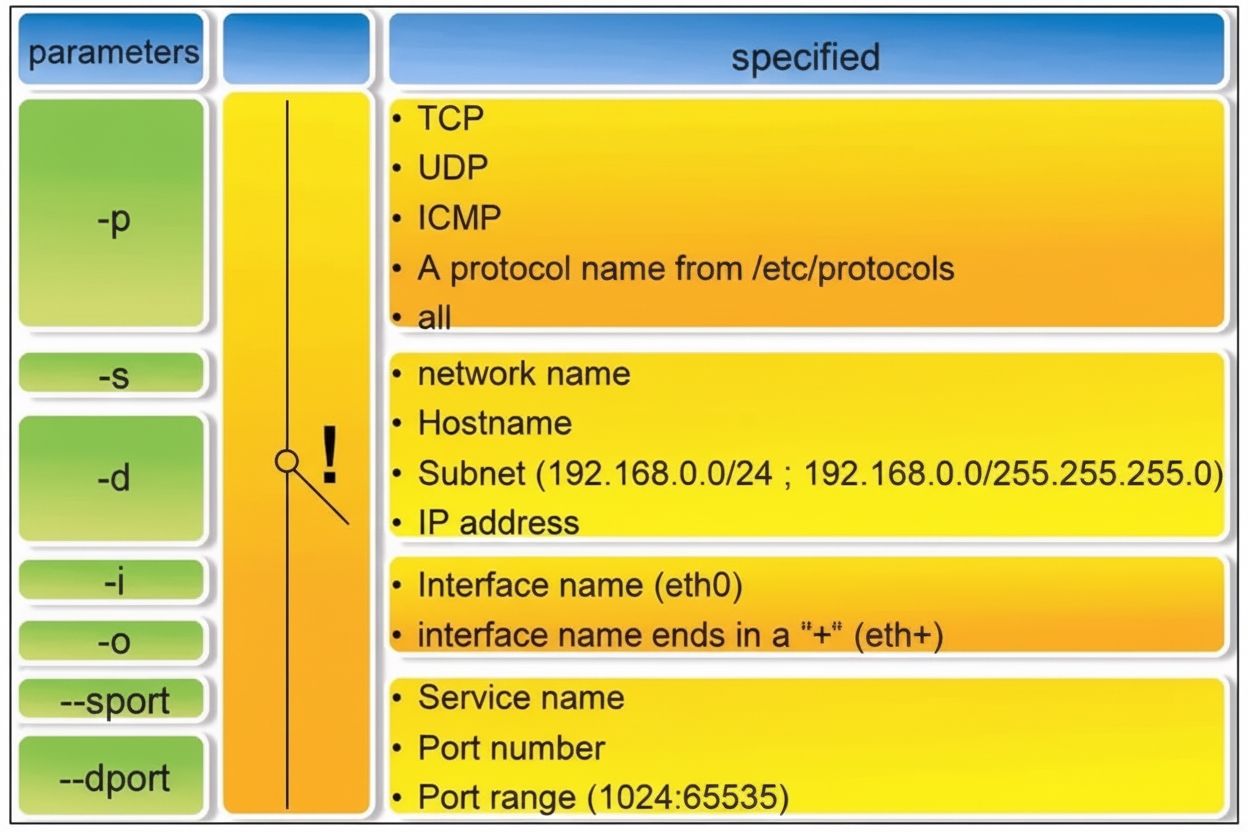
iptables [-t table] command_option [chain] [match_conditions] [-j target]
Table and chain specify which table and chain the command operates on. Command options specify how rules are managed (insert, append, delete, list, etc.). Match conditions define which packets are affected. The target specifies the action for matching packets (ACCEPT, REJECT, DROP, or jump to another chain).
10. iptables command control options
- -A Append a new rule to the end of the specified chain
- -D Delete a rule from the specified chain by rule number or content
- -I Insert a new rule into a chain, default at the first position
- -R Replace a rule in a chain by number or content
- -L List rules in a specified chain
- -E Rename a user-defined chain without changing the chain
- -F Flush all rules
- -N Create a new user-defined chain
- -X Delete a user-defined chain from a table
- -P Set the default policy for a chain
- -Z Zero all packet and byte counters in all chains
- -n Show numeric output
- -v Show verbose rule details
- -V Show version
- -h Show help
11. Saving iptables rules
[root@localhost ~]# service iptables save
12. Basic iptables operations
Clear all rules
(1) Flush all rules in the default filter table:
[root@localhost ~]# iptables -F
(2) Delete user-defined chains from the default filter table and zero counters:
[root@localhost ~]# iptables –X [root@localhost ~]# iptables -Z
(3) Flush NAT table rules:
[root@localhost ~]# iptables –F –t nat
Set default policies for chains
Method 1: Allow all packets, then block dangerous ones as needed:
[root@localhost ~]# iptables –P INPUT ACCEPT [root@localhost ~]# iptables –P OUTPUT ACCEPT [root@localhost ~]# iptables –P FORWARD ACCEPT
Method 2: Deny all packets by default, then allow specific services:
[root@localhost ~]# iptables –P INPUT DROP [root@localhost ~]# iptables –P OUTPUT DROP [root@localhost ~]# iptables –P FORWARD DROP
Add rules to chains
Allow SSH to this server:
[root@localhost ~]# iptables -A INPUT -p tcp --dport 22 -j ACCEPT [root@localhost ~]# iptables -A OUTPUT -p tcp --sport 22 -j ACCEPT
Allow PING (ICMP) to this server:
[root@localhost ~]# iptables -A INPUT -p icmp -j ACCEPT [root@localhost ~]# iptables -A OUTPUT -p icmp -j ACCEPT
iptables configuration file
Edit the iptables configuration directly:
[root@localhost ~]# vim /etc/sysconfig/iptables
[root@localhost ~]# systemctl restart iptables.service // restart firewall to apply configuration [root@localhost ~]# systemctl enable iptables.service // enable firewall at boot
[root@localhost ~]# iptables -L // view firewall rules; default is -t filter; for nat use iptables -t nat -L