Introduction
This article summarizes several commonly used NAT traversal and internal network proxy tools from a penetration-testing perspective, and explains their basic principles and usage.
1. nps / npc
1.1 Overview
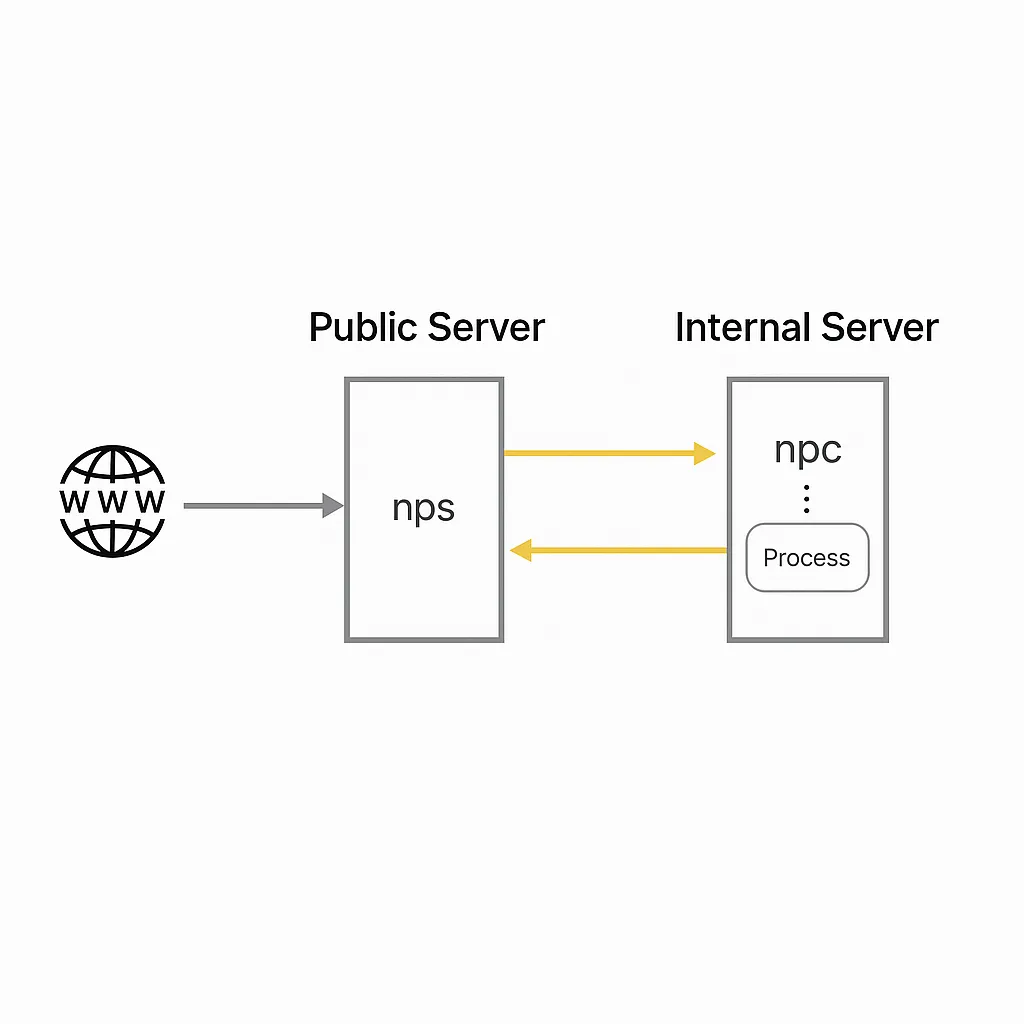
nps is a lightweight, high-performance internal network proxy server. It supports TCP and UDP traffic forwarding and can handle any TCP/UDP-based protocol (accessing internal websites, debugging local payment interfaces, SSH access, remote desktop, internal DNS resolution, etc.). It also supports internal HTTP proxy, internal SOCKS5 proxy, P2P, and includes a web-based management interface.
Deployment model:
- A server with a public IP (VPS) runs the server component (NPS).
- One or more machines inside the private network run the client component (NPC).
1.2 Features
- Written in Go
- Cross-platform
- Supports multiple proxy protocols
- Web management interface
1.3 Releases
Releases are available on the project GitHub release page.
1.4 NPS (server) - Installation and configuration
Find the server binary for your server architecture
cd ~ wget https://github.com/cnlh/nps/releases/download/v0.23.2/linux_amd64_server.tar.gz tar xzvf linux_amd64_server.tar.gz cd ~/nps
In the nps directory there will be the nps executable, a conf directory, and a web directory. Edit conf/nps.conf:
vim conf/nps.conf
Modify the parameters under the web section:
# web section web_host= server IP or domain web_username= admin web_password= your_password web_port= 8080 # web management port
Modify the bridge section to change the NPC connection port. For example, if the server is restricted by a firewall and only certain outbound ports (80, 443) are allowed, change the bridge_port to an allowed outbound port:
## bridge bridge_type=tcp bridge_port=443 # change the connection port bridge_ip=0.0.0.0
Start the server:
# Mac/Linux ./nps test|start|stop|restart|status # test config | start | stop | restart | status # Windows nps.exe test|start|stop|restart|status
1.5 NPC (client)
Start the client with:
./npc -server=your_server_ip:8024 -vkey=unique_auth_key -type=tcp
After creating a client entry in the web UI, you can view the detailed client connection command.
1.6 Web management
In the client interface you can add client connections; each connection has a unique vkey. After a client establishes a connection, it can create multiple tunnels with different protocols; each tunnel is a distinct proxy endpoint.
Use the appropriate protocol and port to connect to the proxied internal machine.
2. frp
2.1 Overview
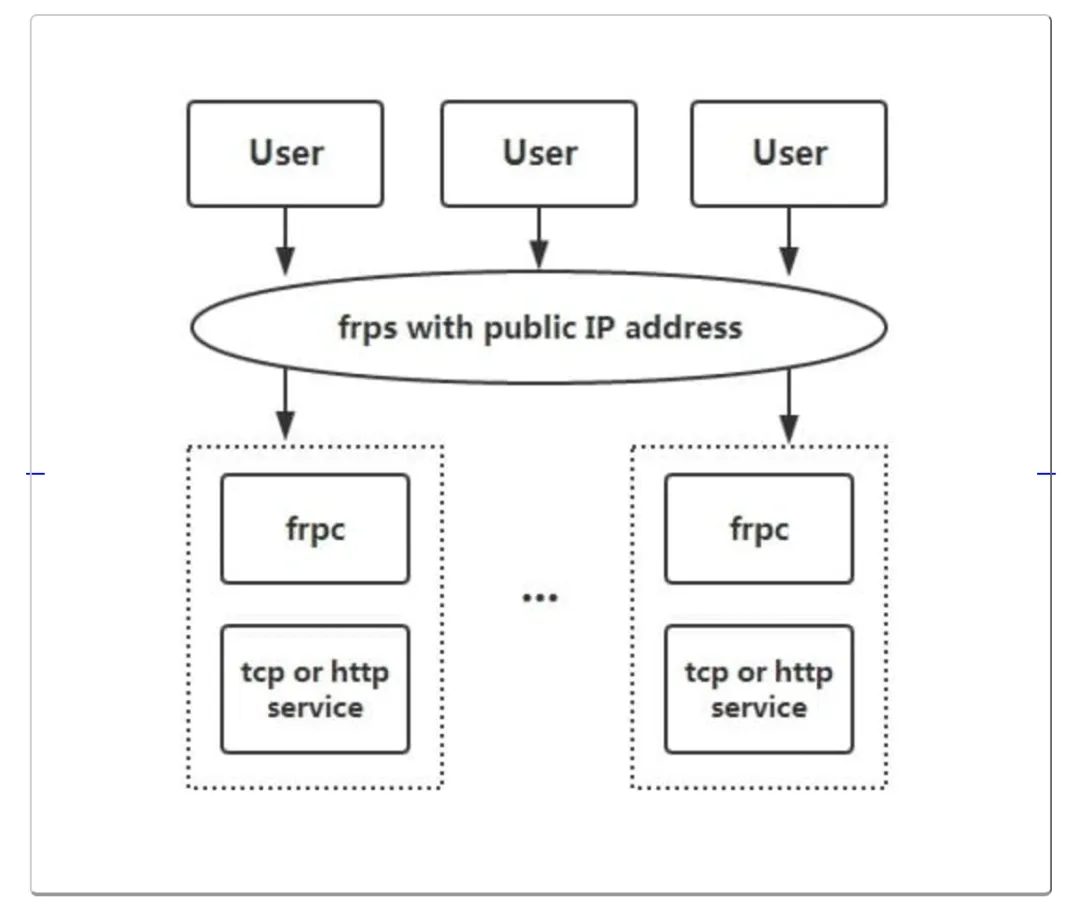
frp is a high-performance reverse proxy focused on NAT traversal, supporting TCP, UDP, HTTP, HTTPS, and other protocols. It can securely expose internal services to the public internet via a node with a public IP.
2.2 Features
- Client-server communication supports TCP, KCP, WebSocket, etc.
- Port multiplexing: multiple services can be exposed through the same server port.
- Cross-platform, with slightly fewer supported platforms than nps.
- Various plugins for extended functionality.
2.3 Usage
Download releases from the project GitHub release page.
The following examples are adapted from a public tutorial.
1) Access a home machine via RDP
Modify frps.ini. For security, configure authentication. Ensure the token in both server and client common sections match:
# frps.ini [common] bind_port = 7000 # token used for authentication, change as needed and keep consistent between server and client token = abcdefgh
Start frps:
./frps -c ./frps.ini
Modify frpc.ini. Suppose the server public IP is x.x.x.x:
# frpc.ini [common] server_addr = x.x.x.x server_port = 7000 # token used for authentication, change as needed and keep consistent between server and client token = abcdefgh [rdp] type = tcp local_ip = 127.0.0.1 local_port = 3389 remote_port = 6000
Start frpc:
./frpc -c ./frpc.ini
Access the remote machine via RDP at x.x.x.x:6000.
Auto-start on Windows
To run frpc silently on startup, create a start_frpc.vbs in the same directory as frpc.exe:
' start_frpc.vbs ' Adjust the paths according to your environment CreateObject("WScript.Shell").Run """D:Program Filesfrp_windows_amd64frpc.exe""" & "-c" & """D:Program Filesfrp_windows_amd64frpc.ini""",0
Copy start_frpc.vbs and place a shortcut in the Startup folder for your user:
C:Users<user_name>AppDataRoamingMicrosoftWindowsStart MenuProgramsStartup
Right-click and paste the shortcut.
2) Access a company internal machine via SSH
frps deployment is the same as above. Configure frpc as follows:
# frpc.ini [common] server_addr = x.x.x.x server_port = 7000 # token used for authentication, change as needed and keep consistent between server and client token = abcdefgh [ssh] type = tcp local_ip = 127.0.0.1 local_port = 22 remote_port = 6000
SSH to the internal machine (assuming username test):
ssh -oPort=6000 test@x.x.x.x
3) Expose an internal web service using a custom domain
If a local machine lacks a public IP but you want to expose a web service by domain name, frp can do this. For HTTP, configure vhost_http_port in frps.ini:
# frps.ini [common] bind_port = 7000 vhost_http_port = 8080 # token used for authentication, change as needed and keep consistent between server and client token = abcdefgh
Start frps:
./frps -c ./frps.ini
In frpc.ini, bind your custom domain to the local web service port (assume server IP is x.x.x.x and local_port is the web service port):
# frpc.ini [common] server_addr = x.x.x.x server_port = 7000 # token used for authentication, change as needed and keep consistent between server and client token = abcdefgh [web] type = http local_port = 80 custom_domains = www.yourdomain.com
Start frpc:
./frpc -c ./frpc.ini
Point the A record of www.yourdomain.com to x.x.x.x, or use a CNAME to the server domain if available. Access the internal web service at http://www.yourdomain.com:8080.
4) Provide a simple file access service
The static_file plugin exposes a simple HTTP file server.
Start frpc and enable the static_file plugin:
# frpc.ini [common] server_addr = x.x.x.x server_port = 7000 # token used for authentication, change as needed and keep consistent between server and client token = abcdefgh [test_static_file] type = tcp remote_port = 6000 plugin = static_file # directory to expose plugin_local_path = /tmp/file # prefix to strip from the URL path; the remaining path maps to files under plugin_local_path plugin_strip_prefix = static plugin_http_user = abc plugin_http_passwd = abc
Access the files at http://x.x.x.x:6000/static/ and authenticate with the configured username and password.
Common features
(1) Dashboard
View frp status and proxy statistics via the web dashboard.
Note: The dashboard is not optimized for very large numbers of proxies. If dashboard access becomes slow, disable this feature.
Enable the dashboard by setting its port in frps.ini:
[common] dashboard_port = 7500 # dashboard username and password, default are both admin dashboard_user = admin dashboard_pwd = admin
Open http://[server_addr]:7500 and log in with the dashboard credentials.
(2) Encryption and compression
These features are disabled by default. Enable them in frpc.ini for specific proxies. Compression uses the snappy algorithm:
# frpc.ini [ssh] type = tcp local_port = 22 remote_port = 6000 use_encryption = true use_compression = true
Enabling use_encryption encrypts communication between frpc and frps, helping avoid traffic identification or blocking by a firewall. Enabling use_compression reduces network traffic between frpc and frps for large payloads, at the cost of additional CPU usage.
(3) TLS
Since v0.25.0, frpc and frps support TLS for encryption. Enable it by setting tls_enable = true in frpc.ini common. This provides stronger security. For port multiplexing, frp uses 0x17 as the first byte of TLS connections.
Note: After enabling TLS, use_encryption is not required except for xtcp.
(4) Bandwidth limiting
Client-side proxy configuration can specify a bandwidth limit per proxy.
# frpc.ini [ssh] type = tcp local_port = 22 remote_port = 6000 bandwidth_limit = 1MB
Supported units: MB and KB.
(5) Range port mapping
frpc can map multiple ports in a range for tcp and udp types. Use a range: stanza; the client will split the configuration into multiple proxies, named with numeric suffixes.
Example mapping local ports 6000-6005 and 6007:
# frpc.ini [range:test_tcp] type = tcp local_ip = 127.0.0.1 local_port = 6000-6006,6007 remote_port = 6000-6006,6007
After connection, 8 proxies are created: test_tcp_0, test_tcp_1, ... test_tcp_7.
3. EW (EarthWorm)
3.1 Overview
EW is a portable network traversal tool providing SOCKS v5 server setup and port forwarding. It can perform NAT traversal in complex environments. The project is no longer actively maintained.
3.2 Features
- Lightweight, written in C
- Supports multi-hop proxy chaining
- Cross-platform
- Only supports SOCKS5
3.3 Usage
The following examples are adapted from the project documentation.
By default, unless stated otherwise, the proxy port is 1080 and services are SOCKSv5.
Commands include six modes: ssocksd, rcsocks, rssocks, lcx_slave, lcx_listen, lcx_tran.
1. Forwarding SOCKS v5 server
$ ./ew -s ssocksd -l 1080
2. Reverse (bind-back) SOCKS v5 server
This operation has two steps:
- On a public-IP host A, run:
$ ./ew -s rcsocks -l 1080 -e 8888
- On the target host B, start a SOCKS v5 service and bind it back to host A port 8888:
$ ./ew -s rssocks -d 1.1.1.1 -e 8888
3. Multi-stage chaining
Port forwarding commands and their parameter formats:
$ ./ew -s lcx_listen -l 1080 -e 8888 $ ./ew -s lcx_tran -l 1080 -f 2.2.2.3 -g 9999 $ ./ew -s lcx_slave -d 1.1.1.1 -e 8888 -f 2.2.2.3 -g 9999
These commands forward TCP services from deep within a network to the front end, for example SOCKS v5. Example two-stage local SOCKS test:
$ ./ew -s ssocksd -l 9999 $ ./ew -s lcx_tran -l 1080 -f 127.0.0.1 -g 9999
Example using lcx_listen and lcx_slave:
$ ./ew -s lcx_listen -l 1080 -e 8888 $ ./ew -s ssocksd -l 9999 $ ./ew -s lcx_slave -d 127.0.0.1 -e 8888 -f 127.0.0.1 -g 9999
Example three-stage local SOCKS:
$ ./ew -s rcsocks -l 1080 -e 8888 $ ./ew -s lcx_slave -d 127.0.0.1 -e 8888 -f 127.0.0.1 -g 9999 $ ./ew -s lcx_listen -l 9999 -e 7777 $ ./ew -s rssocks -d 127.0.0.1 -e 7777
Data flow: SOCKS v5 -> 1080 -> 8888 -> 9999 -> 7777 -> rssocks
4. ngrok
4.1 Overview
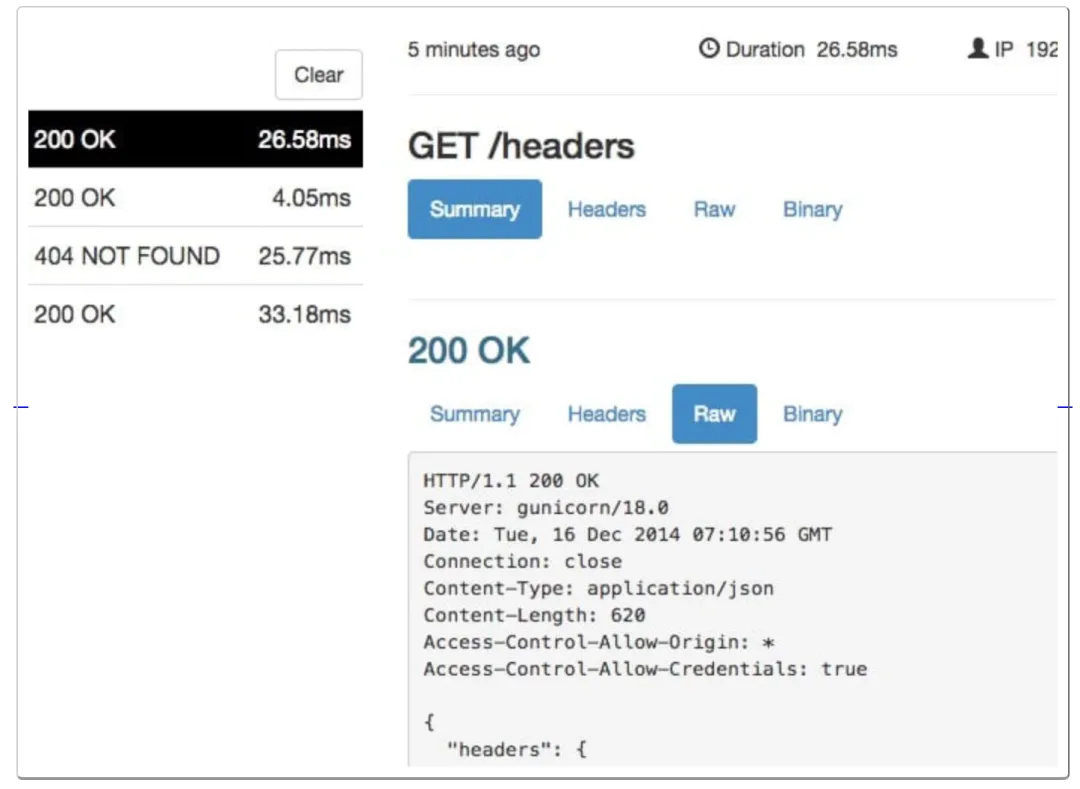
ngrok is a reverse proxy that establishes a secure tunnel between a public endpoint and a local web server, allowing internal services to be exposed to the internet. ngrok can capture and inspect traffic traversing the tunnel, which is useful for testing and debugging.
4.2 Features
- Officially maintained and generally stable
- Cross-platform, closed-source
- Traffic recording and replay features
4.3 Usage
Sign up for an ngrok account and download the client from the official site. Authenticate the client with the provided token:
./ngrok authtoken 1hAotxhmORtzCYvUc3BsxDBPh1H_****
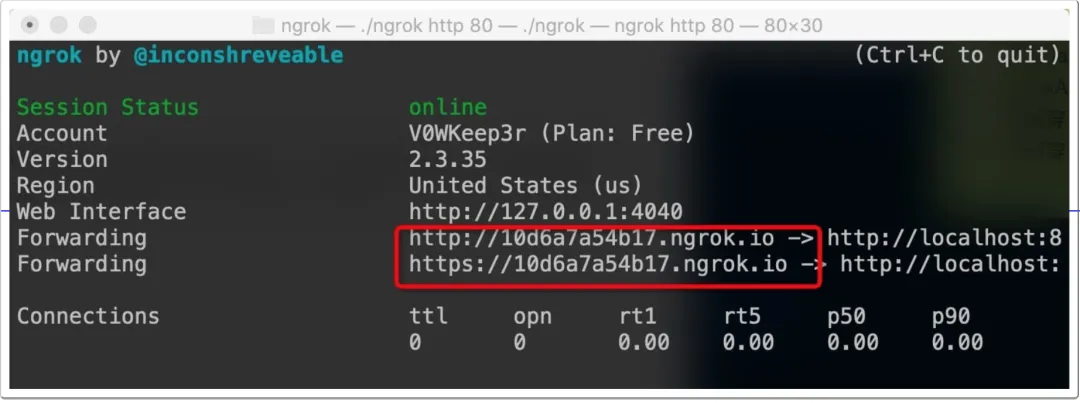
Expose a local HTTP server on port 80:
./ngrok http 80
ngrok will expose the local service to the internet and provide a public domain. The web UI can display captured packets and traffic statistics.
Expose a local folder with authentication:
ngrok http -auth="user:password" file:///Users/alan/share
Expose a local folder without authentication:
ngrok http "file:///C:UsersalanPublic Folder"
Expose the host's TCP port 3389 to the public internet:
ngrok tcp 3389