NPS (nps-npc)
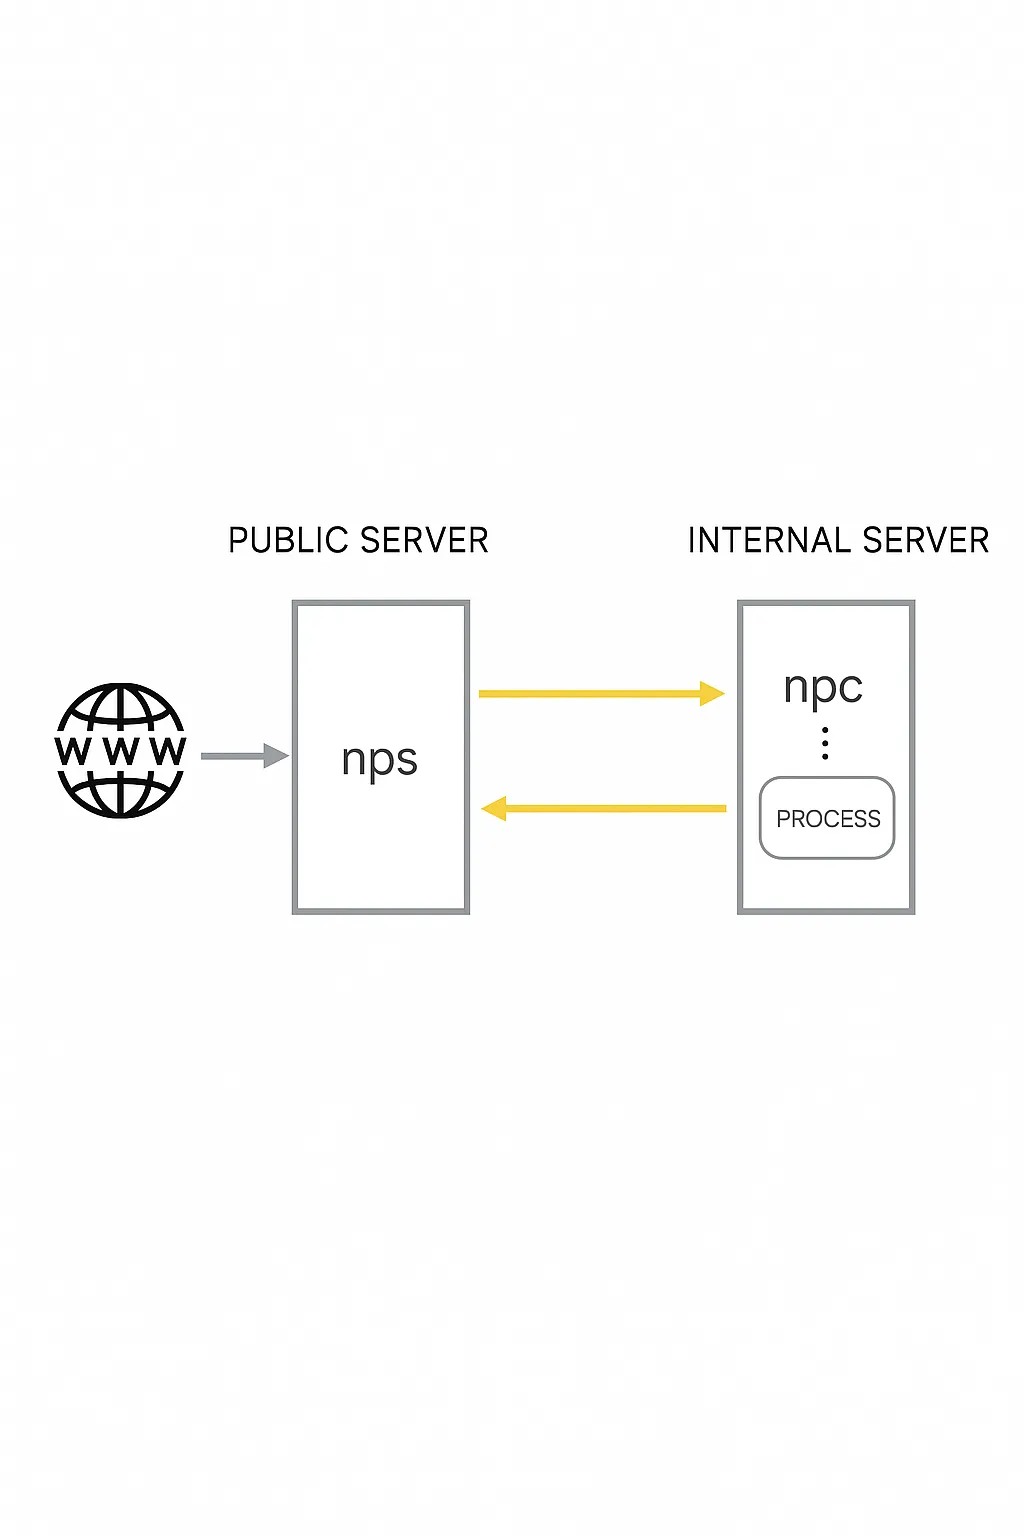
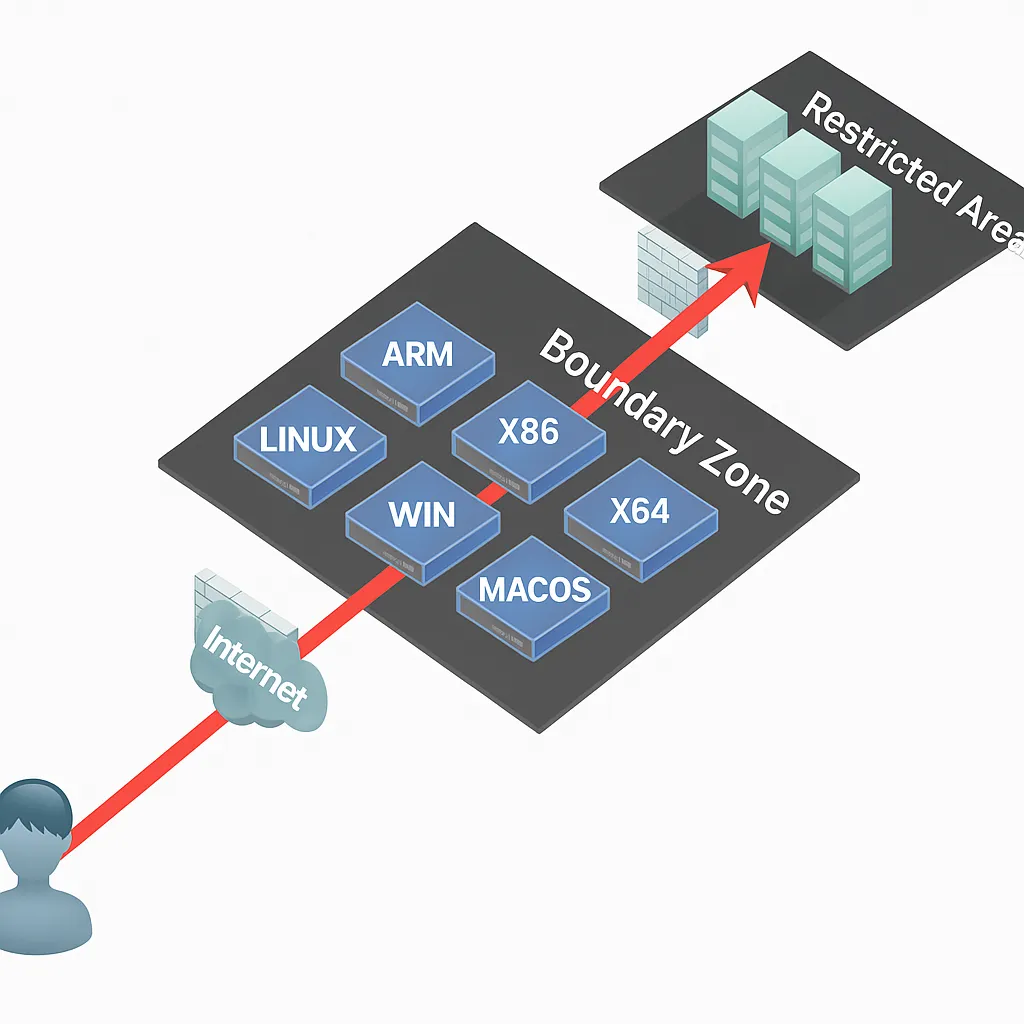
nps is a lightweight, high-performance NAT traversal proxy server. It supports TCP and UDP traffic forwarding and can proxy any protocol running over TCP or UDP, such as internal websites, local payment API debugging, SSH, Remote Desktop, internal DNS resolution, etc.
Features include internal HTTP proxy, internal SOCKS5 proxy, P2P support, and a web management interface.
Typical deployment
- A server with a public IP (VPS) runs the server component (NPS).
- One or more machines inside the LAN run the client component (NPC).
Highlights
- Written in Go
- Cross-platform
- Supports multiple proxy protocols
- Web management interface
Installation and configuration
Download the appropriate server binary for your server architecture, extract it, then enter the nps directory. For example:
wget <release-server-tarball> tar xzvf linux_amd64_server.tar.gz cd ~/nps
In the nps directory you will find the nps executable, the conf directory and the web directory. Edit conf/nps.conf:
vim conf/nps.conf
Adjust the web section parameters:
- web_host = server IP or domain
- web_username = admin (login username)
- web_password = your password
- web_port = 8080 (web management port)
Modify the bridge section to change the NPC connection port. For example, if the server is behind firewall restrictions and only ports 80 and 443 are allowed outbound, set the bridge port to an open port:
#bridge bridge_type = tcp bridge_port = 443 # connection port bridge_ip = 0.0.0.0
Start nps:
# mac/linux ./nps test|start|stop|restart|status # windows nps.exe test|start|stop|restart|status
NPC client
Run the client on the internal machine, for example:
./npc -server=your.server.ip:8024 -vkey=unique_auth_key -type=tcp
After creating a client entry in the web UI you can view the client and the detailed connection command.
Web management
In the web interface you can add client connections. Each client has a unique vkey. Each client, once connected, can create multiple tunnels using different protocols; each tunnel is a separate proxy to internal machines.
Different protocols and ports are used to connect to proxied internal machines.
frp (reverse proxy)
Overview
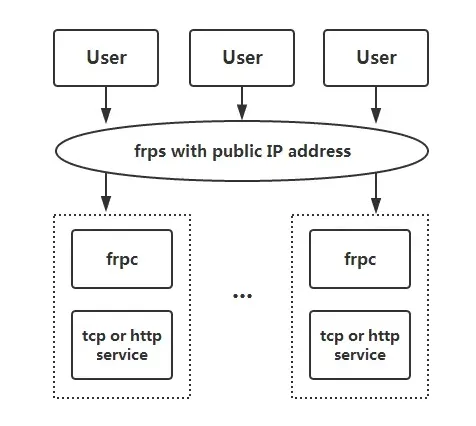
frp is a high-performance reverse proxy focused on NAT traversal. It supports multiple protocols including TCP, UDP, HTTP and HTTPS. It exposes internal services to the public Internet via an intermediary node with a public IP.
Features
- Client and server communication supports TCP, KCP and WebSocket.
- Port multiplexing: multiple services can be exposed through the same server port.
- Cross-platform support (fewer platforms supported than nps).
- Many plugins are available to extend functionality.
Typical usage and examples
Before configuration, download the appropriate release for the target OS and architecture from the frp releases page. Place frps and frps.ini on the machine with a public IP and ensure firewall/security group allows the ports used in the config. Place frpc and frpc.ini on the internal machine.
Example 1: Remote Desktop (RDP) to a home machine
On the server, configure frps.ini with a token for authentication:
# frps.ini [common] bind_port = 7000 # token used for authentication, keep this consistent on client and server token = abcdefgh
Start frps:
./frps -c ./frps.ini
On the client, configure frpc.ini (assuming server IP is x.x.x.x):
# frpc.ini [common] server_addr = x.x.x.x server_port = 7000 token = abcdefgh [rdp] type = tcp local_ip = 127.0.0.1 local_port = 3389 remote_port = 6000
Start frpc:
./frpc -c ./frpc.ini
Connect via RDP to x.x.x.x:6000.
Auto start on Windows
To start frpc silently at boot on Windows, create a VBS script in the same directory as frpc.exe, for example start_frpc.vbs:
' start_frpc.vbs ' Please adjust the paths according to your environment CreateObject("WScript.Shell").Run """D:\Program Files\frp_windows_amd64\frpc.exe""" & " -c " & """D:\Program Files\frp_windows_amd64\frpc.ini""",0
Copy start_frpc.vbs to the user's Startup folder:
C:\Users\ Use the same frps deployment. Configure frpc.ini: # frpc.ini
[common]
server_addr = x.x.x.x
server_port = 7000
token = abcdefgh
[ssh]
type = tcp
local_ip = 127.0.0.1
local_port = 22
remote_port = 6000
Connect from outside: ssh -oPort=6000 user@x.x.x.x
On the server, set vhost_http_port in frps.ini: # frps.ini
[common]
bind_port = 7000
vhost_http_port = 8080
token = abcdefgh
Start frps, then on the client configure frpc.ini to bind the custom domain: # frpc.ini
[common]
server_addr = x.x.x.x
server_port = 7000
token = abcdefgh
[web]
type = http
local_port = 80
custom_domains = www.yourdomain.com
Start frpc. Point the A record for www.yourdomain.com to x.x.x.x (or use a CNAME to the server domain). Access the internal site via http://www.yourdomain.com:8080. Enable the static_file plugin on frpc to serve a local directory over HTTP: # frpc.ini
[common]
server_addr = x.x.x.x
server_port = 7000
token = abcdefgh
[test_static_file]
type = tcp
remote_port = 6000
plugin = static_file
plugin_local_path = /tmp/file
plugin_strip_prefix = static
plugin_http_user = abc
plugin_http_passwd = abc
Access via browser at http://x.x.x.x:6000/static/ and authenticate with the configured username and password. # frpc.ini
[range:test_tcp]
type = tcp
local_ip = 127.0.0.1
local_port = 6000-6006,6007
remote_port = 6000-6006,6007
After connecting, multiple proxies like test_tcp_0, test_tcp_1, ... will be created. EW is a portable NAT traversal toolkit that implements SOCKS v5 server and port forwarding features. It can work in complex network environments. Note that the tool is no longer actively maintained. All examples below assume proxy ports default to 1080 and services are SOCKS v5. The tool provides six command modes: ssocksd, rcsocks, rssocks, lcx_slave, lcx_listen, lcx_tran. $ ./ew -s ssocksd -l 1080
$ ./ew -s rcsocks -l 1080 -e 8888
$ ./ew -s rssocks -d 1.1.1.1 -e 8888
Port forwarding commands and typical multi-hop examples: $ ./ew -s lcx_listen -l 1080 -e 8888
$ ./ew -s lcx_tran -l 1080 -f 2.2.2.3 -g 9999
$ ./ew -s lcx_slave -d 1.1.1.1 -e 8888 -f 2.2.2.3 -g 9999
Examples for local SOCKS testing: (1) lcx_tran usage
$ ./ew -s ssocksd -l 9999
$ ./ew -s lcx_tran -l 1080 -f 127.0.0.1 -g 9999
(2) lcx_listen and lcx_slave usage
$ ./ew -s lcx_listen -l 1080 -e 8888
$ ./ew -s ssocksd -l 9999
$ ./ew -s lcx_slave -d 127.0.0.1 -e 8888 -f 127.0.0.1 -g 9999
(3) A three-level chaining example
$ ./ew -s rcsocks -l 1080 -e 8888
$ ./ew -s lcx_slave -d 127.0.0.1 -e 8888 -f 127.0.0.1 -g 9999
$ ./ew -s lcx_listen -l 9999 -e 7777
$ ./ew -s rssocks -d 127.0.0.1 -e 7777
Data flow: SOCKS v5 -> 1080 -> 8888 -> 9999 -> 7777 -> rssocks
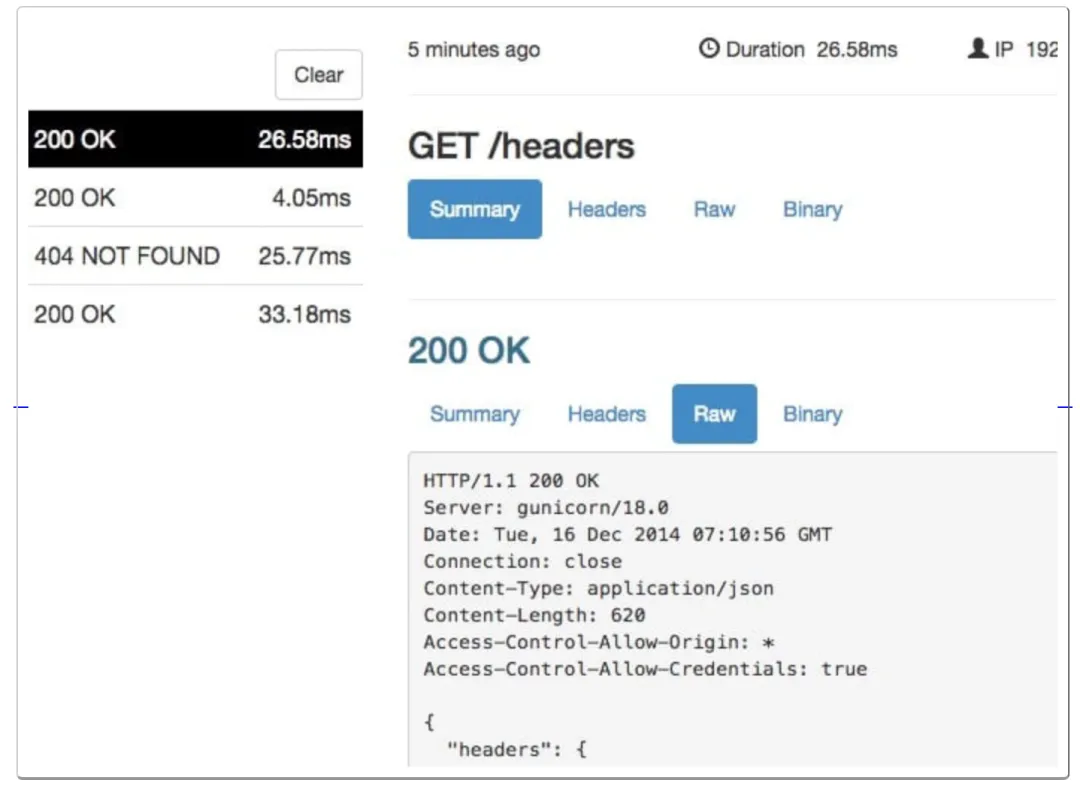
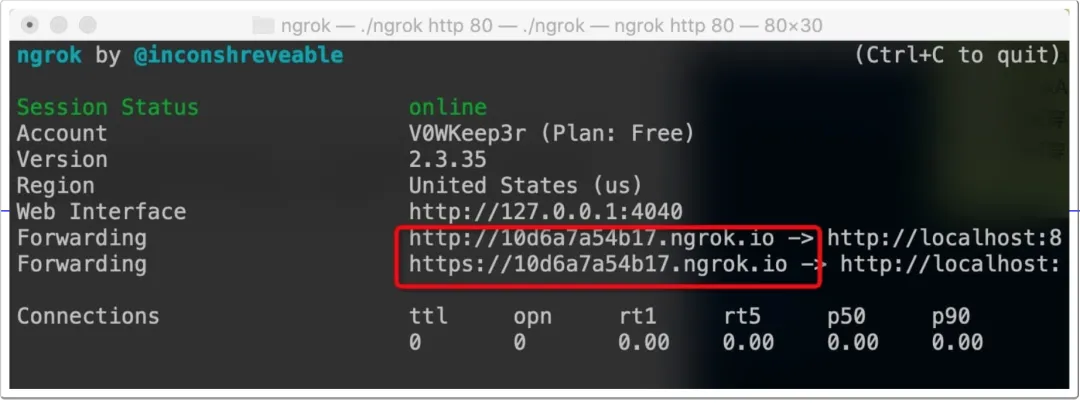
ngrok is a reverse proxy that creates a secure tunnel between a public endpoint and a local web server, allowing internal hosts to expose services to the public Internet. ngrok can capture and inspect traffic on tunnels, which is useful for testing and replaying requests. ./ngrok authtoken 1hAotxhmORtzCYvUc3BsxDBPh1H_****
./ngrok http 80
This will expose the local service and provide a public domain for access.
ngrok can also expose local files or other TCP services: # Authenticated file share
ngrok http -auth="user:password" file:///Users/alan/share
# Unauthenticated file share
ngrok http "file:///C:/Users/alan/Public Folder"
# Expose RDP port 3389 over TCP
ngrok tcp 3389 Example 2: SSH to an internal machine
Example 3: Expose an internal web service with a custom domain
Example 4: Simple file access via static_file plugin
Common features
EW (portable NAT traversal tool)
Overview
Features
Usage
ngrok (reverse proxy)
Overview
Characteristics
Basic usage