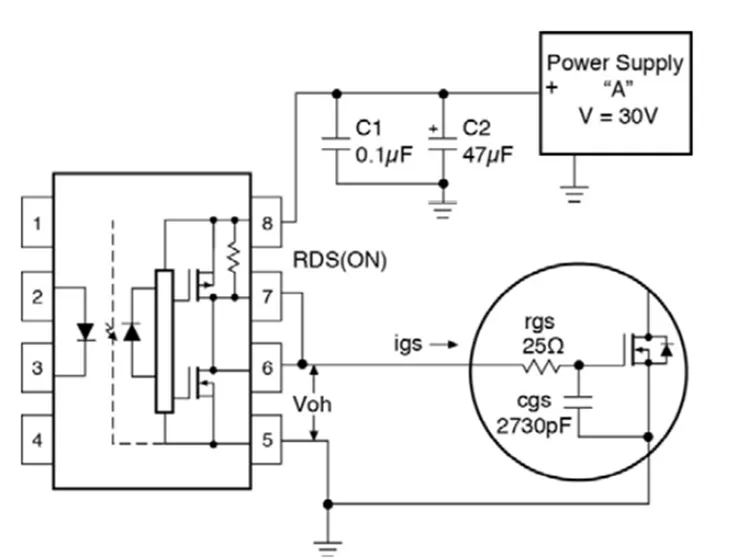
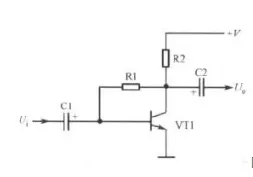
Help
  • FAQ
    browse most common questions
  • Live Chat
    talk with our online service
  • Email
    contact your dedicated sales:
0

Thermocouples vs RTDs: How to Tell Them Apart

Author : AIVON | PCB Manufacturing & Supply Chain Specialists March 17, 2026


Overview

Thermocouples and resistance temperature detectors (RTDs) are common temperature sensors, but they have different measurement ranges and application characteristics.

Thermocouples are used in higher-temperature environments. At medium and low temperatures their output thermoelectric voltage is very small, which makes them more susceptible to interference and places higher requirements on secondary instruments for accurate measurement. At lower temperatures, changes in the cold junction temperature and ambient temperature produce relatively large measurement errors that are difficult to fully compensate.

For medium and low temperature ranges, RTDs are generally used. RTDs commonly cover roughly 200–500°C and can measure even lower temperatures (for example, carbon resistors can measure down to around 1 K). The most widely used RTD is the platinum Pt100 (other variants include Pt50; copper RTDs are used in some industrial applications but have a smaller temperature range, typically ?50 to 150°C; specialized sensors also use indium, manganese, and other materials).


Part 1 — Measurement Principles

The basic principle of a thermocouple is the thermoelectric effect. The measuring instrument is a voltmeter or, for higher precision, an electronic potentiometric instrument.

RTDs operate on the principle that the electrical resistance of a conductor or semiconductor varies with temperature. The secondary instrument is typically an unbalanced bridge circuit.


Part 2 — Field Troubleshooting and On-site Checks

Thermocouples

Thermocouples have positive and negative leads, and compensation wires also have polarity. First ensure connections and configuration are correct. Common faults during operation include short circuit, open circuit, poor contact (which can be diagnosed with a multimeter), and degradation (which can be assessed by surface appearance). When checking, isolate the thermocouple from the secondary instrument.

RTDs

RTDs commonly experience short circuits or open circuits. A multimeter can be used for diagnosis. To check for a suspected short, disconnect one lead at the resistance end and observe the indicator: if the instrument reads maximum, the RTD is shorted; if it returns to zero, the lead is shorted. If connections and configuration are correct but the instrument reading is low or unstable, the protective sheath may have allowed ingress of moisture. A maximum reading indicates an open circuit; a minimum reading indicates a short circuit.


Part 3 — Selecting Thermocouples and RTDs

Thermocouple types are designated by letter codes such as S, R, B, N, K, E, J, and T. Types S, R, and B are noble-metal thermocouples; N, K, E, J, and T are base-metal thermocouples.

Type T offers the highest accuracy among base-metal thermocouples and is typically used for temperatures below 300°C.

RTDs are the most common temperature detectors for medium and low temperature ranges. Their main advantages are high measurement accuracy and stable performance. Platinum RTDs provide the highest accuracy and are used widely in industrial measurement and as reference standards. Most RTDs are made from pure metals; platinum and copper are most common, and materials such as nickel, manganese, and rhodium are also used.


Part 4 — Correct Installation of Temperature Instruments

General installation requirements for instruments

1. Local instruments should be installed according to the following rules:

  • Install where lighting is adequate and operation and maintenance are convenient. Avoid locations with vibration, humidity, risk of mechanical damage, strong magnetic fields, high temperatures, rapid temperature changes, or corrosive gases.
  • The instrument center should be 1.2–1.5 m above the floor where practical.
  • Local display instruments should be positioned so they are easy to read when operating manual valves.

2. Before installation, check that instruments are intact, accessories are complete, and model, specification, and materials match design requirements.

3. Do not strike or vibrate instruments during installation; they must be mounted secure and level.

4. Instruments that require degreasing should be degreased and inspected before installation.

5. Instruments mounted directly on process piping should preferably be installed after pipe purging and pressure testing. If simultaneous installation is unavoidable, remove the instrument during pipe purging. The arrow on the instrument housing should align with the process flow direction. When connecting to the pipeline, the instrument flange axis should be coaxial with the pipeline; fastening should apply even force.

6. Instruments directly mounted on process equipment or piping should be included in the system pressure test after installation.

7. Conduit entries to instrument and electrical gear junction boxes should not face upward to avoid oil, water, and dust ingress; seal when unavoidable.

8. Instrument and electrical nameplates and terminal numbers should be clear and correct.

Wiring rules for instruments and electrical equipment

  • Wires must be checked and labeled before wiring.
  • Do not damage conductor strands when stripping insulation.
  • Stranded wire ends should be tinned or fitted with ferrules. When ferrules are used, connections must be crimped or soldered to ensure even, secure contact.
  • Use non-corrosive flux for soldering.
  • Cable-to-terminal connections must be secured and provide adequate slack.
  • Wiring should be correct, neat, and presentable.
  • Where instruments and electrical equipment are exposed to vibration, spring washers should be used on terminals.
  • Compensation resistors should be firmly mounted and easily removable; allowable resistance tolerance is ±0.1 ohm.

Installation of thermocouples, RTDs, and temperature gauges

1. The temperature-sensing element should be placed where it is responsive and representative of the medium temperature. Avoid mounting near valves, in dead zones of the flow, or on components with heavy vibration.

2. Thermocouple sensing elements should be installed away from strong magnetic fields.

3. When mounting in process piping:

  • For perpendicular installation, the sensor axis should intersect the pipeline axis at a right angle.
  • For inclined installations, position the sensor against the flow direction so the sensor axis intersects the pipeline axis.


4. For pipelines with heavy dust, provide wear protection for sensing elements.

5. When sensors are exposed to strong impingement by the process medium, or when a horizontal installation requires insertion depth greater than 1 m, or measured temperatures exceed 700°C, provide anti-bending protection.

6. Surface thermometers must have the sensing face in intimate contact with the measured surface and be firmly fixed.

7. When installing on an elbow, ensure the sensor axis aligns with the centerline of the straight pipe section.

8. When measuring furnace temperature with thermocouples, avoid direct contact with flame and do not place the sensor too close to the furnace door or furnace wall. Junction boxes should not touch furnace walls to prevent excessive cold-junction temperature.

9. Prevent introduction of interference signals when using thermocouples or RTDs. Junction box openings should face downward to avoid ingress of moisture and dust.

10. If the process pipe is too small, use an extension thermowell at the measurement location. Thermocouples, RTDs, and bimetal thermometers are typically installed on pipes with nominal diameter DN<80 mm.

11. Install thermocouples as close as possible to the temperature control point. To minimize heat conduction along the thermocouple and the effect of the thermowell, immerse the thermocouple in the fluid; insertion depth should be at least 10 times the sensor diameter. When measuring solid temperatures, the thermocouple should be in firm contact with the material. Minimize temperature gradient near the junction to reduce conductive error.

12. When measuring gas temperature inside a pipe where the wall temperature differs significantly from the gas temperature, the thermocouple will radiate or absorb heat from the wall and the reading will be affected. Use a radiation shielded thermocouple to equalize the sensor temperature with the gas temperature.

13. Choose representative measurement points. For flow measurements in a pipe, place the thermocouple sensing tip near the region of maximum flow velocity. In general, the thermowell tip should extend past the flow centerline.

Installation types and precautions

General notes: Choose the appropriate sheath material, thickness, and structure for the process medium and operating conditions. Location, insertion depth, orientation, and wiring must satisfy measurement requirements. Maximum ambient temperature at thermocouple-to-compensation-wire junctions should not exceed 100°C. For thermocouples used below 0°C, seal the connection base with wax to isolate from the environment.

Common mounting styles:

  • Straight head: direct insertion.
  • 45° head: angled insertion.
  • Flange mounting: direct insertion.
  • High-pressure thermowells: fixed or replaceable thermowells.

thermowell-installation.jpg

elbow-mount-installation.jpg

Surface thermocouple installation:

surface-thermocouple.png

Flanged loose-fit thermowell installation on aluminum piping:

flanged-thermowell-aluminum.jpg


Part 5 — Fault Maintenance for Thermocouples and RTD Instruments

Thermocouple diagnostic and repair approach

Common symptoms and causes:

  • Thermoelectric voltage lower than expected (instrument reads low).
  • Thermoelectric voltage higher than expected (instrument reads high).
  • Thermoelectric voltage output unstable.
AIVON | PCB Manufacturing & Supply Chain Specialists AIVON | PCB Manufacturing & Supply Chain Specialists

The AIVON Engineering and Operations Team consists of experienced engineers and specialists in PCB manufacturing and supply chain management. They review content related to PCB ordering processes, cost control, lead time planning, and production workflows. Based on real project experience, the team provides practical insights to help customers optimize manufacturing decisions and navigate the full PCB production lifecycle efficiently.

Related Tags


2026 AIVON.COM All Rights Reserved
Intellectual Property Rights | Terms of Service | Privacy Policy | Refund Policy