What Are Blind Vias and Why Are They Challenging to Solder?
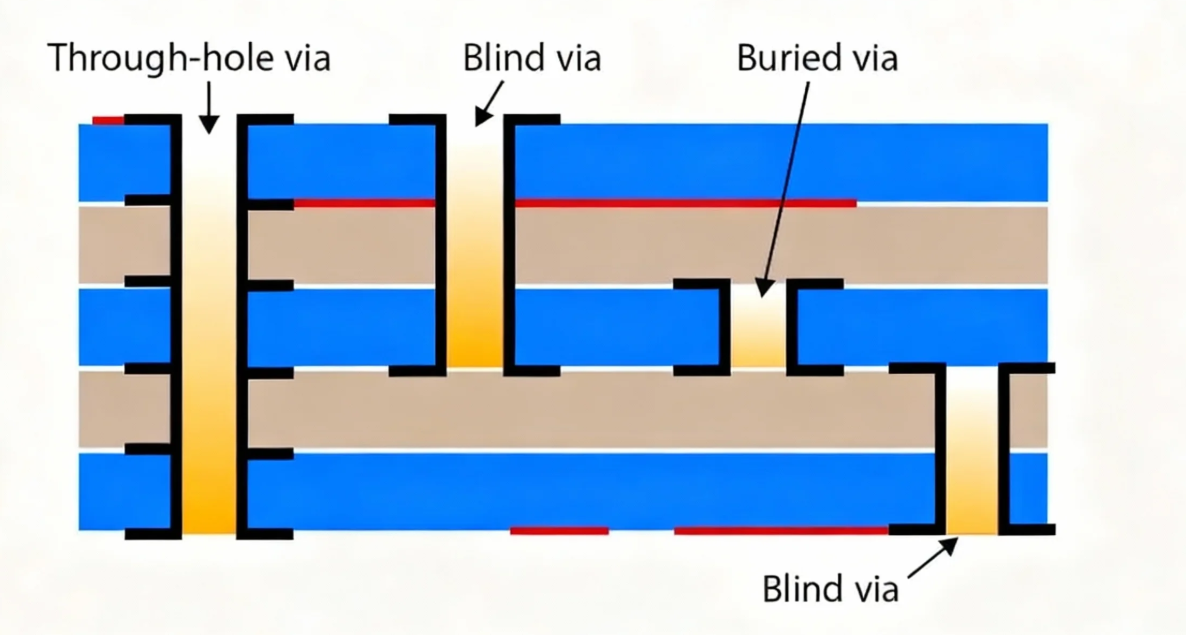
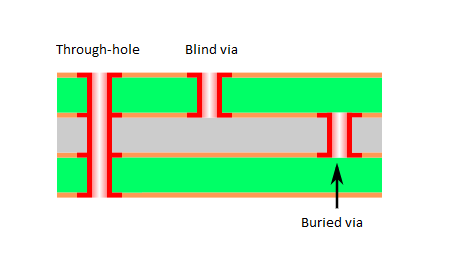
Blind vias represent a specialized type of connection found in multilayer Printed Circuit Boards (PCBs), linking an external layer to an internal layer without penetrating the entire board thickness. Unlike traditional through-hole vias, which are visible and accessible from both sides, blind vias are only exposed on one surface. This design choice is critical for space optimization and enables more intricate routing in HDI circuit boards, commonly found in compact electronics like smartphones and wearable devices.
The inherent difficulty in soldering blind vias stems from their concealed nature. Since the internal connection point is invisible and inaccessible from the opposite side, ensuring a robust solder joint becomes significantly more complex. Applying excessive heat risks damaging the delicate internal layers, while insufficient heat can lead to a weak or unreliable connection. For hobbyists engaging in hand-soldering blind via PCBs, achieving the precise balance of heat application and meticulous precision is paramount for successful outcomes.
Essential Tools for Precision Blind Via Soldering
Before delving into the specific soldering techniques for blind vias, it's crucial to equip yourself with the appropriate tools. Having the right gear is instrumental in achieving clean, dependable solder joints on these challenging PCBs.
Core Soldering Equipment
● Temperature-Controlled Soldering Iron: A soldering iron with a fine tip (0.5mm to 1mm) and adjustable temperature settings (ideally between 250°C and 350°C) is essential for precision work, preventing overheating of sensitive components.
● Thin Solder Wire: Utilize a lead-free solder wire with a fine diameter (0.5mm to 0.8mm) for enhanced control. Rosin-core solder is beneficial for its flux activation properties during the soldering process.
● Flux Applicator: A flux pen or liquid flux is critical for thoroughly cleaning the via and pad surfaces, promoting optimal solder flow into the blind via.
● Desoldering Tools: Keep a desoldering braid or pump on hand to rectify any errors by neatly removing excess solder without causing damage to the PCB.
Inspection and Handling Aids
● Magnification Device: Given the often minuscule size of blind vias, a magnifying glass or microscope is indispensable for inspecting solder flow and evaluating joint quality.
● Precision Tweezers: These are invaluable for accurately positioning small components over blind vias before soldering.
● Work Surface Stability: A heat-resistant mat or a dedicated PCB holder ensures the board remains secure and stable, preventing accidental movement during the intricate soldering process.
Investing in quality tools specifically designed for fine work will ultimately save time and minimize frustration when tackling the unique challenges of hand-soldering blind via PCBs.
Key Techniques for Effective Blind Via Soldering
Soldering blind vias demands a distinct approach compared to through-hole or surface-mount techniques. The following proven soldering methods for blind vias can help hobbyists achieve robust and reliable connections.
Preparing the Work Area and Components
Thorough preparation is the bedrock of successful soldering. Begin by meticulously cleaning the PCB surface around the blind vias using isopropyl alcohol and a lint-free cloth to eliminate any contaminants like dirt, oils, or oxidation. Subsequently, apply a small, precise amount of flux to both the via and the component pad using a flux pen. This flux facilitates smooth solder flow into the via, even though the internal connection remains hidden. If a component is to be placed over the blind via, use tweezers to ensure its exact alignment and double-check the orientation to avoid costly rework later. A magnifying tool at this stage can significantly aid in confirming precise component placement.
Achieving Optimal Heat Management
Blind vias are particularly susceptible to heat damage due to the delicate internal layers of the PCB. Set your soldering iron to a moderate temperature, typically within the range of 280°C to 320°C, adjusting based on the specific solder type and PCB material. If unsure, commence at the lower end of this range and incrementally increase the temperature if the solder doesn't melt effectively. A crucial tip: limit direct contact of the iron with the via to short bursts of 3-5 seconds to prevent thermal damage to the internal PCB layers. If the solder fails to melt promptly, verify your iron's temperature rather than applying prolonged heat.
Precise Solder Application and Inspection
Position the soldering iron tip on the pad or the edge of the via, rather than directly inside, to ensure even heating. After one to two seconds of heating, touch the solder wire to the via or pad, allowing it to naturally flow. For blind vias, the solder must effectively penetrate the hidden connection, so apply sufficient solder to form a small, lustrous dome over the via. However, exercise caution to avoid applying too much solder, which could lead to shorts with adjacent traces. A key blind via soldering tip is to observe the solder "wetting" the surface, which signifies a strong bond. If the solder appears dull or grainy, it often indicates a cold joint, requiring reheating with a minimal addition of solder or flux.
Since the internal connection of a blind via is not visible, thorough inspection relies entirely on the external appearance of the solder joint. Utilize a magnifying glass or microscope to verify a smooth, shiny finish and confirm that the solder has completely filled the via without any gaps or cracks. Whenever feasible, use a multimeter in continuity mode to test the connection, confirming that the blind via is conducting as expected.
Advanced Blind Via Soldering Insights for Hobbyists
Beyond foundational techniques, here are additional blind via soldering tips tailored for hobbyist PCB soldering, designed to help circumvent common pitfalls and enhance overall results.
Practical Tips for Improved Results
1. Practice on Scrap Boards: Before working on a critical project, practice your hand-soldering blind via PCB techniques on a spare or practice board with similar via structures. Experiment with varying temperatures and soldering durations to develop a tactile understanding of the required heat and solder volume. This hands-on experience builds confidence and reduces the risk of damaging valuable boards.
2. Generous Flux Application: Flux is an invaluable ally when soldering blind vias. It not only cleans surfaces but critically aids solder penetration into confined spaces. If solder appears hesitant to flow into the via, add a small amount of additional flux and carefully reheat the joint. Always remember to meticulously clean any residual flux with isopropyl alcohol after soldering to prevent long-term corrosion.
3. Prevent Overheating: Blind vias are inherently vulnerable to heat damage due to their concealed and delicate internal layers. Strictly limit contact time with the soldering iron to brief intervals of 3-5 seconds. If a joint requires rework, allow the area to cool completely before attempting further intervention. Overheating can lead to delamination of the PCB layers, causing irreparable damage.
4. Post-Soldering Continuity Check: Since visual inspection alone is insufficient for blind vias, always employ a multimeter to test for continuity between the soldered component and its intended internal connection point. This step provides conclusive evidence that the solder has successfully reached the internal layer. A lack of continuity indicates a need to reflow the joint, potentially with additional flux and solder.
5. Maintain Clean Tools: A pristine soldering iron tip is crucial for efficient heat transfer. Use a brass wire cleaner or a damp sponge to clean the tip before and after each joint. A dirty tip compromises even heating, leading to poor solder flow or cold joints. Furthermore, "tin" the tip with a thin layer of fresh solder to protect it from oxidation during use.
Avoiding Common Mistakes in Blind Via Soldering
Even with the best techniques, errors can occur. Here are frequent mistakes hobbyists make during blind via soldering and strategies to avoid them.
Pitfalls to Circumvent
● Excessive Solder: Applying too much solder can cause it to overflow, leading to unintended shorts between adjacent traces or pads. Aim for just enough solder to form a neat, small dome over the via.
● Insufficient Heat: If the soldering iron's temperature is too low, the solder will not adequately flow into the via, resulting in a weak, unreliable connection. Always verify your iron is set to the correct temperature for the specific solder alloy you are using.
● Neglecting Flux: Omitting flux often results in poor solder wetting, especially critical in blind vias where internal penetration is vital. Always apply flux before initiating the soldering process.
● Rushing the Task: Soldering blind vias demands patience and precision. Rushing can lead to poorly formed cold joints or thermal damage to the multilayer PCB. Allocate sufficient time for heating, solder application, and thorough inspection of each joint.
Conclusion: Mastering the Art of Blind Via Soldering
Hand-soldering components on blind via PCBs is a specialized skill that harmonizes precision, patience, and the appropriate tools. By grasping the distinct challenges posed by blind vias and meticulously applying the soldering techniques outlined in this guide, hobbyists can achieve professional-grade results. Every step, from meticulously preparing your workspace to conducting post-soldering continuity tests, plays a critical role in establishing reliable connections while safeguarding the integrity of the PCB.
Always remember to begin with practice boards, apply flux generously, and consciously avoid common errors such as overheating or using an excessive amount of solder. With these blind via soldering tips, you will steadily progress towards mastering hobbyist PCB soldering. As you continue to refine your expertise, even the most intricate blind via designs will become second nature.
Whether your efforts are dedicated to a personal project or prototyping a novel design, the refined art of hand-soldering blind via PCBs unlocks a vast realm of possibilities for constructing compact, high-performance electronic circuits. Take your time, adhere to these guidelines, and savor the profound satisfaction of a flawlessly executed task.