Why Embark on a DIY E-Reader PCB Project?
Creating a personalized e-reader offers a profound sense of achievement and empowers you to tailor the device precisely to your preferences. Unlike off-the-shelf e-readers, which can be costly and often impose restrictions on customization or file formats, a do-it-yourself (DIY) approach grants you complete authority over both the hardware and software. This ensures the final product aligns perfectly with your specific needs and desires. Moreover, it serves as an exceptional educational journey for anyone keen on delving deeper into electronics and printed circuit board design.
Beyond the personal satisfaction, designing a custom e-reader PCB can prove to be an economical choice if components are sourced judiciously. It also provides an avenue to explore open-source e-reader PCB designs, where active communities share detailed schematics and code, significantly accelerating your initial setup. Whether you are an experienced engineer or an inquisitive hobbyist, this endeavor offers a practical pathway into the fascinating world of embedded systems and display technologies.
What Are the Core Components of an E-Reader PCB?
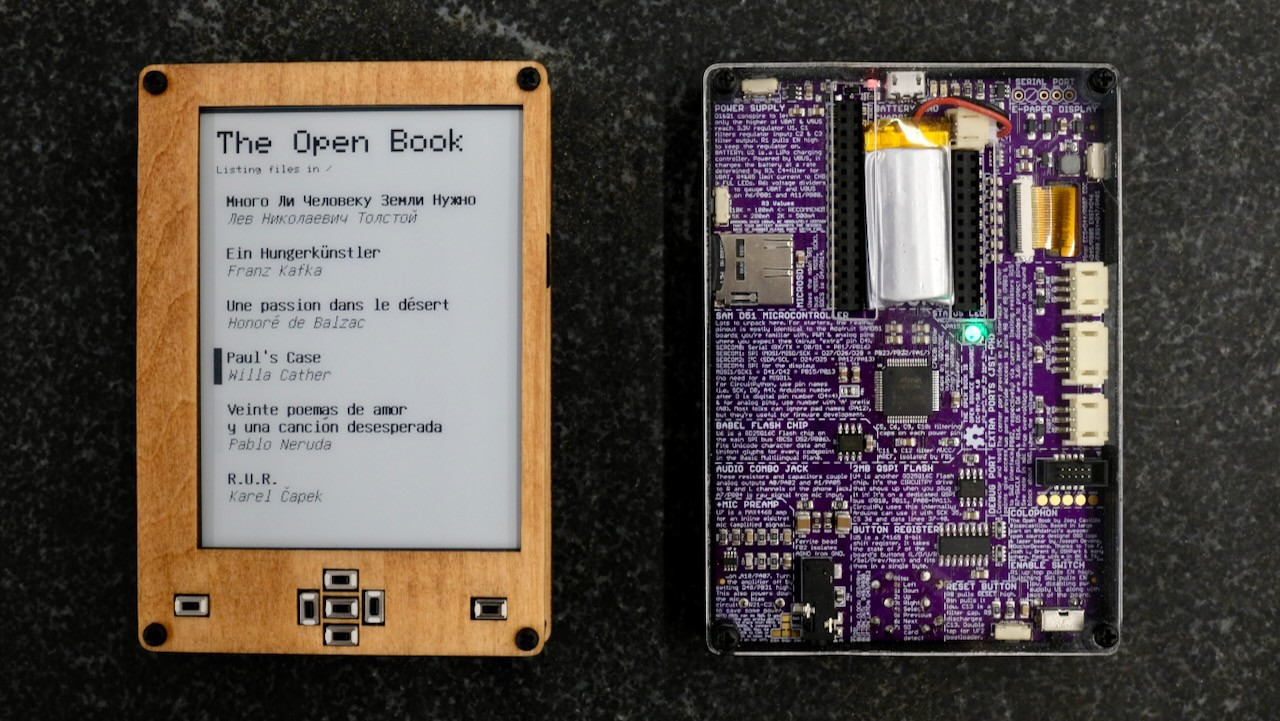
Before diving into the design phase, it's essential to understand the fundamental elements that constitute an e-reader PCB and their respective roles. The printed circuit board serves as the central nervous system, electrically connecting all critical components such as the processing unit, display, and power supply. For a hobbyist e-reader PCB, the primary objective is to develop a compact, energy-efficient layout capable of rendering digital books while minimizing power consumption.
Essential Hardware Elements
● Microcontroller (MCU): This is the "brain" of the e-reader, responsible for processing data, interpreting user commands, and managing overall system operations. Low-power microcontrollers, often operating in the 80-240 MHz range, are preferred for their efficiency.
● E Ink Display: Renowned for their exceptional power efficiency and paper-like reading experience, E Ink displays are ideal for e-readers. They typically come in sizes from 4.2 to 7.5 inches, with common resolutions around 800x600 pixels.
● Memory/Storage: Adequate storage is crucial for holding e-books. Solutions often include an SD card slot for expandable memory or integrated flash memory chips, typically ranging from 8-16 GB.
● Power Management Unit (PMU): This system is vital for portability, comprising a battery (such as a 3.7V Li-Po cell) and associated charging and power regulation circuits to ensure long operational times.
● User Interface (UI) Components: Physical buttons or a touch-sensitive layer facilitate navigation, page-turning, and menu interactions.
Understanding these foundational elements is crucial for meticulously planning your e-reader PCB schematic, ensuring all parts integrate and function cohesively.
Step 1: Defining Your DIY E-Reader Project Goals
Every successful electronics project begins with a well-defined plan. Clearly articulate your objectives for the e-reader. Will it be a minimalist device focused solely on basic reading functionalities, or do you envision advanced features such as Wi-Fi connectivity for seamless book downloads? Your feature set will directly influence the complexity of your custom e-reader PCB design.
Key Planning Considerations
● Display Selection: Determine the optimal display size and type. A 6-inch E Ink display with a resolution of 1024x758 pixels often strikes a good balance between comfortable readability and energy efficiency.
● Power Requirements: E Ink displays are exceptionally power-efficient, consuming merely 0.5-1 mW during page refreshes and virtually no power when the image is static, contributing to extended battery life.
● Design Approach: Decide whether to embark on a PCB design from scratch or to leverage an existing open-source e-reader PCB project as a foundation. Open-source options often come with established community support, readily available schematics, and accompanying software, which can significantly reduce development time.
Step 2: Sourcing Components for Your Hobbyist E-Reader PCB
Once your design plan is solidified, the next phase involves meticulously gathering all necessary components. Here’s an expanded list to guide your DIY e-reader PCB project:
Detailed Component List
● Microcontroller: Prioritize a low-power, 32-bit processor with adequate RAM (e.g., 128-256 KB) to handle e-book rendering and system operations efficiently.
● E Ink Display: Select a display that includes a compatible controller chip. A 4.2-inch E Ink panel might typically cost between $20-30 and requires minimal power.
● Power Supply: A 3.7V, 1000mAh Lithium Polymer (Li-Po) battery is often sufficient to provide several days of use, thanks to the E Ink display's inherent efficiency.
● Storage Module: An SD card module, capable of supporting up to 32 GB, offers an affordable and straightforward solution for e-book storage integration.
● Connectors and Buttons: Simple, durable tactile buttons are effective for page navigation and menu control. Various headers and connectors will be needed for interfacing.
Allocate an estimated budget of $50-100 for components, depending on the desired features and where they are sourced. Purchasing in larger quantities or from specialized electronics suppliers can often lead to cost reductions.
Step 3: Crafting Your E-Reader PCB Schematic
The e-reader PCB schematic is the foundational blueprint of your project, illustrating all electrical connections between components. For newcomers to PCB design, readily available free software tools offer comprehensive schematic editors and layout designers, often including extensive libraries for common microcontrollers and display drivers.
Essential Schematic Design Guidelines
● Stable Power Delivery: Ensure robust power lines, typically 3.3V or 5V, depending on your chosen components. Integrate decoupling capacitors (e.g., 10 μF) strategically near power pins to effectively filter noise.
● Signal Integrity: To minimize interference, keep data lines as short as possible. This is particularly critical for high-speed communication interfaces like SPI or I2C, which can operate up to 4 MHz when interfacing with the display.
● Effective Grounding: Implement a solid ground plane across the PCB to significantly reduce electromagnetic interference (EMI) and improve overall signal stability.
If designing from scratch seems overwhelming, exploring open-source e-reader PCB designs can provide an excellent starting point. Many enthusiasts openly share their schematics and layouts, which you can adapt to suit your specific component choices, after careful review for compatibility.
Step 4: Developing the PCB Layout
Once the schematic is complete and verified, the next crucial step is the PCB layout design. This involves physically arranging components on the board and meticulously routing the copper traces that electrically connect them. Aim for a compact design to optimize space and minimize the PCB manufacturing cost. For a hobbyist e-reader PCB, a two-layer board (top and bottom) measuring approximately 100mm x 80mm is often sufficient for a 6-inch display.
PCB Layout Best Practices
● Microcontroller Placement: Position the microcontroller centrally to minimize the length of traces to other integrated circuits.
● Display Connector Location: Place the E Ink display connector near the board edge to facilitate easier assembly and cable management.
● Trace Widths: Design power traces to be significantly wider (e.g., 20-30 mil) than signal traces (e.g., 8-10 mil) to accommodate higher currents without thermal issues.
● Error Checking: Before proceeding to manufacturing, thoroughly review your layout for common errors such as overlapping traces, unrouted connections, or incorrect component footprints.
Step 5: Manufacturing Your Custom DIY E-Reader PCB
With your finalized design, the next stage is to have your PCB fabricated. AIVON is a reliable large PCB manufacturer that can transform your digital design files into physical circuit boards efficiently. Simply upload your Gerber files—the standard output format from most PCB design software—and specify essential parameters such as board thickness (1.6mm is typical) and copper weight (1 oz is standard).
Manufacturing Considerations
● Cost Efficiency: Costs for a small batch (e.g., 5-10 boards) can range from $10-30, depending on the board's size, complexity, and the chosen manufacturing options.
● Quality Inspection: Upon receiving the manufactured boards, conduct a detailed inspection for any potential defects, such as misaligned drill holes or damaged traces, before proceeding with component assembly.
Step 6: Assembling and Soldering Components
Component assembly involves carefully soldering all parts onto your newly fabricated PCB. If you are new to soldering, it is highly recommended to practice on a scrap board first to refine your technique and prevent potential damage to your e-reader PCB. Utilize a soldering iron equipped with a fine tip (rated 25-30W) and, for safety, use lead-free solder.
Assembly and Soldering Guidelines
● Component Order: Begin by soldering smaller, low-profile components like resistors and capacitors, then progress to larger parts such as the microcontroller and various connectors.
● Alignment Precision: Ensure precise alignment of all components, especially the E Ink display connector, as even slight misalignment can lead to display malfunctions.
● Post-Soldering Verification: After completing the soldering process, use a multimeter to perform continuity tests to confirm all connections are solid and that no inadvertent short circuits have occurred.
Step 7: Programming Your E-Reader's Microcontroller
With the hardware fully assembled, the next critical phase is programming the microcontroller. You can either adapt existing open-source firmware or develop your own custom code to manage e-book rendering, process user inputs from buttons, and efficiently handle power management. Common programming environments support languages like C or Python, depending on your chosen microcontroller architecture.
Essential Firmware Functionality
● E-Book Rendering: The firmware must be capable of reading various e-book file formats (e.g., EPUB, PDF) from storage.
● Display Control: It needs to effectively drive the E Ink display to render text, typically refreshing the screen at a rate of 1-2 seconds per page turn.
● Power Optimization: Implement intelligent power management routines to maximize battery life and system uptime.
Many open-source e-reader PCB projects provide ready-to-use codebases, which you can modify and extend to incorporate personalized features such as adjustable font sizes or integrated backlighting control.
Step 8: Comprehensive Testing and Troubleshooting
Thorough testing is paramount to ensure your e-reader operates exactly as intended. Power on the device and verify that the display initializes correctly. Load a sample e-book and confirm that pages turn smoothly without any flickering or display anomalies. Should issues arise, adopt a systematic troubleshooting approach:
Troubleshooting Common Issues
● Display Problems: Inspect all display connections and verify that the display driver firmware is correctly implemented and configured.
● Power Irregularities: Use a multimeter to measure voltages at key points across the PCB; these should precisely match the requirements of the individual components (e.g., a stable 3.3V).
● Button Malfunctions: Examine solder joints for integrity and test for continuity across button contacts.
Patience is a virtue in debugging; while it can be time-consuming, it is essential for developing a truly reliable and functional device.
Enhancing Your Custom E-Reader PCB Design
Once your fundamental e-reader is fully operational, consider implementing upgrades to augment its functionality and user experience:
● Backlight Integration: Add a backlight circuit using efficient LEDs (typically drawing 20-50 mA) to enable comfortable reading in low-light conditions.
● Wireless Connectivity: Integrate Wi-Fi or Bluetooth modules (ensuring 2.4 GHz compatibility) for convenient wireless book downloads and other connectivity features.
● Custom Enclosure: Design and 3D-print a bespoke enclosure to protect the PCB and give your e-reader a professional, aesthetically pleasing finish.
These enhancements can elevate your hobbyist e-reader PCB into a sophisticated device that rivals commercially available products.
Overcoming Challenges in DIY E-Reader Projects
Building an e-reader from scratch is a rewarding journey, but it comes with its share of challenges. Component compatibility can often be a hurdle; E Ink displays, for instance, frequently require very specific drivers, necessitating careful review of datasheets before making purchases. Power management also poses a significant challenge; inefficient designs can lead to rapid battery depletion. Utilizing low-dropout (LDO) regulators with quiescent currents below 50 μA can significantly optimize power efficiency.
Software bugs are another common source of frustration. To overcome these, actively engage with online forums and open-source communities, particularly if you are using an open-source e-reader PCB design. Shared solutions and collaborative updates can save countless hours of debugging effort.
Conclusion: Begin Your DIY E-Reader PCB Adventure Today
Undertaking a DIY e-reader PCB project is a deeply fulfilling endeavor that masterfully blends creativity, technical skill, and problem-solving. From the initial planning of your custom e-reader PCB design to the meticulous assembly and sophisticated programming, each stage brings you progressively closer to realizing a truly personalized reading device. Whether you are a novice exploring a hobbyist e-reader PCB or an seasoned expert refining an open-source e-reader PCB, the process offers boundless learning opportunities.
Ready to bring your vision to life? Gather your components, meticulously sketch out your e-reader PCB schematic, and leverage AIVON’s high-quality manufacturing support to transform your design into a tangible product. Dive into this immersive, hands-on project and savor the immense satisfaction of reading e-books on a device that you meticulously crafted from the ground up!


