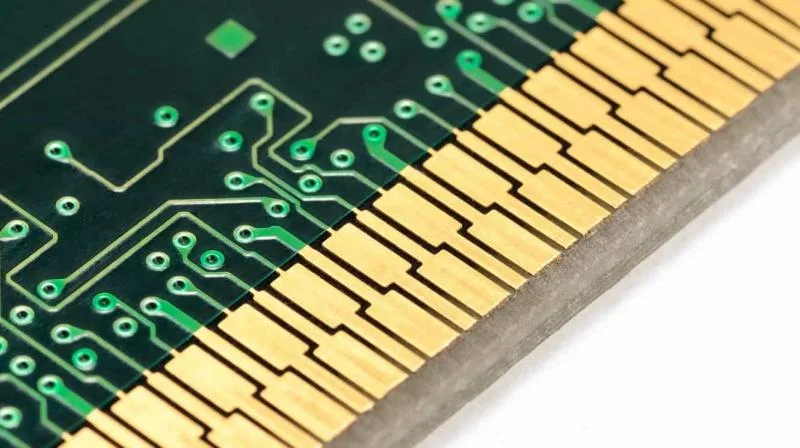
What Are PCB Gold Fingers and Why Are They Important?
PCB gold fingers, also known as edge connectors, are gold-plated contacts situated along the periphery of a printed circuit board. Their primary function is to facilitate electrical connections when the PCB is inserted into a corresponding slot or connector in another electronic device.
Gold fingers are commonly found in components such as computer memory modules, expansion cards, and various other interface boards. The application of gold is strategic due to its exceptional electrical conductivity and superior resistance to corrosion, ensuring a stable and enduring connection. Typically, the gold layer ranges in thickness from 3 to 50 microinches, a specification balanced between ensuring durability and managing PCB cost.
However, these critical connectors are susceptible to damage from various factors, including routine wear, improper handling, or exposure to harsh environmental conditions. Issues such as scratches, corrosion, or contamination from solder can disrupt the integrity of signal transmission, leading to unreliable connections or data loss. For electronics hobbyists engaged in personal projects or salvaging older equipment, acquiring the ability to repair these gold fingers is an invaluable skill, potentially saving both time and financial resources by extending the operational life of their circuit boards.
Common Problems Affecting PCB Gold Fingers
Before attempting any repair, it’s crucial to accurately diagnose the specific type of damage affecting the PCB gold fingers. Different issues necessitate different repair approaches.
Types of Damage
● Corrosion: This is often caused by exposure to moisture or various chemicals, leading to oxidation. Visibly, the gold fingers may appear dull or tarnished, which significantly impairs electrical connectivity due to increased contact resistance.
● Physical Damage: This includes scratches, nicks, or dents, typically resulting from mishandling or abrasive contact. Such physical disruptions to the gold layer can directly impede signal transmission pathways.
● Solder Contamination: During soldering operations on nearby components, solder can inadvertently splash or spread onto the gold fingers. This metallic contamination can drastically reduce their intended effectiveness as clean, low-resistance contacts.
● Wear from Repeated Use: Frequent insertion and removal of a PCB into its slot can gradually abrade the thin gold plating. Over time, this exposes the underlying, less noble metals, which are more prone to degradation and corrosion.
Accurately identifying whether the issue is simply surface tarnish or more significant physical damage will guide you toward the most appropriate repair method, ranging from basic cleaning to more involved techniques like gold plating restoration or even full replacement.
Essential Tools and Materials for Hobbyist Gold Finger Repair
To successfully undertake DIY PCB gold finger repair, hobbyists will need a specific set of tools and materials. Assembling these beforehand will ensure a smoother and more effective repair process.
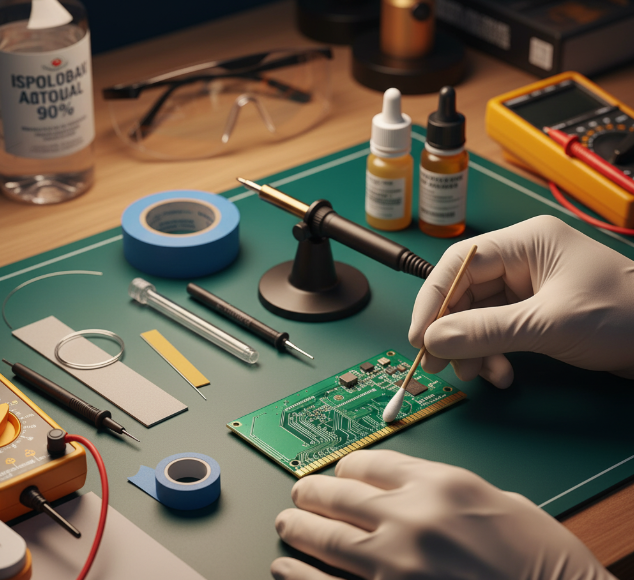
● Isopropyl Alcohol (90% or higher): Indispensable for thorough cleaning to remove contaminants and oxidation.
● Soft-Bristled Brush or Cotton Swabs: For gentle yet effective application of cleaning agents without scratching the delicate gold surface.
● Gold Plating Repair Kit: Available from electronics suppliers, these kits are designed for re-applying a thin layer of gold to worn or damaged areas.
● Fine-Grit Sandpaper (2000 grit or finer) or Fiberglass Scratch Brush: Used sparingly for carefully abrading minor surface imperfections.
● Soldering Iron and Fine Solder: Necessary for more advanced repairs involving severe damage or missing sections.
● Masking Tape: Essential for protecting adjacent components and traces during the repair process.
● Multimeter: For testing electrical continuity and contact resistance before and after repairs, ensuring a reliable connection.
● Protective Gloves and Safety Goggles: Crucial safety gear when handling chemicals found in plating kits.
Having these items readily accessible will facilitate a precise and effective repair, contributing to the longevity and functionality of your PCBs.
Related Reading: 5 Essential Tools for Working with PCB Components in Your Home Lab
Step-by-Step DIY Gold Finger Repair Techniques
With the necessary tools at hand, you can now proceed with repairing damaged PCB gold fingers. The method chosen will depend on the severity and nature of the damage.
Step 1: Cleaning Corroded Gold Fingers
For gold fingers that show signs of tarnishing or corrosion, thorough cleaning is the initial and often most effective step. Corrosion can increase contact resistance significantly, potentially exceeding 50 milliohms, which is detrimental to signal integrity.
1. Preparation: Always work in a well-ventilated area and wear protective gloves to prevent skin exposure to cleaning agents.
2. Alcohol Application: Dampen a cotton swab or a soft-bristled brush with 90% or higher isopropyl alcohol. Gently rub the affected gold fingers to dislodge and remove any accumulated dirt, grease, or oxidation. Apply minimal pressure to avoid inadvertently scratching the gold layer.
3. Thorough Drying: Use a clean, lint-free cloth to ensure the cleaned area is completely dry. Any residual moisture can exacerbate corrosion issues if left on the board.
4. Inspection and Testing: Under good lighting, visually inspect the gold fingers for any remaining residue or discoloration. Subsequently, use a multimeter to measure the contact resistance; for a reliable connection, the ideal reading should be below 10 milliohms.
If simple cleaning does not resolve the connectivity issues, more advanced repair methods may be required.
Step 2: Addressing Minor Scratches and Surface Damage
For gold fingers exhibiting only minor scratches or superficial damage, a gentle abrasive treatment can prepare the surface for potential replating or restore basic functionality.
1. Protect Surrounding Areas: Carefully apply masking tape to cover any nearby components or traces. This prevents accidental damage during the abrasive process.
2. Gentle Abrasion: Using a fiberglass scratch brush or very fine-grit sandpaper (2000 grit or higher), lightly buff only the damaged areas. The goal is to smooth out imperfections without aggressively removing the thin gold layer. Excessive abrasion can expose the underlying nickel or copper, which are less resistant to corrosion.
3. Final Clean-up: After abrasion, clean the area again with isopropyl alcohol and a soft cloth to remove any generated debris.
Exercise extreme caution during this step to preserve as much of the original gold plating as possible.
Step 3: Utilizing a Gold Plating Repair Kit
When the gold layer is visibly worn or damaged beyond what cleaning can fix, a gold plating repair kit can effectively restore the conductive surface. These kits typically include a gold plating solution, a low-voltage power source (e.g., battery or USB-powered), and specialized applicators.
1. Follow Kit Instructions: Always consult and adhere to the specific instructions provided with your gold plating kit, as procedures can vary between manufacturers.
2. Surface Preparation: Ensure the gold fingers are impeccably clean and free from any contaminants, as any foreign matter can compromise the quality of the new plating.
3. Plating Application: Dip the applicator into the gold plating solution. Gently and evenly rub it over the damaged gold fingers. The kit's power source will facilitate the electrochemical deposition of a new, thin layer of gold, often 5-10 microinches thick per application.
4. Rinsing and Drying: Once plating is complete, rinse the treated area with distilled water to remove any excess solution, then thoroughly dry it with a lint-free cloth.
5. Connectivity Verification: Employ a multimeter to confirm that the contact resistance is within acceptable limits (ideally under 10 milliohms), indicating a successful repair.
Gold plating repair kits offer a cost-effective solution for hobbyists, typically ranging from $20 to $50, and can significantly extend the operational life of a PCB.
Step 4: Soldering for Severe Gold Finger Damage
In instances where gold fingers are severely compromised or have small sections entirely missing, direct soldering might be a necessary, albeit more advanced, repair technique. This method demands precision to prevent further damage to the board.
1. Damage Assessment: First, confirm that the underlying conductive traces are still intact. If these traces are broken, they must be repaired before attempting to solder the gold finger area.
2. Solder Application: Using a fine-tip soldering iron and thin solder, apply a minimal, even layer of solder directly onto the damaged area. Maintain a low iron temperature (around 300°C or 570°F) to avoid overheating and potentially damaging the PCB.
3. Optional Replating: For enhanced durability and conductivity, consider using a gold plating kit to apply a thin gold layer over the newly soldered area. This helps prevent solder corrosion and improves electrical performance.
It's important to note that this method serves as more of a functional patch. Solder inherently has higher electrical resistance (approximately 15-20 milliohms) compared to pure gold plating, so this repair might not fully restore original performance specifications.
Step 5: Full Replacement of Gold Fingers for Extensive Damage
When gold fingers are damaged beyond localized repair, a complete replacement is the final, most complex option. This process is typically challenging for hobbyists and often best performed by professionals, though experienced individuals can attempt it.
1. Remove Damaged Plating: Carefully strip away the existing damaged gold layer. This can be done using a fiberglass brush or specific chemical strippers, exposing the base material, which is commonly nickel or copper.
2. Apply New Base Layer (If Needed): If the underlying base layer is also compromised, applying a new thin layer of nickel may be necessary before proceeding with gold plating. This often requires specialized equipment not readily available to hobbyists.
3. New Gold Plating: Use a gold plating kit or a professional solution to apply a fresh gold layer. Aim for a thickness between 5 and 30 microinches, adjusted according to the board's intended application and durability requirements.
4. Board Testing: After the replacement, thoroughly test the new gold fingers using a multimeter and by inserting the board into its intended slot to confirm functionality and reliable performance.
Full gold finger replacement is a time-intensive process and may not yield perfectly factory-like results for hobbyists without access to industrial-grade tools. For high-value or mission-critical PCBs, consulting a professional repair service is often the most prudent course of action.
Preventing Damage to PCB Gold Fingers: Best Practices
Proactive measures are far more effective than reactive repairs. Adopting careful handling and storage habits can significantly prolong the life and reliability of your PCB gold fingers.
● Proper Handling: Always manipulate circuit boards by their edges. Avoid direct contact with the gold fingers to prevent the transfer of skin oils, dirt, or other contaminants, which can initiate corrosion.
● Optimal Storage: Store PCBs in anti-static bags or dedicated containers. This protects them from environmental factors such as moisture, dust, and static discharge, all of which can degrade gold plating.
● Correct Insertion Techniques: When installing PCBs into slots, ensure precise alignment. This minimizes the risk of physical damage, such as scratches or bending, that can occur from forceful or misaligned insertion.
● Maintain a Clean Workspace: Keep your work area tidy and free from dust, debris, and any chemical contaminants. A clean environment reduces the chances of accidental damage or corrosion to the delicate gold plating.
By consistently applying these preventive tips, hobbyists can dramatically reduce the incidence of gold finger damage, thereby saving time and effort on future repairs.
When to Engage Professional PCB Repair Services
While DIY repairs are suitable for many common issues, certain situations necessitate the expertise of professional repair services. Recognizing these instances can prevent further damage and ensure the longevity of valuable electronics.
If the PCB in question is part of a high-value or indispensable device, or if it features complex multilayer designs, professional intervention is highly recommended. Similarly, boards requiring precise impedance matching—such as 50 ohms for high-speed data signals—should typically be handled by specialists. Professional repair facilities possess access to advanced plating equipment, intricate soldering tools, and specialized testing apparatus. This allows them to execute repairs with a level of precision and quality that ensures long-term reliability, particularly for critical applications where performance cannot be compromised. Consulting experts in such scenarios can safeguard the functionality and integrity of your electronic components.

Conclusion: Revive Your PCBs with Confidence
Successfully repairing damaged PCB gold fingers is a highly rewarding skill for any hobbyist dedicated to salvaging or maintaining their circuit boards. This guide has explored a range of essential techniques, from simple cleaning of corroded contacts and utilizing specialized gold plating repair kits to more intricate procedures like soldering on new gold sections. By systematically following these DIY gold finger plating and repair steps, you can confidently restore functionality to compromised edge connectors and significantly extend the operational lifespan of your various electronics projects.
Always remember to initiate the repair process with the least invasive solutions, such as thorough cleaning, before escalating to more complex methods like the full replacement of gold fingers on PCBs. Diligence, combined with the appropriate tools and a commitment to preventive measures, will ensure your circuit boards remain in excellent working condition for many years to come. Approach your next repair challenge with newfound confidence, equipped with the knowledge and techniques needed to effectively tackle any gold finger issue.


