Introduction
In the world of DIY electronics, creating your own printed circuit boards opens up endless possibilities for custom projects. Drilling precise holes is a critical step that directly impacts the quality and functionality of your circuit board. Choosing the right PCB drill bits ensures clean through-holes for components, preventing issues like poor soldering or electrical shorts. Hobbyists often start with basic hand tools, but understanding PCB drilling tools makes the process smoother and more reliable. This guide covers everything from drill bit sizes to best practices, tailored for electronic hobbyists building prototypes at home. With the proper selection, your DIY PCBs will perform just as well as professional ones.
Why Choosing the Right Drill Bit Matters for Your DIY PCB Projects
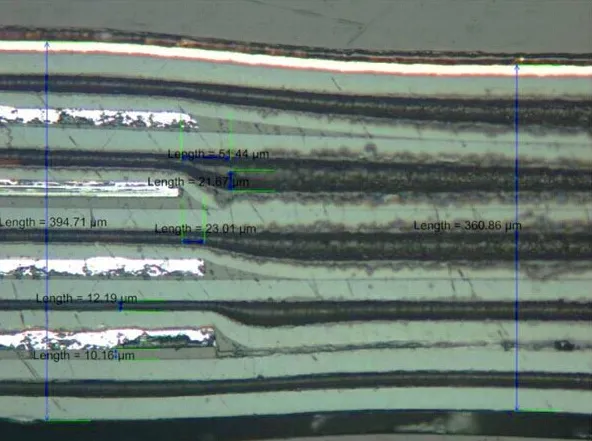
Selecting appropriate PCB drill bits prevents common frustrations in circuit board drilling. Wrong sizes lead to loose fits for component leads, causing unreliable connections during assembly. Dull or unsuitable materials create burrs around holes, which can damage traces or require extra cleanup time. In DIY electronics, precision matters because even small errors compound during soldering and testing. Industry standards like IPC-6012 emphasize tight tolerances for hole sizes to ensure board reliability. Ultimately, the right tools save time, reduce waste, and boost your project's success rate.
Poor hole quality affects solder joints, leading to intermittent failures in your circuits. Hobbyists frequently overlook how drill bit choice influences heat buildup, which can delaminate the board material. Consistent hole diameters allow for repeatable results across multiple boards. This attention to detail separates hobby projects from professional outcomes. By prioritizing PCB drilling tools from the start, you avoid rework and focus on innovation.
Understanding Types of PCB Drill Bits
PCB drill bits come in various designs optimized for the unique challenges of circuit board materials like FR-4. Tungsten carbide bits dominate for their hardness and ability to maintain sharpness through multiple holes. These bits handle the fiberglass reinforcement without excessive wear, ideal for hobbyist volumes. High-speed steel (HSS) options serve as budget alternatives but dull faster, suiting infrequent use. Each type has a two-flute geometry for efficient chip evacuation during drilling. Selecting based on your project's scale ensures durability and precision.
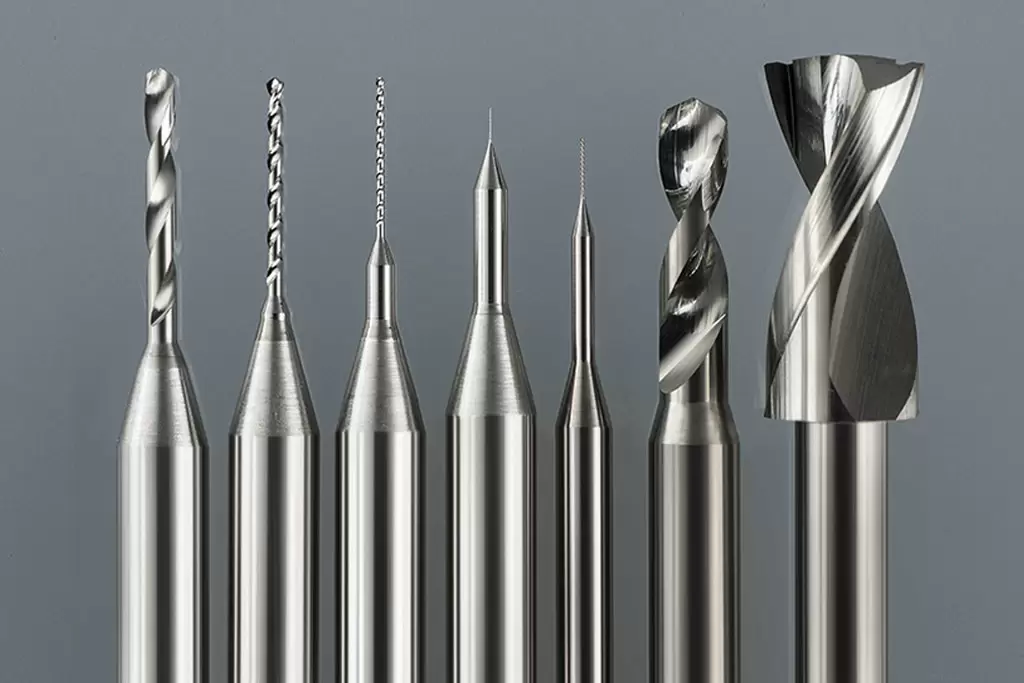
Carbide bits excel in maintaining straight holes, crucial for aligning multi-layer DIY boards. Their brittleness requires careful handling to prevent snapping, especially in smaller diameters. HSS bits flex more, which can wander off-center on harder substrates. For DIY electronics, carbide provides the best balance of cost and performance for repeated drilling sessions. Understanding these differences helps hobbyists stock the right set without overspending.
Key Considerations for Drill Bit Sizes in PCB Drilling
Drill bit sizes dictate the fit for through-hole components and vias in your designs. Common sizes for hobbyists range from 0.6 mm to 1.5 mm, covering most resistors, capacitors, and IC leads. A 0.8 mm bit fits standard axial components perfectly, while 1.0 mm to 1.2 mm works for larger pins. Smaller bits like 0.6 mm or 0.7 mm suit fine-pitch parts but demand steady hands. Always match the bit to your schematic's requirements for optimal annular ring support. IPC-2221 guidelines recommend accounting for plating shrinkage in finished hole sizes, even for unplated DIY boards.
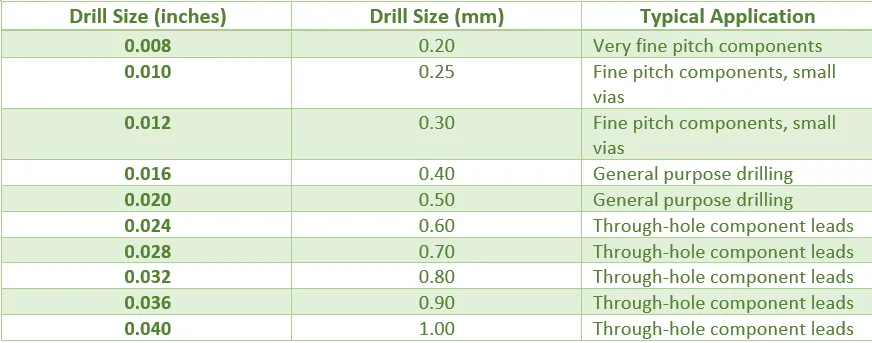
Oversized holes weaken pad adhesion, risking trace lifts during soldering. Undersized ones make insertion difficult, potentially cracking the board. Hobbyists benefit from kits spanning 0.8 mm, 0.9 mm, 1.0 mm, 1.2 mm, and 1.5 mm for versatility. Test on scrap material to verify fit before committing to your main board. This approach aligns with standard PCB drill bit practices used in prototyping.
Materials and Coatings for Durable PCB Drilling Tools
Material choice defines a drill bit's lifespan in PCB applications. Tungsten carbide withstands the abrasive nature of epoxy and glass fibers far better than steel alternatives. Coatings like titanium nitride on some carbide bits reduce friction and extend usability. HSS bits, while softer, absorb shocks better during hand-drilling mishaps. For circuit board drilling, prioritize carbide for clean entry and exit without delamination. These properties ensure holes meet acceptability criteria in standards like IPC-A-600.
Heat management is key, as excessive friction melts resin around the hole. Carbide dissipates heat efficiently, preserving trace integrity. Hobbyists drilling dozens of boards per project notice the difference in bit longevity. Avoid uncoated HSS for prolonged sessions, as they overheat quickly. Selecting coated carbide elevates your DIY setup to semi-professional levels.
Essential PCB Drilling Tools and Setup for Hobbyists
Beyond bits, your setup amplifies results in DIY electronics. A variable-speed rotary tool or mini drill press provides stable RPMs between 20,000 and 40,000 for small bits. Secure the board with clamps or a fixture to prevent movement. Use a backup board underneath to avoid breakout burrs on the exit side. Lubrication with compressed air clears debris mid-drill. These PCB drilling tools create professional-grade results at home.
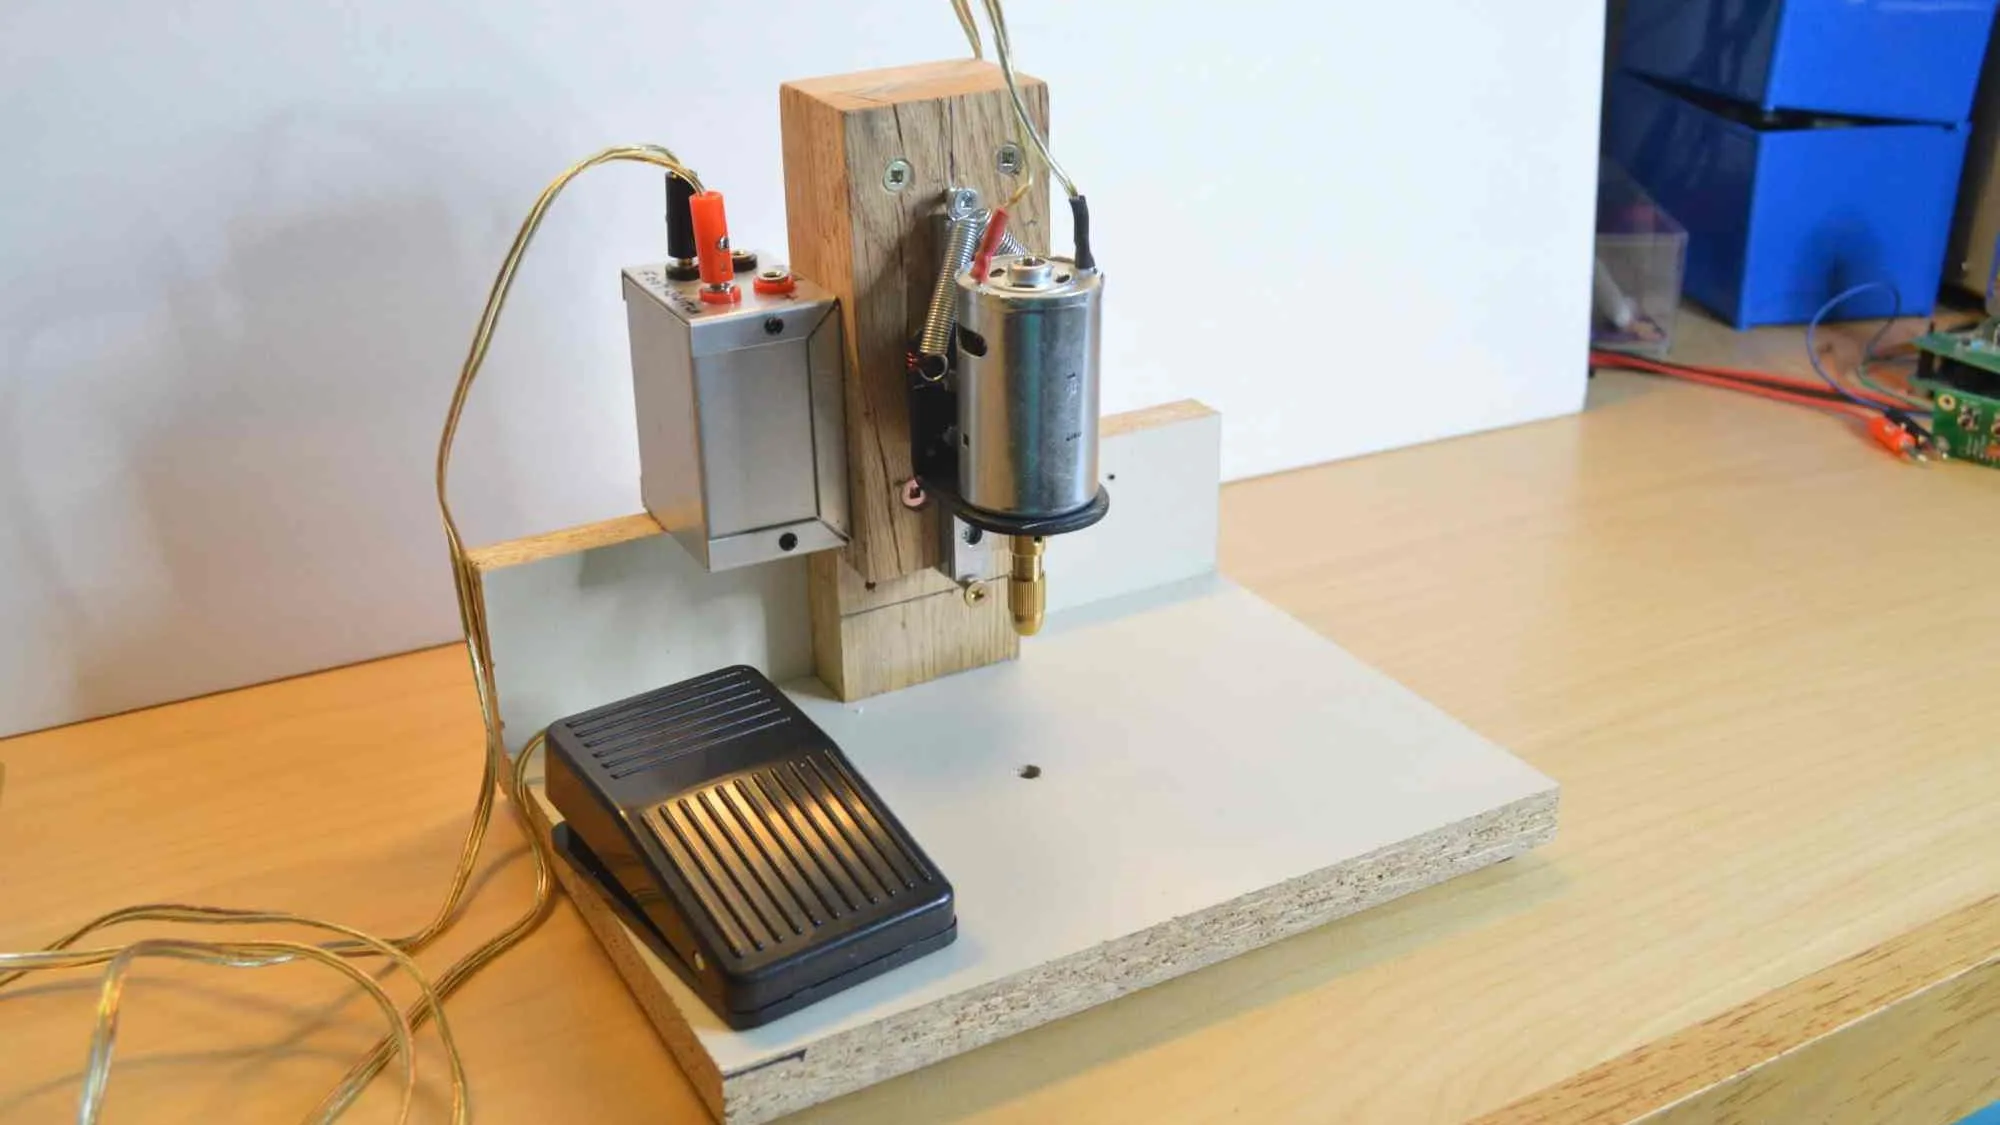
Alignment jigs or laser-guided presses enhance accuracy for multi-hole patterns. Start with peck drilling: plunge briefly, retract, and repeat to evacuate chips. This technique prevents bit binding, common in hobby setups. Proper fixturing reduces wander, ensuring holes match your artwork. Invest in quality collets matching your bit shanks for zero runout.
Best Practices for Selecting and Using PCB Drill Bits
Match bit size to component datasheets, adding a slight oversize for plating simulation. Inspect bits for wear after every few boards; replace if flutes clog or edges round. Maintain consistent light pressure and high speed to shear material cleanly. Deburr holes post-drill with a countersink or fiberglass brush for smooth soldering. Store bits in organized cases to avoid damage. Following IPC-DR-572A drilling guidelines minimizes defects even in home workshops.
Calibrate speeds per bit diameter: smaller bits need higher RPMs. Practice on test coupons to dial in your technique. Clean the work area to prevent copper filings from shorting traces. These habits turn novice hobbyists into confident prototypers.
Common Mistakes to Avoid in Circuit Board Drilling
Using dull bits tops the list, causing rough holes and trace damage. Hobbyists often push too hard, snapping brittle carbide. Incorrect speeds lead to heat cracks or wandering paths. Skipping backups results in splintered exits, ruining aesthetics. Mismatched sizes force awkward soldering fixes. Awareness averts these pitfalls, streamlining your workflow.
Hand-holding boards invites misalignment, especially for fine-pitch arrays. Overlooking chip buildup clogs flutes, escalating to breakage. Rushing without pecking heats the laminate excessively. Learning from these errors refines skills quickly.
Troubleshooting Drill Bit Issues in DIY Projects
Bit breakage signals excessive pressure or misalignment; lighten up and check runout. Rough holes indicate dullness or low speed; sharpen or replace promptly. Wandering starts from poor entry; use pilot dimples or jigs. Excessive burrs stem from no backup; always add one. Heat discoloration points to friction; increase RPM or peck more. Systematic checks restore quality fast.
Conclusion
Mastering PCB drill bits transforms DIY electronics from trial-and-error to reliable crafting. Focus on carbide materials, standard sizes like 0.8 mm to 1.5 mm, and proper techniques for flawless results. Adhering to principles from IPC standards ensures your boards meet professional benchmarks. Build a versatile kit, practice consistently, and iterate on setups. Your next circuit board drilling project will yield durable, high-performance prototypes ready for assembly. Embrace these insights to elevate your hobbyist endeavors.
FAQs
Q1: What are the most common PCB drill bit sizes for DIY electronics?
A1: For hobbyist projects, sizes from 0.6 mm to 1.5 mm cover most needs. A 0.8 mm bit suits standard through-hole leads, while 1.0 mm and 1.2 mm handle larger components. Start with a set including 0.8 mm, 1.0 mm, and 1.2 mm for versatility in circuit board drilling. These align with typical component footprints without requiring plating adjustments.
Q2: Why choose carbide over HSS for PCB drilling tools?
A2: Carbide bits offer superior wear resistance against FR-4 abrasives, staying sharp longer for multiple boards. HSS dulls quickly, leading to rough holes in prolonged sessions. Carbide ensures precise PCB drill bits for clean vias and pads. Use HSS only for one-off holes to save costs. This choice boosts reliability in DIY setups.
Q3: How do I avoid breaking PCB drill bits during use?
A3: Apply light pressure, use high RPMs around 30,000, and peck drill to clear chips. Secure the board firmly to prevent flexing. Inspect bits for damage before starting. These steps protect brittle carbide in hobbyist circuit board drilling. Proper handling extends bit life significantly.
Q4: What RPM should I use for different PCB drill bit sizes?
A4: Smaller bits like 0.6 mm to 0.8 mm thrive at 35,000 to 40,000 RPM for clean cuts. Larger 1.2 mm to 1.5 mm bits work well at 20,000 to 30,000 RPM to manage heat. Adjust based on your tool for optimal PCB drilling tools performance. Test on scrap for best results.
References
IPC-6012E — Qualification and Performance Specification for Rigid Printed Boards. IPC, 2017
IPC-2221B — Generic Standard on Printed Board Design. IPC, 2016
IPC-DR-572A — Drilling Guidelines for Printed Boards. IPC, 2007