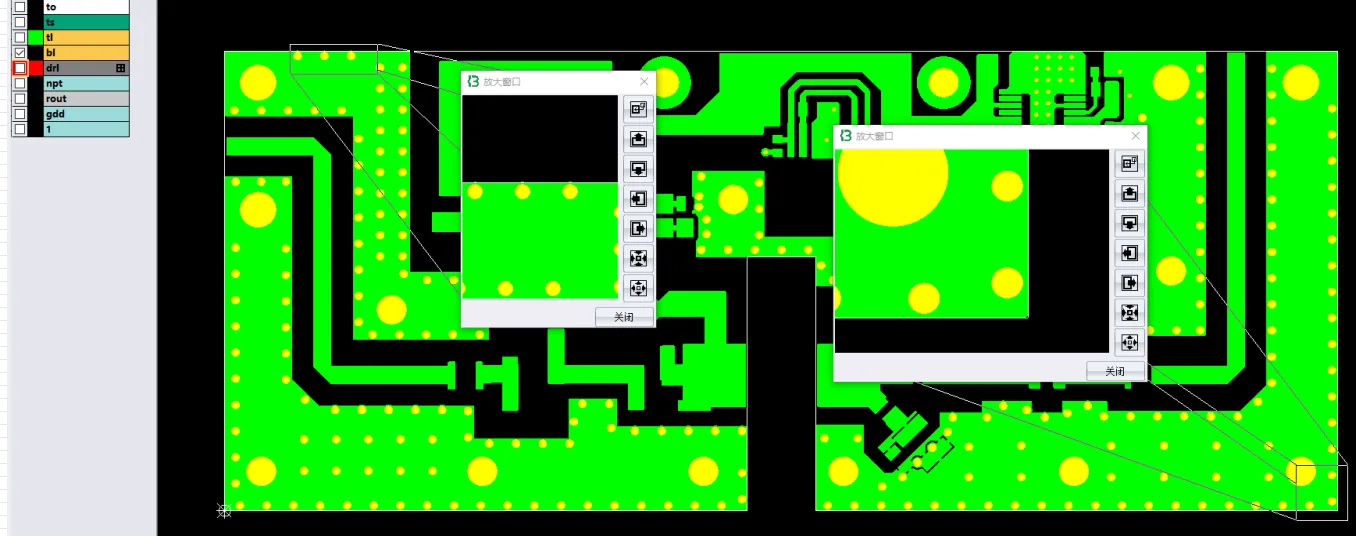
In March 2026, we handled a straightforward 2-layer PCB order that still required significant engineering clarification. Measuring 179 × 158.3 mm with 1.6 mm thickness, the board featured customer panelization (3×2) with V-CUT separation. Despite being only 2 layers, several layout and panelization decisions created notable manufacturability risks during CAM review.
Even simple 2-layer boards can generate multiple EQs when component placement, solder mask, and mechanical features are not aligned with production capabilities. Our CAM team identified several critical issues that could have led to solderability problems, edge defects, or panel handling failures if left unaddressed.
Order Overview
This was a 2-layer FR-4 TG150 PCB ( #FR4-20260423-049 ) with 1 oz copper on both sides, 1.6 mm finished thickness, and ENIG surface finish. Minimum hole size was 0.3 mm. The design used customer self-panelization in 3×2 format with V-CUT separation and 7 mm process borders on four sides. Order quantity was 120 pcs (20 sets). 100% flying probe testing was required. No impedance control or blind vias were needed.
Special notes included silkscreen and fiducial placement per customer panel recommendation, highlighting the importance of precise mechanical and legend coordination.
Key PCB CAM Review Issues in 2-Layer Design
1. Tight SMD Pad Spacing and Solder Mask Bridge Risk
We noticed several locations where line-to-pad or pad-to-pad spacing was only 4 mil. Our standard process requires approximately 7.8 mil clearance to reliably form a solder mask bridge.
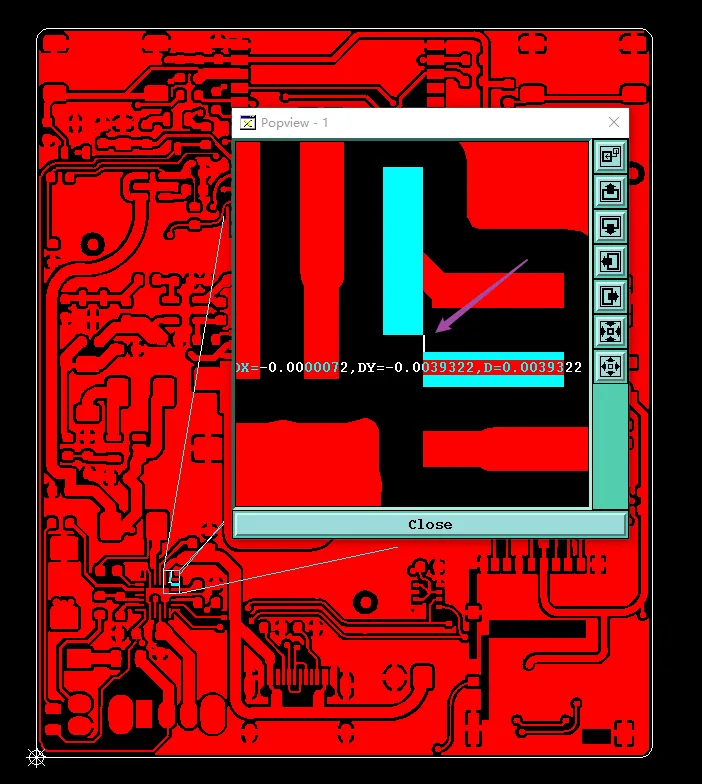
Figure 1: line-to-pad or pad-to-pad spacing was only 4 mil
Our CAM engineer flagged this immediately because insufficient bridge width commonly leads to mask breakage or incomplete coverage. We asked the customer to confirm whether to increase spacing, remove the bridge requirement, or accept potential solder mask defects.
If ignored, solder shorts between pads during assembly or incomplete mask protection would likely occur, resulting in high assembly failure rates and possible scrap of the entire batch. According to typical IPC-A-600 criteria, such tight spacing often falls outside acceptable limits for reliable production.
2. Pads Too Close to Board Outline – Edge Exposed Copper Risk
Multiple pads were positioned extremely close to or overlapping the final board outline. We noticed that after V-CUT depanelization and routing, this would cause exposed copper on the board edges.
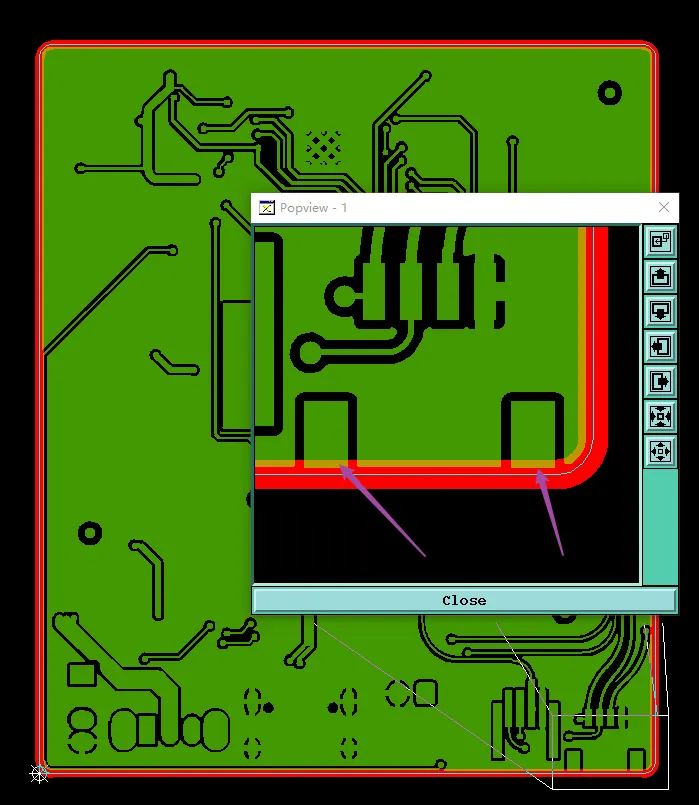
Figure 2: Multiple pads were positioned extremely close to or overlapping the final board outline
Our engineer recommended reviewing component placement against the outline and suggested adjustments or confirmation to proceed with risk awareness. Edge copper exposure is a frequent issue in customer-panelized designs.
If not clarified, the finished FR4 boards could have copper burrs or exposed edges, leading to short circuits during assembly, corrosion in the field, or failure to meet IPC-6012 cleanliness and edge quality standards.
3. PTH Holes Without Solder Mask Openings
Several large 3.1 mm PTH holes had no solder mask openings defined on either the top or bottom layers. This is a common but critical oversight in through-hole designs. During CAM review, our engineer noticed that without defined openings, solder mask ink could flow onto the annular rings and into the holes during the application process.
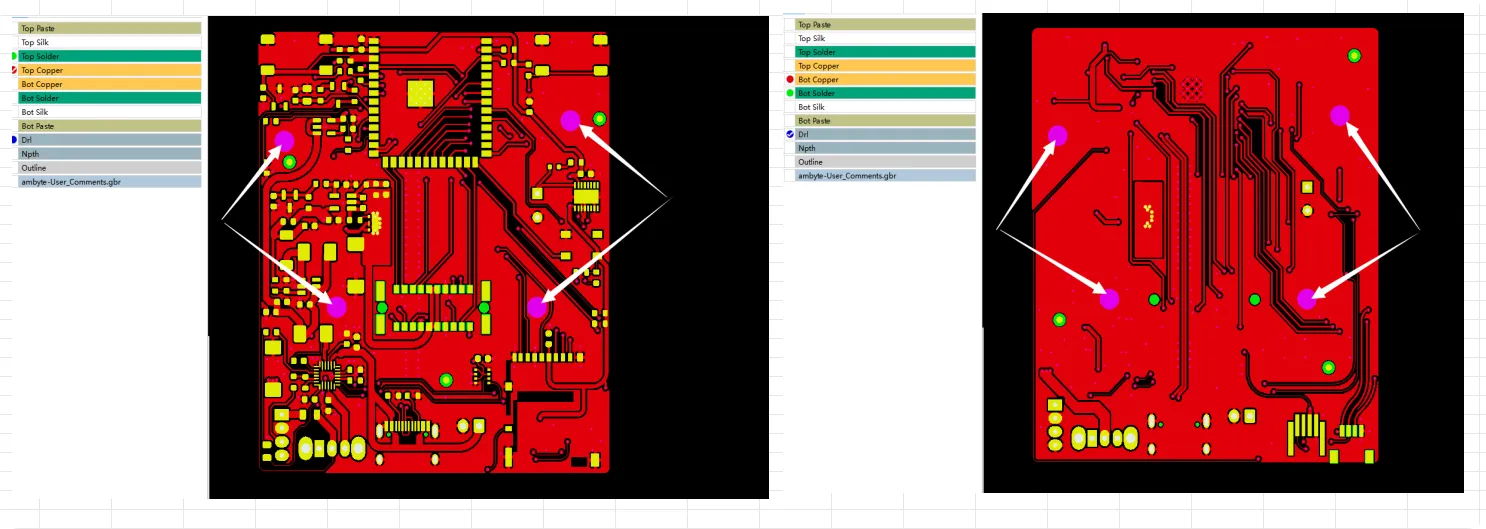
Figure 3: 3.1 mm PTH holes had no solder mask openings on top and bottom layers
We raised this EQ because large PTH holes are typically used for connectors, switches, or mechanical components that require clear, clean pads for reliable soldering and insertion. If left unaddressed, the mask could partially or completely cover the pads, leading to poor solderability, insufficient wetting, or even blocked holes that prevent component pins from inserting properly. In severe cases, this results in assembly line rework, cold solder joints, or complete board scrap after wave or hand soldering.
We recommended adding full solder mask openings (slightly larger than the copper pads) on both sides and asked the customer to confirm their preference. This adjustment ensures compatibility with standard assembly processes while maintaining good registration tolerance.
4. Panelization and V-CUT Clarifications
The customer-provided 3×2 panelization included several areas with duplicate or overlapping V-CUT lines, which required immediate clarification. Additionally, we reviewed the placement of silkscreen frames on the process edges, fiducial mark positions, tooling holes, and whether certain process edge features needed routing slots instead of V-CUT.
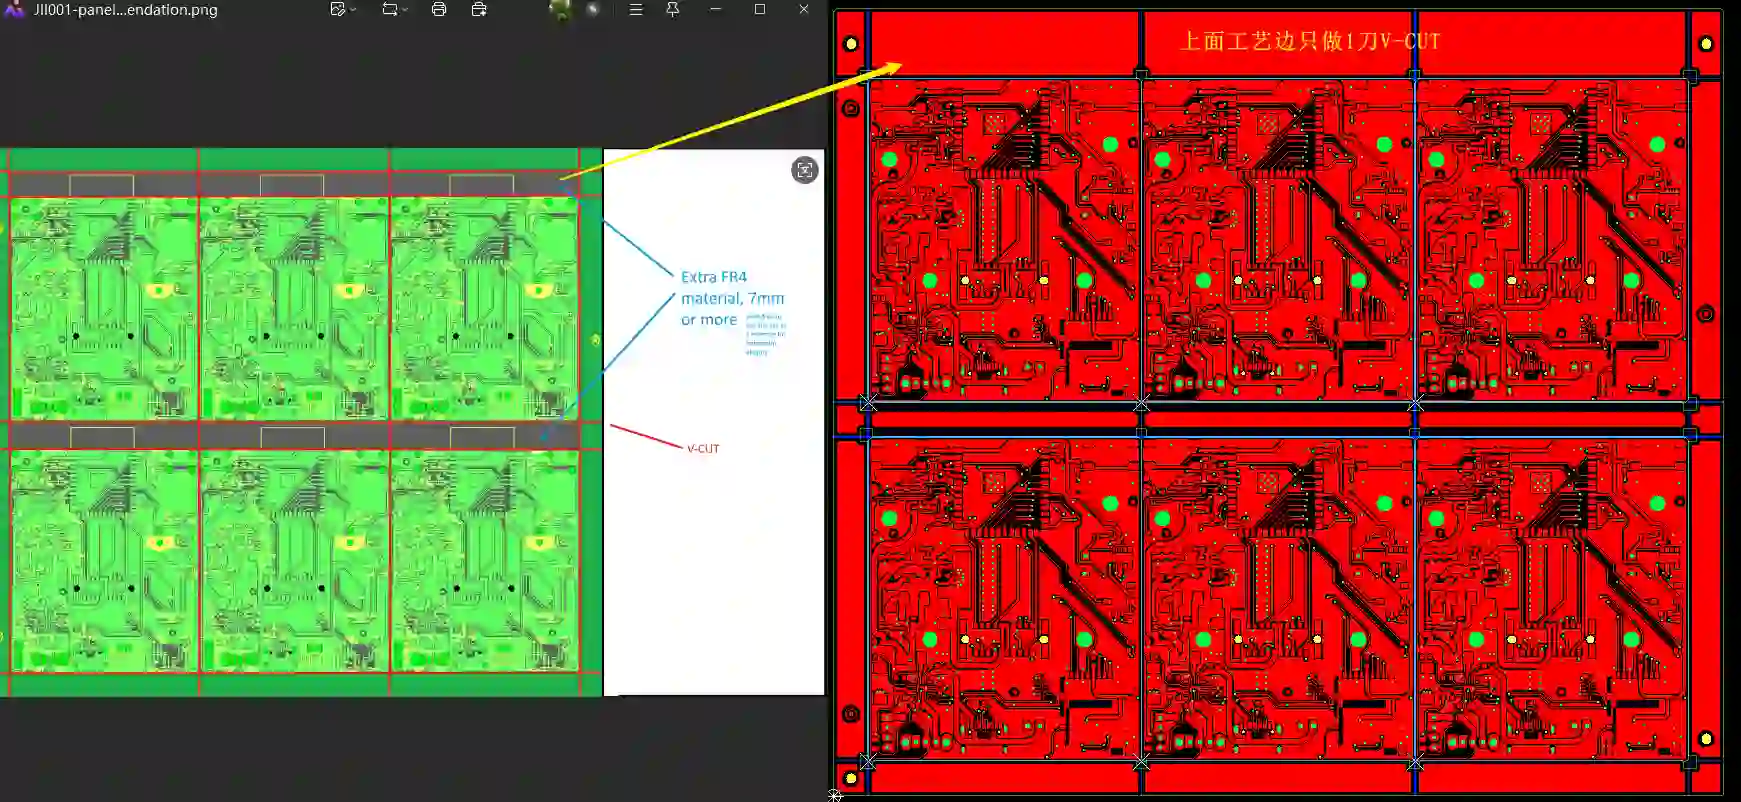
Figure 4: duplicate V-CUT lines
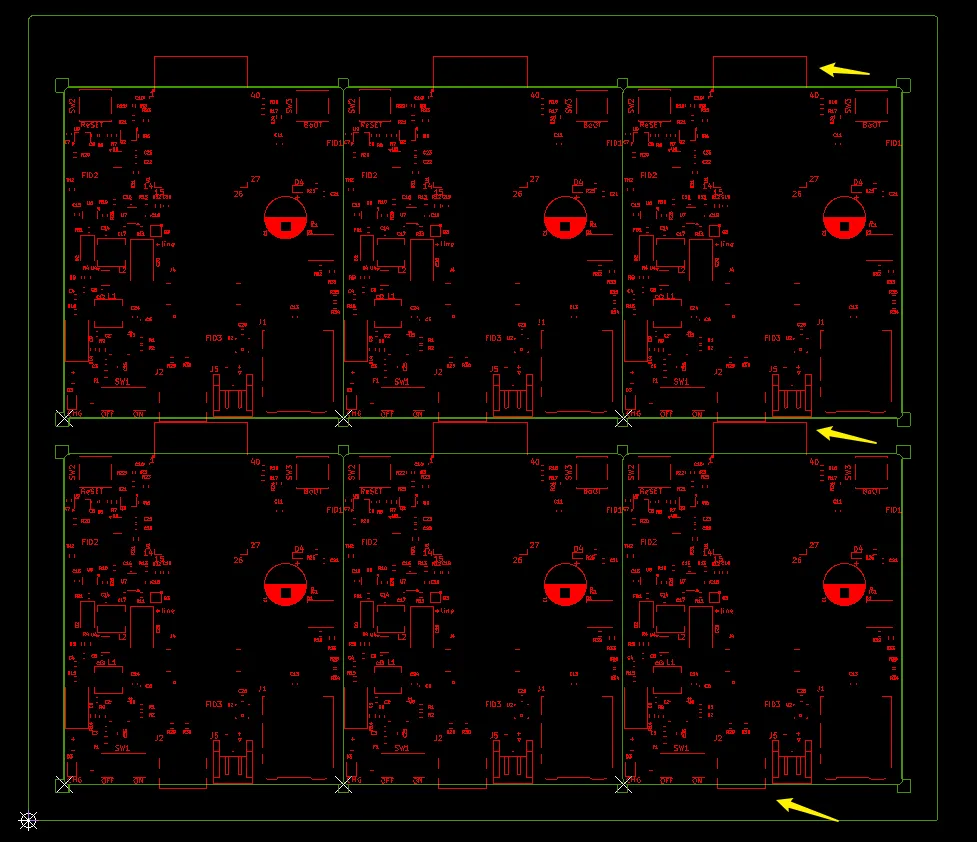
Figure 5: silkscreen frame placement on process edges
Our CAM team identified that duplicate V-CUT lines could cause panel instability during handling or premature separation during depanelization. We also confirmed the exact panel dimensions after a customer-requested adjustment (final panel size became 179 × 159.3 mm). Via solder mask treatment showed a mixed pattern of open and tented vias, which we verified against the original Gerber data to avoid inconsistency.
If these panelization details had been ignored, the panel could suffer from alignment issues, excessive burrs on V-CUT edges, or damaged circuits near the cuts. Proper fiducial and tooling hole placement is essential for accurate drilling and routing registration on multi-up panels. We prepared annotated drawings showing the proposed optimizations and received customer approval before finalizing the production data. This step significantly reduced the risk of mechanical defects and improved overall panel handling efficiency.
Manufacturing Risks and DFM Insights for 2-Layer PCBs
This case highlights how even basic 2-layer designs can encounter problems when pad placement ignores manufacturing tolerances. Tight pad spacing and insufficient board edge clearance are two of the most common DFM violations we see, especially in customer-defined panelization. V-CUT positioning errors can also cause premature panel separation or excessive burrs.
Missing solder mask openings on large PTH holes frequently leads to assembly complications, while inconsistent legend placement risks readability or interference with soldering.
How the Engineering Team Resolved the PCB CAM Issues
Our team prepared annotated screenshots and revised production files showing proposed adjustments to pad-to-edge clearance, V-CUT lines, and process edge features. After customer confirmation on solder mask strategy, panel layout, and silkscreen placement, we finalized the manufacturing data. Panel dimensions were updated to 179 × 159.3 mm as requested, with optimized V-CUT configuration.
To reduce manufacturing risk, we ensured all fiducials and optical points were placed as suggested and confirmed the silkscreen border treatment.
Final Manufacturing Outcome After EQ Resolutions
All engineering questions were resolved through customer feedback. Production files were approved, DFM checks passed, and the order was successfully released for fabrication with optimized panelization and mask parameters.
Key Takeaways for PCB Designers
- Maintain adequate pad-to-pad and trace-to-pad spacing (minimum 7–8 mil recommended) to allow reliable solder mask bridges.
- Keep component pads at least 0.3–0.5 mm away from final board outlines to prevent edge exposed copper after routing or V-CUT.
- Always provide solder mask openings for PTH holes intended for through-hole components.
- Clearly define V-CUT lines in panelization — avoid duplicates and ensure proper spacing from active circuitry.
- Coordinate silkscreen placement carefully to avoid overlapping pads or extending into process areas unintentionally.
- Provide detailed panel drawings including fiducial, tooling hole, and process edge requirements early.
- Review Gerber data against actual manufacturing capabilities rather than pushing minimum design rules.
FAQ
Q1: Why is minimum solder mask bridge spacing important?
A1: Insufficient spacing prevents reliable mask formation, leading to solder shorts, exposed copper, or mask peeling during assembly and operation.
Q2: What happens if pads are too close to the board edge?
A2: Depanelization can damage pads or leave exposed copper on edges, causing shorts, corrosion, or cosmetic/electrical failures.
Q3: Should large PTH holes always have solder mask openings?
A3: Yes, especially for plugged components. Without openings, mask ink can flow into holes and onto pads, interfering with soldering and insertion.
Q4: Why check V-CUT lines multiple times in panelization?
A4: Duplicate or misplaced V-CUTs can cause premature board separation, panel instability, or damage to nearby circuitry during handling and depanelization.
Q5: How important is process edge and fiducial placement?
A5: Critical for accurate registration, automated assembly, and panel stability. Incorrect placement leads to misalignment or production delays.