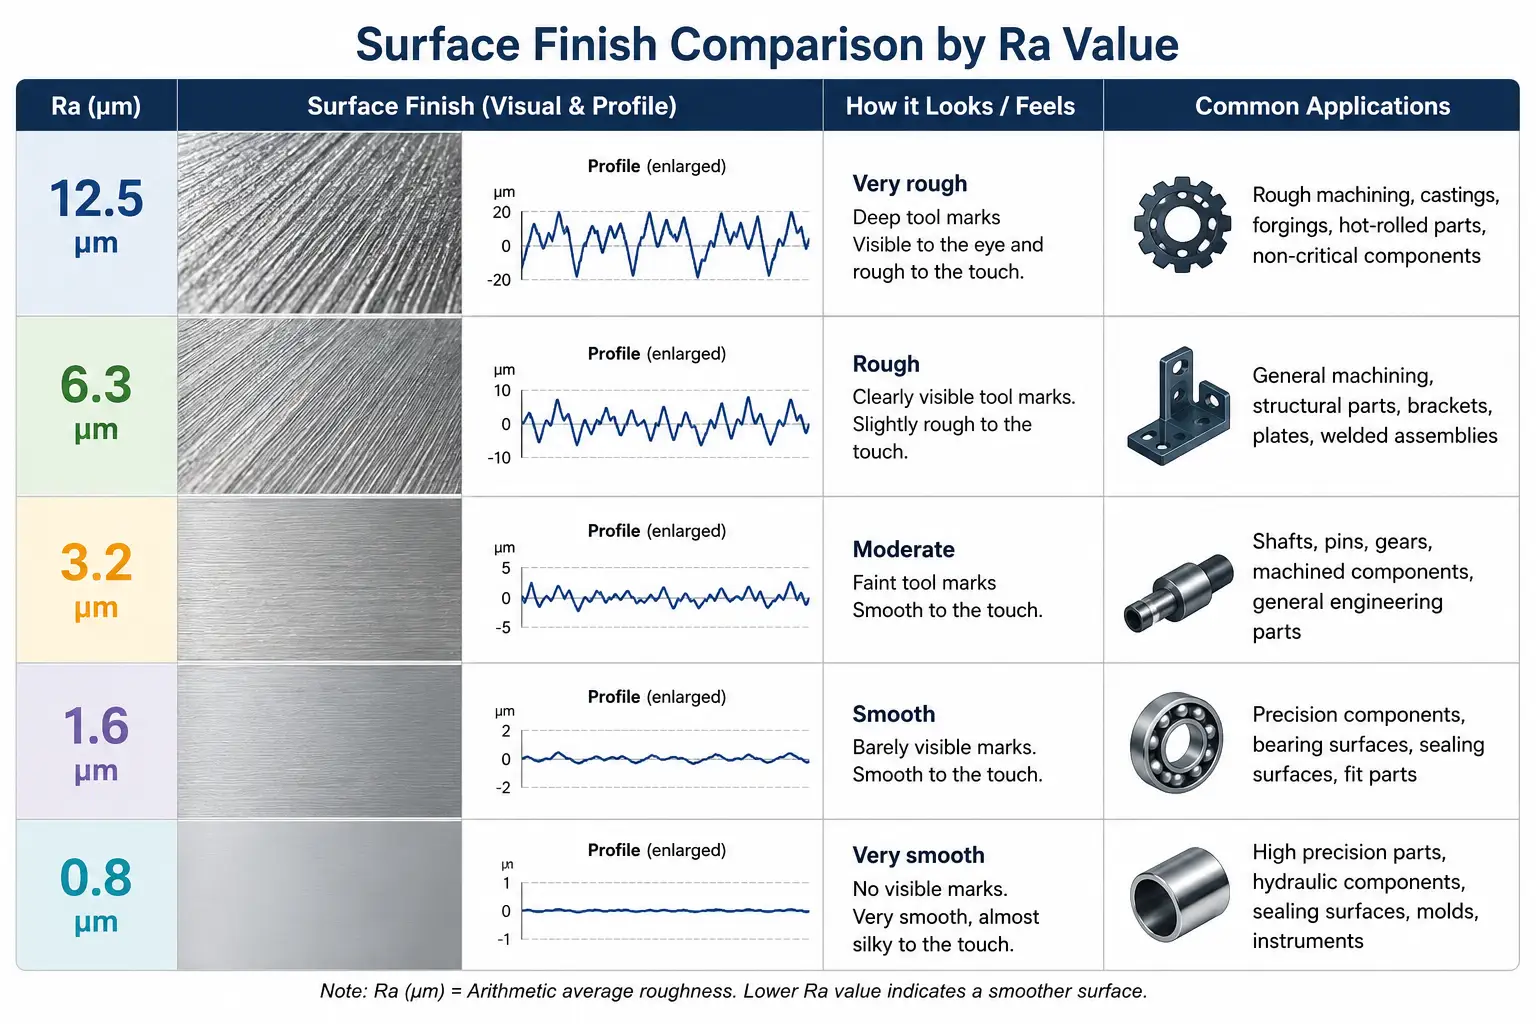
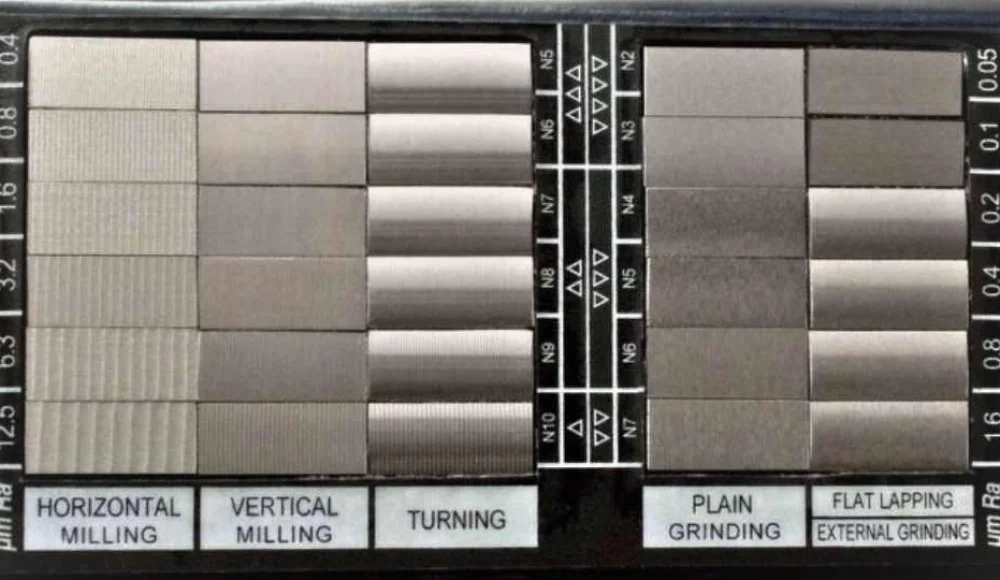
In production we default to as-machined for most aluminum and steel parts unless the drawing calls out something else. CAM programmers set tool paths to leave the specified Ra value, usually 1.6µm or better, and we run final passes with fresh cutters to control tool marks. When designers specify CNC surface finish options like anodizing, brushing, bead blasting, painting or laser marking, we adjust the entire process chain from raw stock to final inspection.

How As-Machined Finish Performs in Real Production Runs
Most factories deliver parts straight off the CNC without secondary operations when the drawing says ''as machined.'' This keeps cost and lead time low. What we typically see on the shop floor is visible feed lines and minor chatter marks depending on tool diameter, stepover, and spindle speed. For enclosure panels or brackets that will be hidden inside assemblies, this is usually acceptable. We measure surface roughness with a profilometer at first article and again at sampling intervals.
If the part needs tight flatness or will mate with another surface, we slow down the final pass and use smaller stepovers. Ignoring this requirement during programming leads to inconsistent contact areas later in assembly.
Why Bead Blasting Becomes the Default for Uniform Appearance
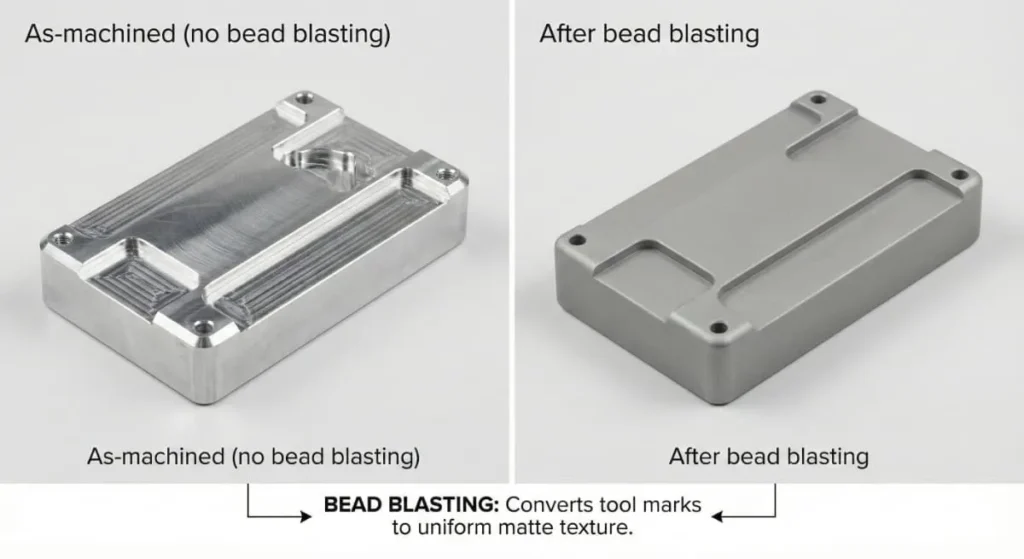
Bead blasting removes tool marks and creates a consistent matte texture across the entire part. In our shop we use glass beads at controlled pressure after machining but before any chemical treatment. This step is critical for parts that will receive anodizing because it evens out the surface and improves dye absorption.
Without blasting, anodizing color can look patchy where cutter paths were heavier. Production impact shows up as higher scrap rates when visual inspection rejects parts for uneven finish. We typically blast at 60-80 psi and check coverage with a loupe during setup.

Brushing Process and When Directional Texture Matters
Brushed finish is achieved by running the part under rotating abrasive belts or wheels after machining. This creates fine parallel lines that hide minor imperfections better than as-machined but still show directionality. Factories apply this mainly on visible faces of aluminum enclosures and faceplates.
The grain direction must be called out on the drawing otherwise operators align it with the longest edge by default. In high-volume runs, inconsistent brushing direction across a batch causes visual mismatch when parts are assembled. We control brush grit (usually 180-320) and feed speed to maintain repeatable Ra values around 0.4-0.8µm.
Anodizing Workflow and Thickness Control in Production
For aluminum parts we run sulfuric acid anodizing after surface preparation. Standard Type II builds 10-25µm oxide layer depending on color and wear requirements. Parts go through cleaning, etching, anodizing bath, dyeing if needed, and sealing. CNC surface finish options that include anodizing require the machinist to leave extra stock or mask critical dimensions because the coating grows outward.
What happens if this is ignored: threaded holes bind, press-fit tolerances shift, and flatness goes out of spec. Our CAM team adds process notes and we verify dimensions post-anodizing with calibrated gauges. Clear anodizing preserves the brushed or blasted look while hard anodizing (Type III) adds significant wear resistance but needs even more dimensional compensation.

Painting and Powder Coating Realities on CNC Parts
When drawings specify painting we usually recommend powder coating for durability on aluminum and steel. The surface must be blasted or chemically pretreated for adhesion. Wet painting is used for low-volume or special colors but shows orange peel more easily on machined surfaces. Masking is labor intensive so designers should avoid paint on threads and tight tolerance features.
In production we see adhesion failures when blasting is skipped or when parts retain machining oil. Thickness is controlled between 60-100µm for powder coat. Ignoring this leads to chipping during assembly or field use, especially on edges and corners that receive less coverage.
Laser Marking Integration After Surface Treatment
Laser marking is typically done after anodizing or painting because the oxide layer or coating provides contrast. On as-machined or brushed parts the marking can look shallow unless power and speed are dialed in. We use fiber lasers for metals and adjust parameters based on the exact finish — higher power for painted surfaces, lower for anodized.
Marking before anodizing risks poor readability after the bath. Production sequencing matters: machine → finish surface → treat → mark → final inspection. This avoids rework when serial numbers or logos become illegible.
Key Differences Between CNC Surface Finish Options in Practice
As-machined is fastest and cheapest but shows every tool path. Bead blasting unifies appearance and prepares for coating at moderate added cost. Brushing gives premium directional look suitable for visible panels. Anodizing adds corrosion protection and color while changing dimensions slightly. Painting offers widest color choice but requires careful masking. Laser marking provides permanent identification that survives most finishes.
- Cost order from lowest to highest: as-machined → bead blast → brushed → anodized → painted.
- Lead time impact: anodizing and painting add 2-5 days depending on color and batch size.
- Wear resistance: hard anodize and powder coat outperform brushed or blasted alone.
What Happens When Finish Selection Is Left Uncontrolled
Parts arrive with visible machining lines that collect dirt in service. Anodizing on unprepared surfaces shows streaks. Paint peels at edges. Laser marks fade or become unreadable. In worst cases entire batches get rejected at incoming inspection, causing shipment delays and extra freight costs. We see this most often when drawings simply say ''nice finish'' without specifics.
Factory Recommendations for Specifying CNC Surface Finish Options
Call out exact finish on each feature or face. For anodizing specify type, color, and thickness. For blasting note media size and final Ra target. Include masking requirements early. Our DFM review flags missing details and suggests compatible combinations — for example, bead blast plus clear anodize works well for most aluminum housings.
When high cosmetic demand exists we run sample parts through the full process before production release. This catches issues like color variation between batches or dimensional stack-up after coating.
Exceptions and When We Can Relax Requirements
For internal brackets or non-visible components we often accept as-machined even if drawing calls for blasting. Prototype runs sometimes skip anodizing to save time if corrosion is not an issue during testing. High-volume orders justify the extra steps because per-part cost drops. Tight tolerance parts may need post-finish machining on critical features after anodizing or painting.
Communicate priorities clearly — cosmetic, functional, or cost — and the production team will propose the practical solution that meets the real need.
Choosing the right CNC surface finish options early prevents most downstream problems and keeps parts moving smoothly through the factory.