










Building a Desk Buddy Pet Robot: From Prototype to Custom PCB
Key Moment
Project Background
In today's maker-driven electronics landscape, the demand for compact, personality-rich desk gadgets has never been higher. Engineers, hobbyists, and product designers increasingly seek devices that blend practical utility with emotional appeal—something that does more than display data and actually feels alive on a workspace. The Desk Buddy Pet Robot answers this need perfectly. Built around an ESP32-C3 SuperMini, a crisp OLED display, a TTP223 capacitive touch sensor, and a rechargeable LiPo battery, this tiny companion delivers animated eyes that blink and glance, live weather and temperature from the cloud, a world clock, and seamless mode switching—all inside a clean 3D-printed enclosure.
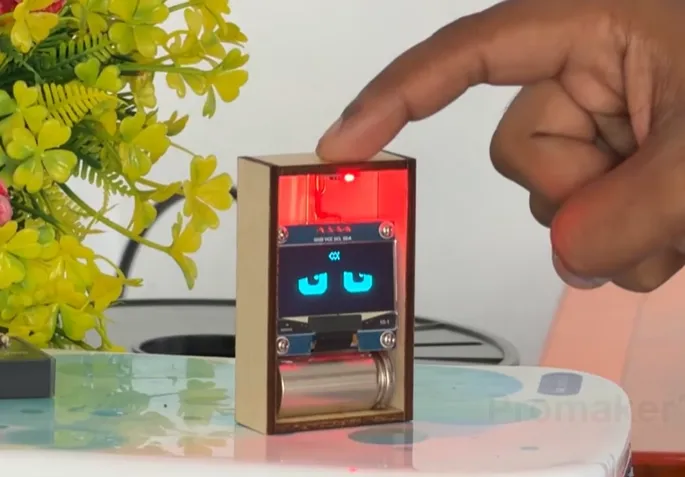
The creator, Pro maker 101, set out to move beyond a one-off breadboard experiment. The goal was a device that could sit permanently on any desk, maintain solid Wi-Fi connectivity for continuous weather updates, deliver crisp touch response day after day, and survive repeated handling without looking or feeling like a prototype. In a market flooded with temporary DIY builds that degrade after a few weeks of real use, achieving true everyday reliability requires far more than clever firmware. It demands professional-grade PCB design, careful material choices, and manufacturing support that anticipates real-world stresses. That is precisely where AIVON PCB's expertise in PCB prototyping, rapid PCB manufacturing, and free DFM analysis becomes the decisive factor that turns a charming idea into a product people keep on their desks for months and years.
What This Video Covers
This KOL video walks viewers through the complete journey of bringing the Desk Buddy Pet Robot to life. It begins with the core concept and component selection—ESP32-C3 SuperMini as the brain, OLED for expressive eyes and information displays, TTP223 for button-free interaction, and a compact LiPo for cordless freedom. The video then demonstrates software integration, including OpenWeatherMap API setup, smooth animation timing, and intuitive single-tap and long-press controls.
More importantly for professional makers and engineers, the content highlights the critical transition from hand-wired modules to a custom 2-layer PCB. Viewers see the practical impact of board thickness, surface finish, ground-plane strategy, and antenna keep-out zones on final performance. The video also showcases assembly inside the tight 3D-printed case, real-world testing of Wi-Fi stability and touch consistency, and the finished device operating as a polished everyday companion. Throughout, the narrative underscores how thoughtful PCB decisions and manufacturing partnership eliminate the reliability gaps that typically separate weekend projects from desk-ready products.
Project Highlights and Key Features
- Expressive OLED face with multiple eye animations that blink, look around, and respond to user interaction, giving the robot genuine personality.
- Single-tap cycling through useful modes: local time and date, current weather status and temperature, world clock, and cloud-connected updates.
- Long-press TTP223 capacitive touch control that instantly switches eye animation styles for a fresh personality on demand.
- ESP32-C3 SuperMini core delivering reliable Wi-Fi connectivity for live weather data while remaining compact and cost-effective.
- Rechargeable LiPo battery power for fully cordless, always-available desk use lasting days between charges.
- Clean, intentional 3D-printed enclosure that hides all electronics and presents a finished product aesthetic rather than a prototype look.
- Custom 2-layer FR-4 PCB (1.0 mm thickness, 1 oz copper, ENIG finish) engineered specifically for the tight enclosure, solid ground plane under the MCU, dedicated antenna keep-out zone, short I2C runs to the OLED, and optimized battery/charger placement to minimize noise.
- Production-ready DFM optimizations that ensure consistent assembly, high soldering yield on small pads, and long-term mechanical reliability under daily handling.
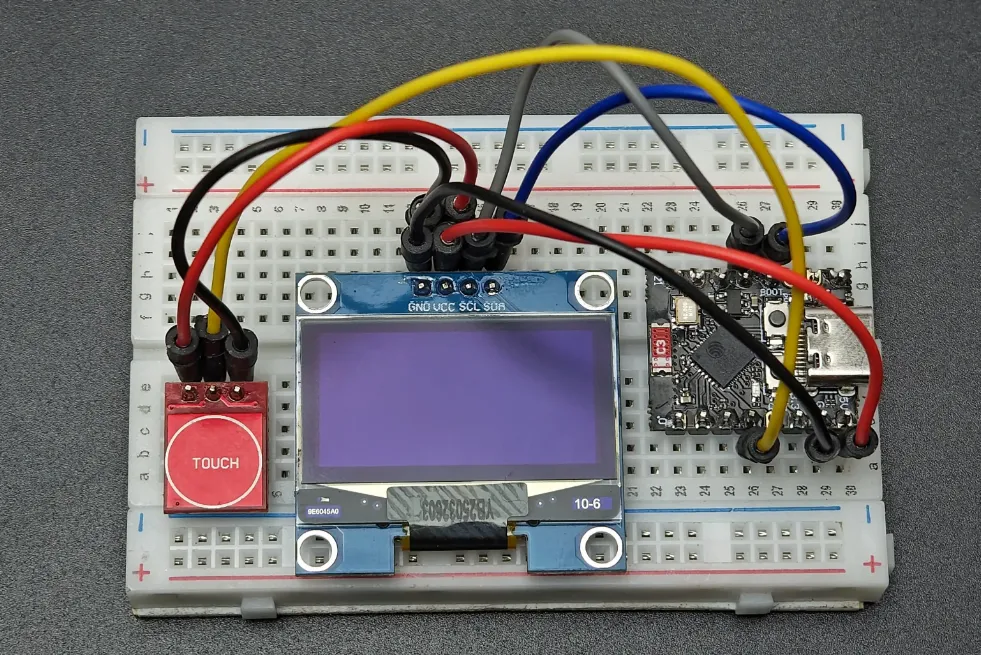
Challenges Encountered During Development
Compact battery-powered desk robots introduce a cluster of interconnected challenges that become apparent only when moving from the bench to a closed enclosure. Space constraints make traditional hand-wired modules and Dupont cables unreliable; loose connections and mechanical stress on OLED and touch-sensor leads quickly appear once the case is closed and the device is handled repeatedly.
Wi-Fi performance is especially sensitive. The ESP32-C3's onboard PCB antenna loses range dramatically if copper pours, the battery, or even plastic walls sit too close. Without a proper keep-out zone, weather updates become intermittent—exactly the opposite of the "always useful" experience the project aims for. Power integrity presents another risk: Wi-Fi transmit bursts create current spikes that can brown-out the MCU if ground returns are long or decoupling is inadequate. Charging circuitry must also be carefully isolated so noise does not couple into the I2C bus or the capacitive touch lines.
Finally, capacitive touch reliability itself can vary with board flex, enclosure material, and hand position. Achieving consistent response across multiple units is nearly impossible with point-to-point wiring; only a clean, repeatable PCB layout delivers the crisp, predictable interaction users expect. Timeline pressure and cost considerations further complicate the picture—makers often face the choice between shipping a fragile prototype or investing the time and budget needed for a manufacturable design. These are the exact pain points that professional PCB manufacturing and early DFM analysis are designed to eliminate.
How AIVON PCB Helps
AIVON PCB transformed the Desk Buddy from a promising but fragile prototype into a reliable, desk-ready product through a combination of fast-turn manufacturing, free expert DFM review, and production-oriented process control. When the creator submitted the schematic and early layout, AIVON's engineering team did not simply quote a board. They examined the actual use case: a battery-powered, always-on, Wi-Fi desk companion that must fit a tight 3D-printed shell and survive daily handling.
Key recommendations included moving to a 1.0 mm board thickness to keep overall stack height low, selecting ENIG surface finish for reliable soldering of small battery pads and OLED headers across many charge cycles, and implementing a continuous solid ground plane under the ESP32 combined with a clear 5–8 mm antenna keep-out zone. These changes immediately improved Wi-Fi stability and eliminated intermittent display flicker caused by noisy I2C runs.
AIVON's DFM checks also caught several subtle but critical issues before any boards were fabricated: pad sizes that were too aggressive for consistent soldering yield, via placement that would have created mechanical stress points, and connector orientations that would have made enclosure assembly awkward. All corrections were implemented in a single revision cycle. The boards arrived quickly, assembled cleanly, and delivered the smooth eye animations, reliable weather updates, and crisp touch response that define the finished product.
This is the quiet advantage of partnering with a capable PCB manufacturer: rapid PCB manufacturing, free engineering review, high-quality materials, and one-stop support that lets makers focus on creativity while the hardware foundation is made rock-solid. Whether the next project is another compact IoT gadget, a wearable, or a high-density HDI design, AIVON's combination of speed, expertise, and process discipline turns ambitious ideas into products that actually last.
Conclusion
The Desk Buddy Pet Robot proves that a fun, personality-driven concept can become a polished everyday companion when creative vision is paired with professional PCB design and manufacturing. By moving from hand-wired modules to a carefully engineered 2-layer board and leveraging AIVON's free DFM analysis, rapid prototyping, and reliable production, the creator crossed the critical line from "it works on the bench" to "it lives on real desks without babysitting."
FAQ
Q1: Why is a 2-layer PCB sufficient for an ESP32-C3 desk companion like the Desk Buddy Pet Robot?
A1: For low-speed signals (I2C OLED, GPIO touch, battery management), a well-designed 2-layer board with a solid ground pour under the MCU delivers excellent performance while keeping cost, thickness, and fabrication time low. Four-layer boards become necessary only with motors, high-speed interfaces, or extreme routing density.
Q2: How critical is the antenna keep-out zone on an ESP32-C3 SuperMini custom PCB?
A2: Extremely critical. Even a few millimeters of copper, battery, or dense ground under the antenna can severely degrade Wi-Fi range and reliability for cloud weather updates. Always maintain a clear 5–8 mm keep-out and validate signal strength on the first production run.
Q3: What surface finish is recommended for compact battery-powered projects with small pads?
A3: ENIG is the preferred choice. It provides flat, oxidation-resistant pads ideal for battery contacts and fine-pitch OLED headers, supports both hand soldering and reflow, and ensures long-term reliability through repeated charge cycles.
Q4: How can power-related brown-outs during Wi-Fi transmission be prevented on a compact PCB?
A4: Use a continuous solid ground plane, place 10 µF + 100 nF decoupling capacitors immediately adjacent to the ESP32 power pins, and keep battery return paths short and wide. These fundamental DFM practices eliminate most brown-out issues in battery-powered designs.
Q5: Is 1.0 mm board thickness a good choice for 3D-printed desk enclosures?
A5: Yes. The thinner profile reduces overall stack height so the PCB, battery, and OLED fit cleanly without stressing the case. Mechanical strength should still be verified against the final enclosure design and expected handling forces.
[0:00 – 1:52] [music] (Visuals only: robot eye animations, time/weather display, overall look, assembly close-ups. No voiceover)
[1:52] Build your PCB prototype with Aivon and get up to $60 in new user support. High precision PCB manufacturing, PCB assembly, fast turnaround, and free engineering review. New users can receive manufacturing and shipping credits on their first order. Simply create an account or log in, upload your Gerber files, select PCB color, quantity, thickness, size and other options, then place the order from the cart. After entering your shipping address and choosing the delivery method, complete the payment and wait for your PCB delivery. Check the description for more details.
[2:30] [music]
[2:50] Open the code file download link in the description and first install all the required libraries. After that, set up your home Wi-Fi SSID and password in the code, then enter your city and country code. Next, open openweathermap.org, log in to your account, click on the My API keys, and generate a new API key. Copy the generated API key and paste it into the code. Finally, select the ESP32-C3 board, choose the correct COM port, and click upload.
[3:23] [music] (Final product showcase with eye animations and music, occasional "Oh" sound effects)





