










Turning an ESP32-S3 into a USB Host Mini Computer with a Custom PCB
Key Moment
- 0:00 Introduction – ESP32-S3 as USB Host
- 0:51 Connecting USB Devices (Pins & OTG Adapter)
- 1:27 Installing USB Host Library
- 1:48 USB Mouse Demo
- 2:29 USB Keyboard Demo
- 2:57 Mouse + Keyboard Together
- 3:03 AIVON PCB Sponsorship
- 3:40 Using a USB Hub
- 4:26 USB Flash Drive Test
- 5:04 Demo OS (Calculator, File Explorer, Mini Game)
- 5:41 Outro & Ideas Request
Project Background
In the maker and embedded systems community, the ESP32-S3 has long been valued for its dual-core performance, Wi-Fi, and Bluetooth capabilities. Yet most projects still treat it primarily as a wireless microcontroller. TechTalkies set out to answer a more ambitious question: what if an ESP32-S3 could behave like a genuine mini computer?
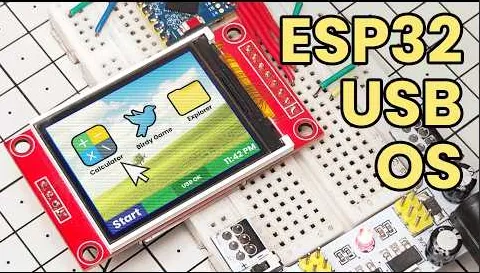
The project begins with an everyday ESP32-S3 Super Mini board, an ST7735 160×128 TFT display, a simple OTG adapter, a USB hub, a standard mouse, keyboard, and a USB flash drive. Using the EspUsbHost library together with Adafruit ST7735 and GFX libraries, the firmware enables full USB Host operation. A live mouse cursor appears and tracks smoothly across the tiny screen. Keyboard presses register in real time, complete with hexadecimal codes. A flash drive mounts, a Windows 95-style file explorer displays the root directory, and text files can be opened. Later iterations expand into a complete mini-OS featuring a file explorer, calculator, and even a playable bird game.
This is not another quick sensor or IoT demo. The goal is to prove that a mainstream microcontroller can host real USB peripherals, present a familiar desktop interface, and still remain approachable for makers. The hardware stays deliberately simple; the software does the heavy lifting. However, anyone who has moved from a working breadboard prototype to a finished product knows the critical next step: a clean, manufacturable AIVON custom PCB that can deliver the electrical performance the firmware promises under real-world conditions.
What This Video Covers
The video systematically demonstrates the ESP32-S3's native USB Host capabilities and the progressive build-up of a mini-computer experience:
- Live USB HID mouse support with a crisp, edge-clamped cursor on the ST7735 display and zero noticeable lag.
- Real-time USB HID keyboard input, including key-press detection and hexadecimal code display.
- Concurrent dual-device operation through a USB hub, proving the ESP32-S3 can enumerate and service multiple HID devices simultaneously.
- USB mass-storage class support: mounting a flash drive, browsing the root directory in a retro file explorer, and opening text files for preview.
- Expansion into a complete mini-OS environment that includes a file explorer, calculator application, and a simple but fully playable bird game—all running on the same compact board.
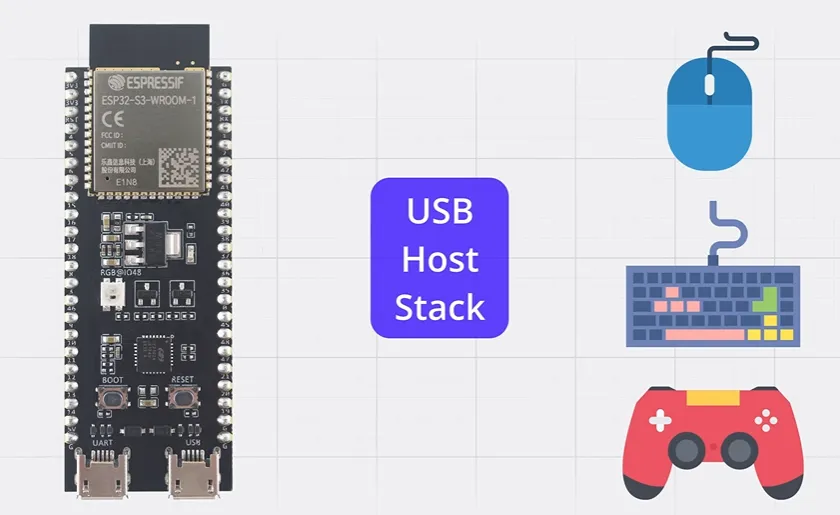
Throughout the demonstration, the creator emphasizes that USB Host functionality is available only through the native D+/D– pins (GPIO 19 and 20). The UART bridge port cannot be used. Proper 5 V power delivery to peripherals, clean SPI routing to the display, and overall system stability under simultaneous device loads become the decisive engineering factors.
Project Highlights and Key Features
- Native full-speed USB Host operation on the ESP32-S3 without any external PHY chip.
- Smooth, responsive mouse cursor and keyboard input that transform the microcontroller into a true input host.
- Simultaneous multi-device support via USB hub while maintaining real-time UI responsiveness.
- Functional mass-storage integration allowing folder browsing and file preview directly on the 160×128 display.
- Complete mini-OS layer with file explorer, calculator, and interactive game, proving the platform can host non-trivial application software.
- Careful attention to power integrity so that mouse, keyboard, and flash drive can all draw current without collapsing the 5 V rail.
- Intentional retro UI design that feels playful yet polished, reinforcing the "real computer" experience on tiny hardware.
These features succeed only when the underlying PCB respects controlled-impedance routing, continuous ground references, and adequate power distribution—precisely the areas where professional manufacturing elevates a clever demo into a dependable product.
Challenges Encountered During Development
Moving from a temporary Super Mini plus flying wires to a board that others can actually use introduces several real engineering frictions.
USB differential pairs (D+/D–) must be tightly coupled, length-matched, and referenced to a continuous ground plane. Any unnecessary vias, splits under the pair, or impedance deviations quickly produce intermittent enumeration failures. SPI lines feeding the ST7735 must stay short and well separated from the USB pair; otherwise display updates become noisy or laggy. The 5 V host rail must supply continuous current for multiple peripherals, demanding generous copper pours and local decoupling near the connector.
A subtle but instructive software-side issue appeared during mass-storage testing. The drive was correctly detected and the root directory displayed, yet subfolder contents remained empty. This classic partial success in early USB Host + MSC development is far harder to isolate and fix on a noisy or power-unstable breadboard setup.
Mechanical reliability also matters. Repeated plug/unplug cycles on USB connectors require proper support, and fine-pitch ESP32-S3 pads need correct solder-mask expansion and silkscreen clearance. Without disciplined DFM analysis, these small details accumulate into prototypes that work once on the bench and then become unreliable.
How AIVON PCB Helps
AIVON PCB treated the project as an engineering partnership rather than a simple fabrication order. The design moved to a four-layer stack-up that provided a solid, continuous ground plane under the critical USB differential pair. Controlled-impedance routing for the 90 Ω D+/D– lines was verified against the actual stack-up, not merely a calculator estimate. The pair was kept short, length-matched to within tight tolerances, and free of unnecessary vias; where a layer change was required, ground return vias were placed immediately adjacent.
Power distribution received equal attention. A dedicated 5 V rail with generous copper and multiple decoupling capacitors near the host connector ensured that a mouse, keyboard, and flash drive could all operate simultaneously without supply collapse. The SPI bus to the ST7735 was routed away from the USB pair and given its own clean return path, preserving sharp, lag-free UI updates.
DFM checks caught the details that routinely kill prototypes: silkscreen clearance around the USB connector, proper solder-mask expansion on the fine-pitch ESP32-S3 pads, accessible test points on D+/D– and 5 V for fast bring-up, and mechanical support features for the connectors. The finished board powered up correctly on the first attempt and remained stable when the hub, mouse, keyboard, and storage were all active together.
The result was more than a working prototype. Cursor tracking became smoother, device detection more consistent, and the mini-OS demos could be presented with confidence. What began as a clever Super Mini experiment became a board that felt product-ready—an outcome made possible by rapid PCB prototyping, expert DFM analysis, and manufacturing that treats the creator's vision with the same seriousness as a production design.
Conclusion & Call to Action
Watching an ESP32-S3 host a real mouse, keyboard, and flash drive while running a Windows 95-style desktop is pure maker joy. The project proves that ambitious ideas can live on surprisingly small hardware—provided the PCB underneath is engineered correctly.
The journey from Super Mini plus OTG adapter to a clean, reliable custom board is the step that decides whether a cool demonstration remains a one-off or becomes something others can build and enjoy. Respecting differential pair integrity, power delivery, and signal separation, then partnering with a manufacturer that performs thorough DFM analysis, turns a working demo into a shareable, production-ready design.
If your next ESP32 or microcontroller project needs to host real USB peripherals, drive a sharp display, or simply leave the breadboard behind, the same path is open. Design carefully, verify impedance and power, and let professional PCB manufacturing elevate the result.
Ready to move your idea from prototype to reliable board? Request a free DFM analysis or start your rapid PCB prototyping project with AIVON PCB today. Upload your design, receive an instant quote, and experience manufacturing that treats every prototype as seriously as the creator does.
FAQ
Q1: Does the ESP32-S3 support full USB Host without an external PHY chip?
A1: Yes. The ESP32-S3 includes a native USB OTG peripheral. Use the dedicated D+/D– pins (typically GPIO 19 and 20) and supply proper 5 V power to the devices. No external PHY is required for full-speed Host operation.
Q2: Why is controlled 90 Ω differential impedance critical on an ESP32-S3 USB Host PCB?
A2: Even full-speed USB can fail to enumerate or drop packets if the D+/D– pair is poorly matched or lacks a continuous ground reference. Achieving the correct impedance on a custom PCB costs almost nothing; debugging intermittent detection later costs significant time.
Q3: Can a USB mouse, keyboard, and flash drive be powered directly from the ESP32-S3 board?
A3: Yes, provided the 5 V rail and its regulator can deliver the combined current. Design the power path with adequate copper width and place local decoupling capacitors near the host connector to maintain stability.
Q4: What is the most common DFM mistake in ESP32-S3 USB Host designs?
A4: Routing the native USB pins through long, unmatched, or poorly referenced traces, or mistakenly using the UART USB port. The second most frequent error is failing to provide a robust 5 V supply capable of powering the peripherals.
Q5: Is a 2-layer board sufficient for an ESP32-S3 USB Host + TFT project?
A5: It can work for very short runs and light loads, but a 4-layer board with a continuous ground plane under the USB pair and SPI bus dramatically improves signal integrity and reliability while remaining cost-effective at prototype quantities.
Did you know that you could connect USB devices to your ESP32S3 boards like the mouse I am using here to control the cursor?
Yes, ESP32S3 boards have a built-in USB host support which support a variety of devices like mouse, keyboard, gamepads, and even USB flash drives which allows me to do something like this.
This is a very small operating system that I made for the ESP32. It is not a full operating system, but it supports a few USB devices and has some apps for demonstration.
But what kind of devices will it support? Watch till the end to find out.
ESP32S3 boards support the USB interface on pins 19 and 20. If your board has these pins exposed, you can connect a USB connector like this directly to these pins.
But most boards do not expose these pins. Instead, they are routed to the USB port on the board. This actually make things easier for us.
Now, all we need is an OTG adapter. And we can plug any USB device directly.
I am using an ESP32S3 Super Mini for this video.
Now, I'm going to test USB devices one by one. And first we need the USB host library. The GitHub link is in the description. Download the repo and in the Arduino IDE install the library manually. The example programs that I'm using here are on the techies GitHub page if you need them.
First is the mouse test. Upload the mouse test program and I've connected a TFT display to the ESP32. Also, I'm connecting an external 5V power supply because we are using the USB port for the devices.
Plug in the mouse, it gets detected and we can move it. And it even records the clicks with left and right clicks shown in different colors.
Now that our mouse is working, I want to test a keyboard. So upload the keyboard program, connect the keyboard, and I should be able to type now. And I can even see the hex code of the pressed keys here.
Next, let's check if we can use both the keyboard and the mouse at the same time.
And before that, a quick shout out to this video sponsor, Aivon. Aivon provides a structured solution for prototyping and production. For new users, the platform includes up to $60 in welcome credits along with a free engineering review. This includes $30 in manufacturing credit, $30 for shipping, and the free engineering review itself. With this, you can do a lot of things like PCB prototyping, making PCBA orders, or even engineering driven jobs. You simply have to sign up and verify your account. And you can start uploading your design and start placing orders.
And to connect the mouse and keyboard together to the ESP32, I'll be using this USB hub. Mine has a USBC connector, so I don't need the adapter anymore.
I have connected both the devices to the hub and connected the hub to the ESP32. Now we can use the keyboard and mouse simultaneously. I am actually surprised how there is no lag even with the two devices working at the same time.
Let's see if we can push this a little further. So, I'm going to test out a USB flash drive.
Upload the example code for it. And I already have the mouse connected to the hub. And when I connect a flash drive, it should be detected automatically.
It is detected. And we can see the folders. I was able to read the root contents of the drive, but for some reason the contents of the folder would not show up at all. I have tried everything. Let me know in the comments if you know how to fix this.
But we have the proof of concept. We are able to detect USB flash drives and browse them.
And finally, I have made this demo operating system to show you guys the possibilities of this amazing feature. It is not a full operating system but technically we can have a mouse, a keyboard and a storage device which already brings a lot of possibilities.
There is a calculator, a file explorer which is currently under development but technically if you have an SD card connected with the SD card module you should be able to explore the files and even a mini bird game.
Let me know your thoughts on this feature and how we can use this and comment some ideas for the operating system and see you in the next one.
Keep making.





