










ESP32 1D LED Game Console: From Breadboard to Reliable Handheld
Key Moment
Project Background
In the maker community, few projects capture pure creative energy quite like transforming everyday components into something unexpectedly delightful. Tech Talkies did exactly that in their popular video "I Turned an LED Strip into a Game Console." Starting with a simple 60-LED WS2812B strip, an ESP32-C3 Super Mini, a compact ST7735 TFT, four push buttons, and a passive buzzer, the creator built a fully playable handheld that reimagines classic games in one dimension.
The market for compact, educational, and entertaining electronics projects continues to grow. Engineers, hobbyists, and product developers increasingly seek self-contained devices that demonstrate clever interaction without relying on traditional rectangular displays. Customers need solutions that move beyond fragile breadboard prototypes into sturdy, enclosure-ready hardware capable of sustained play sessions. Voltage stability under heavy LED loads, clean signal integrity for SPI displays, reliable button response inside closed cases, and manufacturable designs that support small batches or kits are all practical requirements.
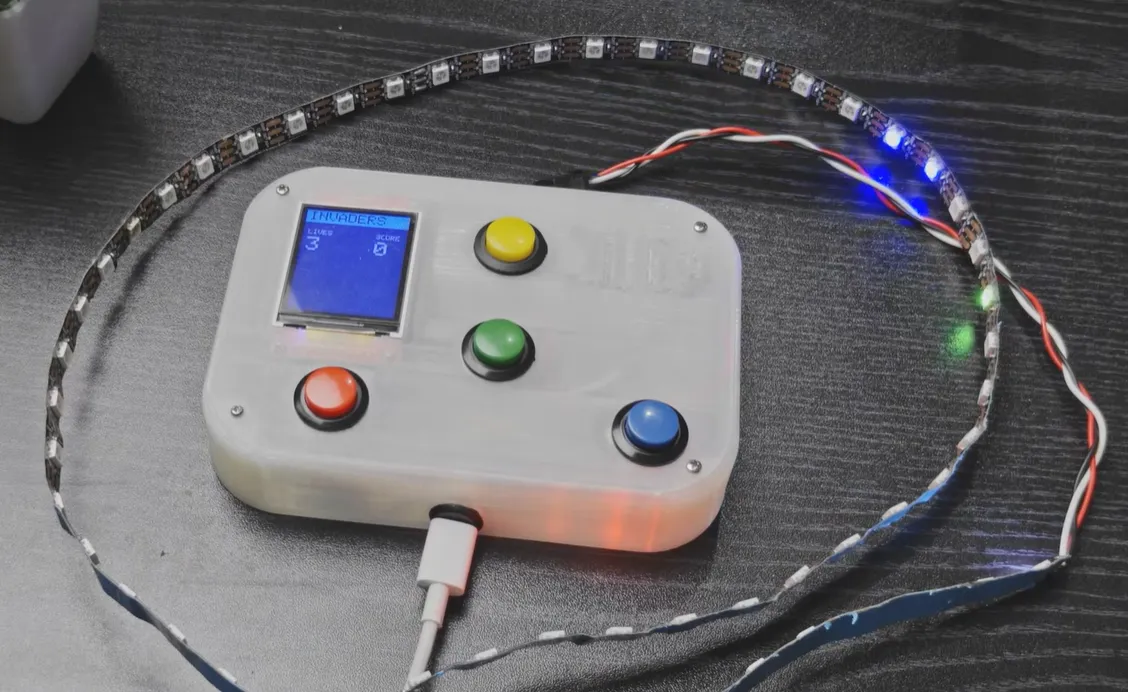
This project sits at the intersection of playful innovation and serious PCB engineering. The finished console features six one-dimensional games—Space Invaders-style shooting, Chrome-dino-inspired running, two-player Pong, memory sequences, pure reaction timing, and Tug of War—running on a translucent 3D-printed case that lets the glowing LED strip shine through. Power arrives via USB-C, menus and scores appear on the flicker-free TFT, and retro sound effects complete the experience. The original video and the detailed engineering write-up together show how thoughtful PCB design turns a fun idea into a reliable device.
What This Video Covers
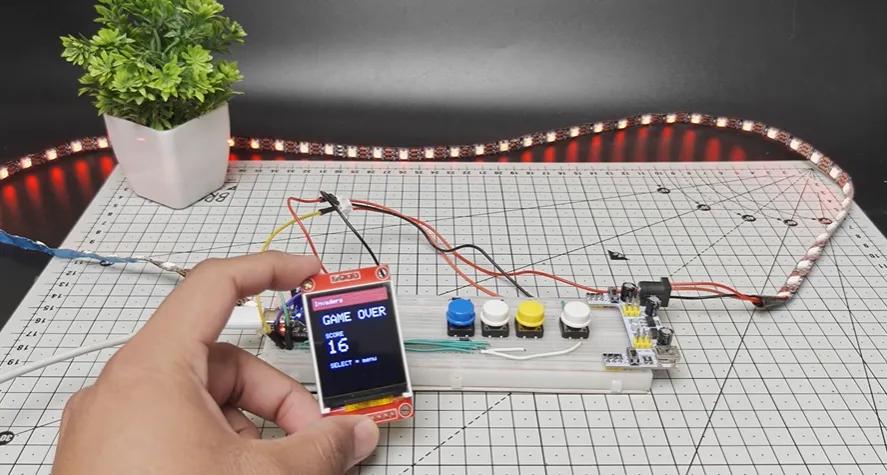
The video walks through the complete journey from concept to finished handheld. It begins with the core inspiration: proving that engaging gameplay does not require a conventional screen. Viewers see the breadboard prototype, the clean pin mapping (TFT on SPI, buttons on GPIOs 9/20/21/10, LED data on GPIO 7, buzzer on GPIO 8), and the deliberate software choices—one Arduino sketch, FastLED library, Adafruit GFX with off-screen GFXcanvas16 framebuffer for smooth, tear-free menu and score updates.
Gameplay demonstrations highlight how each title adapts classic mechanics to a linear LED strip. Space Invaders becomes a linear battlefield of ships and colored shots. Runner delivers obstacle-dodging energy. Pong turns into a two-player reaction duel. Memory tests sequence recall. Reaction rewards pure timing. Tug of War lets two players mash buttons to push a shared color zone. Instant reset from any game back to the menu keeps the experience playful.
The video also covers the transition from jumper-wire prototype to a custom production-intent board housed inside the 3D-printed enclosure, emphasizing mechanical fit, power delivery, and signal integrity. Hardware list, wiring decisions, and the practical results of moving to a professional PCB are all shown, giving engineers a clear view of both the creative and the manufacturing sides of the project.
Project Highlights and Key Features
- Compact, self-contained handheld built around a 60-LED WS2812B strip as the primary gameplay surface and an ST7735 SPI TFT for menus, game names, scores, and lives.
- Six fully playable one-dimensional games that feel fresh because of the linear constraint.
- ESP32-C3 Super Mini running a single, beginner-friendly Arduino sketch with FastLED and double-buffered TFT rendering for flicker-free updates.
- Satisfying physical interface: four 16 mm colored push buttons, passive buzzer for retro sound effects, and clean USB-C panel-mount power.
- Thoughtful 4-layer PCB design featuring continuous ground plane under SPI and LED data lines, generous 5 V copper pours, bulk and local decoupling, series resistor on the WS2812 data line, and ENIG surface finish.
- Mechanical reliability inside a closed translucent PLA case, with proper pad sizing, mounting holes matched to the printed enclosure, and thermal considerations for extended play.
- Open-source firmware and documented pin mapping that invite others to recreate or extend the design.
- Instant game reset and smooth menu transitions that keep the experience fun rather than frustrating.
Challenges Encountered During Development
Moving from a working breadboard to a permanent, enclosure-ready console surfaces several classic pitfalls. Power delivery is the most immediate concern. Sixty WS2812B LEDs can draw 3–3.6 A at full white. Thin traces or long jumper wires cause voltage drop, color shift toward the far end of the strip, and occasional ESP32-C3 resets.
Logic-level compatibility between the 3.3 V ESP32-C3 outputs and the 5 V expectations of many WS2812 strips creates intermittent data glitches, especially with temperature changes or slightly longer cables. SPI noise on the TFT appears when traces are long or routed near high-current LED paths, producing occasional artifacts even with double buffering.
Mechanical and thermal realities inside a closed case add further constraints. Buttons that feel perfect on a breadboard can bounce or fatigue once mounted. Heat from the LEDs and microcontroller has limited escape paths if copper is undersized. Fine-pitch ESP32-C3 pads, USB-C connector clearance, and soldermask expansion all require careful attention if the board is to solder cleanly and survive repeated handling.
None of these issues are insurmountable, but each becomes more pronounced the moment the project leaves the prototype stage and aims for reliability across dozens of play sessions or potential small-batch production.
How AIVON PCB Helps
AIVON PCB treated the board as an engineering conversation rather than a simple Gerber upload. Early DFM review caught copper balance around the dense ESP32-C3 area, adequate clearance for the USB-C connector, and proper soldermask expansion for fine-pitch pads. The four-layer stack-up delivered a continuous ground plane under both the SPI bus and the LED data line, directly improving signal integrity and eliminating the noise seen on the breadboard version.
Material and copper choices remained practical: standard FR-4 with Tg 150 °C, 1.6 mm thickness, 1 oz outer / 0.5 oz inner copper, and ENIG finish. These selections handled LED current peaks cleanly while providing reliable joints for connectors that see repeated use. Engineering support refined via placement and decoupling locations so the board stayed quiet even when the strip updated at full speed and the TFT refreshed scores.
The practical results were immediate. Assembly simplified dramatically—no more fragile jumper nests inside the case. Voltage remained stable under full-white loads. Random resets disappeared. The consistent, production-ready board opened the door to small batches or kits. Instant quoting and responsive engineering removed the usual friction of moving from a one-off prototype to something manufacturable. AIVON's combination of expert DFM analysis, rapid PCB prototyping capability, and one-stop manufacturing support turned the playful concept into a device that works every time.
Conclusion
Tech Talkies began with a simple, delightful question: what if an LED strip could become a game console? Through clever one-dimensional game design, careful hardware selection, and a solid custom PCB, that question became a fully playable handheld that still makes people smile when the lights start racing.
The journey from breadboard to reliable device is the path most ambitious maker and professional projects follow. The creative spark belongs to the designer. The manufacturing partner who removes electrical and mechanical obstacles is what allows the idea to shine without constant babysitting.
Whether you are building your own 1D LED console, scaling a similar interactive product, or developing the next compact electronics project, professional PCB support makes the difference.
PCB-Related FAQ
Q1: Do I really need a level shifter between the ESP32-C3 and WS2812B LEDs?
A1: Many strips work at 3.3 V with short wires, but reliability varies by LED batch, cable length, and temperature. A series resistor (220–470 Ω) placed close to the first LED is the minimum reliable approach; a proper level shifter or first-pixel power at 3.3 V provides the most consistent results for production boards.
Q2: How much current should I plan for a 60-LED WS2812B strip on a custom PCB?
A2: At full white, budget approximately 3–3.6 A. Size the 5 V supply, PCB copper pours (≥ 2 A continuous), and power-injection points accordingly. Always place bulk capacitance near the LED connector and inject power at both ends of longer runs to prevent voltage drop and color shift.
Q3: Is a 4-layer board necessary for an ESP32-C3 LED game console?
A3: A careful 2-layer design can function, but a 4-layer stack-up with a continuous ground plane under SPI and LED data lines significantly improves signal integrity and noise immunity. The modest cost difference is usually justified for compact handhelds that must remain reliable during extended play.
Q4: What surface finish works best for boards with USB-C connectors and frequently pressed buttons?
A4: ENIG offers the best balance of solderability for fine-pitch parts, long-term joint reliability under repeated handling, and reasonable cost for prototypes and small production runs.
Q5: What is the single biggest DFM mistake people make on LED-strip controller boards?
A5: Under-sizing the 5 V power copper and omitting bulk capacitance near the LED connector. Once the rail collapses under load, color shift, resets, and intermittent failures follow. Proper copper width, power injection, and decoupling solve the majority of field issues before they appear.
Hello makers. I made this game console, but it doesn't play 3D games. It doesn't even play 2D games. It plays 1D games. Yes, you heard me right, 1D. And we do this using this LED strip.
This is one of the games. The enemy pixels spawn at the top and you have to send the same colored pixels to cancel them out. Sending a wrong pixel will cost you a life. And you can see the lives left and the score on the display.
If you want to build this console yourself, let me show you how.
We'll be using an ESP32C3 Super Mini, a TFT screen, 16 mm push buttons. You'll need four of these. I am using red, green, and blue to correspond to the game colors. The color of the fourth one doesn't matter. A small buzzer and a WS2812 RGB LED strip. This one has 60 LEDs, but you can use different lengths and change it in the code. And I've soldered a three pin JST connector at the end and pair it with the male connector on the console. A type-C panel mount for power. And this 3D printed enclosure, I've printed it in translucent PLA to give it this retro look.
I've made all the connections on a breadboard to check if everything works correctly. Everything works. So, we can move this project into the 3D printed enclosure.
Let's upload the code before making the connections. Code link is in the description. Open the code in Arduino IDE and upload it. You don't need to change anything unless you are using different modules or want to change the pin numbers.
And if you need a custom PCB for a project, Aivon is a one-stop PCB manufacturing and assembly service. So you can go from design to fully assembled board without juggling multiple vendors. Ordering is also pretty straightforward. You can go to their website, upload your Gerber files, select your board specs like thickness, layers, and quantity, and you'll get an instant quote. From there, you can place your order, track the progress online, and they handle the rest, including fabrication, and even assembly if needed. They support everything from quick prototypes to full production runs. If you want to try it out, I have left the links in the description. Go check them out.
You can use the red and green buttons to navigate the menu and the blue button to select. And the yellow button is used to reset the console.
Let me show you all the games.
The first one is the pixel game that we saw at the beginning of the video.
The next one is a runner game. It's like the dino game you see on your browser when there is no internet. You have to press to jump when there is an obstacle.
The next one is a pong game. This is a two-player game. Each player has to press their corresponding colored button right at the exact moment when the ball is about to hit their paddle.
The next one is a memory game. You have to press the colored buttons in the same sequence that the LEDs are flashing.
The next one is my favorite. It's a two-player tug of war game. You have to keep pressing the buttons on each side. And the goal is to have the other color completely out of the LED strip.
The code is completely open source. You can add more games to the firmware if you like.
And like the video if you like the console and subscribe to see more open-source projects like these.
Until then, keep making.





