










Offline Voice ESP32 PCB: From Demo to Production-Ready Board with AIVON
Key Moment
- 0:00 Demo – Offline Voice Commands
- 0:32 Introduction to TT Voice Studio
- 1:03 Hardware Requirements (ESP32-S3 + Mic)
- 1:26 Flashing the Firmware
- 1:49 Connecting to Web Interface
- 2:11 Setting Microphone Pins
- 2:47 AIVON PCB Sponsorship
- 3:22 Adding LED Control Commands
- 4:42 Controlling Onboard RGB LED
- 5:41 Controlling RGB LED Ring
- 6:55 Adding Servo Control
- 7:36 Relay / Home Appliance Control
- 7:54 Summary & Outro
Project Background
Makers and electronics engineers have long wanted reliable offline voice control for robots, smart-home devices, interactive props, and installations. Most solutions force users into coding, model training, or constant cloud dependence. Tech Talkies created TT Voice Studio to remove those barriers: an ESP32-S3 firmware that understands custom spoken commands completely offline, configured through a simple browser interface, and able to drive LEDs, RGB rings, servos, buzzers, or relays—without writing a single line of code.
After flashing the firmware, the board creates its own Wi-Fi access point. Users connect from a phone, open the web page at 192.168.4.1, set microphone pins once, and assign any voice phrase to a GPIO action. Commands are stored permanently and survive power cycles. The system uses an INMP441 MEMS microphone for clean digital I2S audio and keeps everything local and private after initial setup.
A development board proves the concept. Turning that concept into a dependable product that behaves the same every time it powers up requires thoughtful hardware design and manufacturing. That is where professional PCB support becomes essential.
What This Video Covers
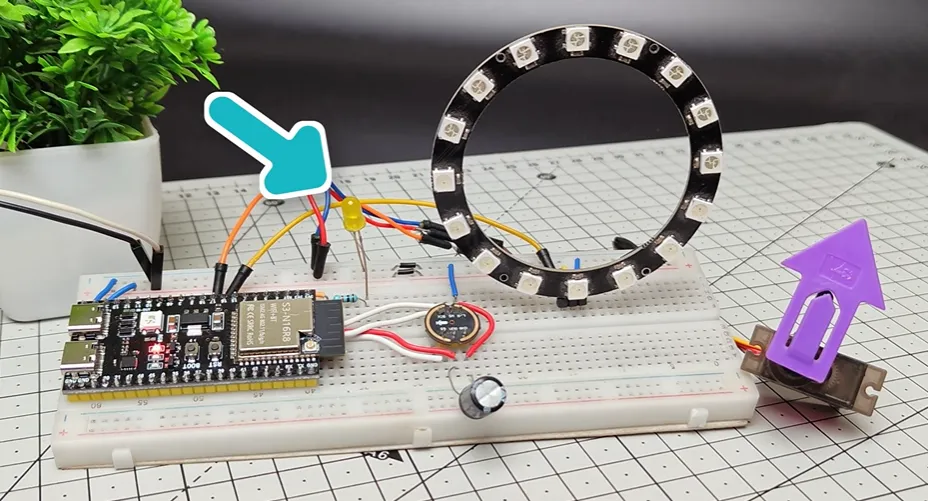
This video walks through the complete TT Voice Studio experience. It begins with the board already listening, demonstrates clear wake-word activation, and shows spoken phrases controlling lights, RGB colors, servo positions, and relays—all without any cloud round-trip or API keys. Viewers see the convenient web flasher, the clean browser configuration interface, practical hardware connections for the INMP441 microphone, external loads, and power considerations. The focus stays on the zero-code workflow and true offline operation that makes the project immediately useful for real applications.
Project Highlights and Key Features
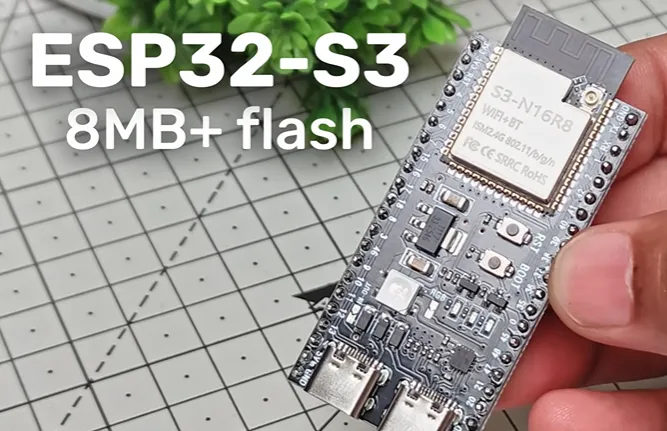
- Fully offline speech recognition on ESP32-S3 with at least 8 MB flash—no internet required after setup
- Browser-based configuration: flash once, connect to the temporary access point, assign any voice phrase to GPIO actions
- Support for digital on/off, RGB color control, servo angle positioning, buzzer tones, and relay switching
- Permanent command storage that survives power cycles
- Practical microphone path using INMP441 digital MEMS with I2S interface
- Clear separation of power domains so inductive loads do not disturb the 3.3 V rail feeding the MCU and microphone
- Fast, friendly interface that lets non-programmers create working voice-controlled devices in minutes
- Ready foundation for smart-home gadgets, robots, props, and interactive installations
Challenges Encountered During Development
Moving from a working development-board demo to a consistent, manufacturable custom PCB introduces several predictable technical and production challenges. Microphone signal integrity is usually the first issue. Long jumper wires act as antennas and pick up digital noise from the ESP32 and switching loads, reducing recognition accuracy and increasing false triggers. I2S traces must stay short (under 30 mm), length-matched (difference under 5 mm), and routed over a continuous ground plane.
Power distribution is another frequent source of trouble. Driving LEDs, servos, and relays from the same rail that feeds the MCU can create voltage dips that reset the chip or briefly corrupt the speech model. Separate 3.3 V and 5 V domains, local decoupling, solid ground pours, and flyback diodes across inductive loads are required.
GPIO flexibility, while powerful, creates layout risks. The web interface allows almost any free pin to be assigned, so the PCB needs clear silkscreen labeling, robust headers, adequate spacing, and test points. Permanent command storage also demands that the finished board survive power cycles and occasional ESD events without losing configuration. Acoustic hole alignment under the INMP441 port, proper antenna keep-out zones, and consistent solder-paste volume further affect both performance and yield in small-batch production. These issues are exactly what a thorough DFM review is designed to catch early.
How AIVON PCB Helps
AIVON approaches projects like TT Voice Studio with a free engineering review focused on the exact pain points of offline voice boards: I2S routing, microphone land pattern including the acoustic hole, decoupling placement within a few millimeters of the INMP441 VDD pin, and clean power-domain separation. The recommended 4-layer stackup provides a continuous ground plane under the audio section, measurably improving signal-to-noise ratio for consistent wake-word and command accuracy.
Material and finish choices remain practical. Standard FR-4 with Tg 135–150 °C keeps cost reasonable while surviving reflow and everyday temperature swings. ENIG surface finish delivers reliable soldering on the fine-pitch ESP32-S3 pads and withstands multiple rework cycles. Impedance control at 50 Ω on the critical I2S clock lines keeps edge rates clean so digital microphone data arrives without errors. Manufacturing precision handles the small but critical details—via placement that does not slice the ground plane under the mic, consistent solder-paste volume so every board behaves the same, and clear silkscreen that remains readable after assembly.
Responsive engineering support answers questions about GPIO current budgeting or relay protection quickly, letting creators stay focused on the fun parts of the project. The finished result preserves every feature of TT Voice Studio while removing the fragility of jumpers and breadboard noise. Recognition stays sharp, power remains stable under load, and the units look and feel ready for a real enclosure or small production run. AIVON's rapid PCB manufacturing and one-stop prototyping services turn an inspiring demonstration into hardware that other makers can trust and build upon.
Conclusion
Watching Tech Talkies transform a powerful offline voice idea into something any maker can use in minutes is genuinely inspiring. The firmware removes the coding barrier; a carefully designed and manufactured PCB removes the reliability barrier. Together they keep creativity at the center.
If you are planning to add voice control to a robot, prop, smart-home device, or interactive installation, start with the free firmware and flasher, prove the concept on a development board, then move to a proper custom board when you need something that lasts. Professional manufacturing support is ready when you need it.
FAQ
Q1: Why is a 4-layer stackup preferred for offline voice ESP32-S3 boards like TT Voice Studio?
A1: A continuous ground and power plane dramatically reduces digital noise coupling into the I2S microphone path and stabilizes the 3.3 V rail when GPIOs switch inductive loads, delivering more consistent recognition accuracy.
Q2: How should I2S traces be routed for reliable INMP441 performance on a custom PCB?
A2: Keep the three I2S traces under 30 mm, length-matched within 5 mm, and routed over a continuous ground plane. Place 100 nF decoupling (plus optional bulk) within 3 mm of the microphone VDD pin.
Q3: Can servos and relays be driven safely from the same board as the ESP32-S3?
A3: Yes, when a separate 5 V supply is used for the loads, their ground returns stay local, solid power pours are provided, and flyback diodes protect every inductive load from voltage spikes.
Q4: What surface finish and flash size are recommended for small production runs of these voice boards?
A4: ENIG offers excellent solderability on fine-pitch ESP32-S3 pads and resists oxidation. The module needs at least 8 MB flash for the speech models and web configuration interface.
Q5: Does AIVON provide DFM support specifically for offline voice and I2S audio projects?
A5: Yes. AIVON offers free engineering review focused on I2S routing, microphone acoustic hole alignment, decoupling, power-domain separation, and impedance control so prototypes become reliable, manufacturable boards.
Hi ESP. Lights on. Lights off. Red light. Green light. Clear light. Ring. Red. Ring. Clear. Ring. Purple. Ring. Clear. Turn left. Turn right. Go to center.
Can you believe all this is offline and without writing a single line of code?
This is done using the Tech Talkies Voice Studio firmware. You just have to flash it, set the commands using the web tool and you can start controlling your project with your voice. No internet, no coding. And if you want to learn to do this, watch till the end.
You'll need any ESP32S3 board with at least 8 MB of flash memory. I'm using an ESP32S3 dev board, but it works with any brand or variants. Here it is running on my Xiao ESP32S3.
Hi ESP. Lights on, lights off, and an INMP441 microphone.
The first step is to flash the firmware. Connect the board to your computer and head over to the Tech Talkies flasher page here. Select the Voice Studio and connect your board and flash it.
Once flashed, use your mobile phone and connect to the TT Voice Studio Wi-Fi network. The password is techies and then open 192.168.4.1 on your browser. This is where the magic happens.
First, go to the settings page here and set the pins for the mic. These are the pins you will use to connect your mic. Once set, connect the mic to those pins. I have already connected my mic here. The LR pin is connected to ground and the VCC is connected to 3.3 volts. And it is good to have an external power source if you're powering things like motors or a lot of LEDs.
And if you need custom PCBs for projects like these, Aivon provides a structured solution for prototyping and production. For new users, the platform includes up to $60 in welcome credits along with a free engineering review. This includes $30 in manufacturing credit, $30 for shipping, and the free engineering review itself. With this, you can do a lot of things like PCB prototyping, making PCBA orders, or even engineering driven jobs. You simply have to sign up and verify your account and you can start uploading your design and start placing orders.
Next, let's connect an LED and try to control it. I'm adding the LED on pin 15 with the resistor, of course. Never forget the resistor.
Now, in the web app, enter the command you want to use. You don't have to change the command ID. It is automatically set. Next, enter the pin number and then select the type of control. We just want to turn the LED on or off. So, select the on/off option and also add a command to turn it off. At the bottom you can see all the saved commands.
Let's try our new commands. Before saying the command you need to wake up the device and you can do that by calling out hi ESP or Jarvis.
Hi ESP lights on lights off.
Next, let's try to control the onboard RGB LED. On this board, the LED is connected to pin 48. And for the control type, select RGB LED. I set the number of LEDs. We just have the one. And set the color. I think I'll leave it to red.
Now let's test it.
Hi ESP red light, green light, clear light, green light, clear light.
Next, let's try to control an RGB LED ring. And I will be switching to an external power supply from here because there are a lot of LEDs.
Hi ESP ring red ring purple ring clear. Hi ESP ring red lights on ring clear red light.
Next, I'm adding a servo to the setup.
Hi ESP. Turn left. Turn right. Go to center. Turn left. Turn right. Turn left. Red light. Lights on. Ring. Red. Ring clear.
And this way you can even add and control a relay and control your home appliances if you want.
Hi ESP. Turn off the fan. Turn on the fan. Turn off the fan. Lights on. Turn on the fan.
And all this is completely offline and without writing a single line of code.
I made this firmware to help beginners make voice control projects easily. For advanced users, drop a comment and I will make a tutorial on how to code voice control projects like these.
Like this video and share it if you want to support me making firmwares like these.
And until then, keep making.





