A 4-layer FR-4 board with one HDI step, blind and buried vias, 1.0 mm finished thickness, 1 oz copper on all layers, green solder mask on both sides, white legend, OSP finish, and via tenting arrived for CAM review with customer self-panelization specified as 2×5 and no process edges. The order called for mechanical routing, 100 % flying-probe test, and customer-defined stackup. During data review the engineering team identified several documentation and geometry issues that required clarification before production tooling could be finalized. No customer replies or release records accompany the EQ list, so the analysis below stays within what the parameters and factory questions establish.
Absence of a Defined Single-Board Outline
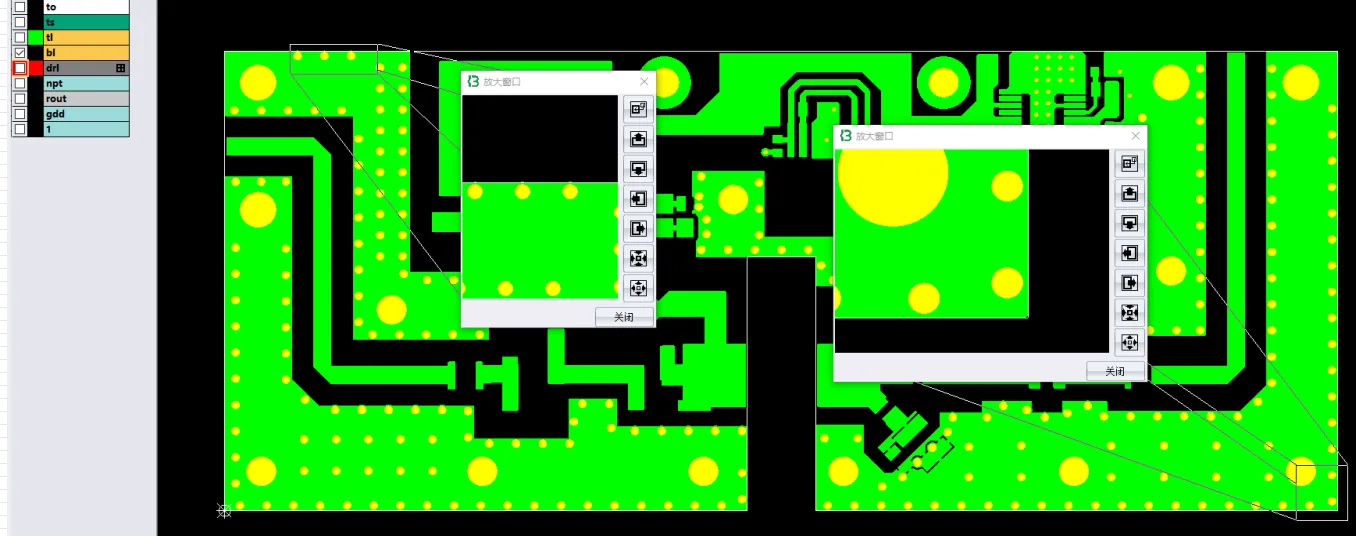
The supplied data did not contain a dedicated single-board outline layer. Engineering therefore proposed to treat the gm2 routing layer as the authoritative profile for both the individual board and subsequent panel construction. In a customer-self-panelized order this choice is consequential: the routing path defines the final edge, the copper-to-edge clearance that must be enforced, and the locations where process bridges or mouse-bites will be placed. Using the routing layer avoids inventing a profile, yet it also means any discrepancy between the routing data and the copper or solder-mask artwork will propagate into the finished outline.

Figure 1: Treat the gm2 routing layer as the authoritative profile
Because the order listed zero process-edge width and mechanical routing, the team needed explicit confirmation that the gm2 path was complete and that no additional outline features (slots, internal cut-outs, or keep-outs) had been omitted. Without that confirmation the panelization drawing and the copper-avoidance operations described below rest on an assumption rather than a verified design intent.
Copper Features Placed Too Close to the Proposed Outline
With the routing path taken as the outline, multiple copper features were observed to lie inside the normal manufacturing keep-out zone. Standard practice is to remove or pull back copper so that the finished edge does not expose copper after routing. The EQ therefore stated that copper avoidance would be applied and the excess copper removed. On a 1.0 mm, 1 oz, HDI board ( HDI-20260514-035 ) the risk is not merely cosmetic: residual copper at the routed edge can create intermittent shorts if the board is later placed against a metal chassis or if residual burrs remain, and it can also interfere with subsequent plating or solder-mask adhesion at the perimeter.

Figure 2: The excessed copper will be removed
The same clearance question reappeared when the factory prepared its own panelization drawing. Process edges were added and copper was poured on those edges; the forming method retained the customer's bridge connections. Adding process-edge copper improves panel stiffness and provides a more stable surface for routing, yet it also increases the total copper area that must be balanced against the internal layers. Because the original data specified "no process edges," the addition constitutes a manufacturing adjustment that required customer confirmation. The records do not show whether the added copper or the bridge geometry was accepted.
Holes Sized Identically to Their Pads
Certain drills were equal in diameter to the pads they intersected. Engineering proposed to treat these holes as non-copper (i.e., non-plated or cleared of copper). On a board that already contains blind and buried vias, the distinction between plated and non-plated holes affects both the drill program and the subsequent plating sequence. A hole that matches the pad exactly leaves no annular ring; if the hole is plated, the resulting barrel has no land for reliable interconnection and is vulnerable to breakout under thermal or mechanical stress. Treating the feature as non-copper removes that risk but also means the pad cannot serve as a plated via or through-hole connection.

Figure 3: Certain drills were equal in diameter to the pads they intersected
The order listed a minimum hole size of 0.1 mm and stated that resin plugging was not required, yet it did not classify these equal-size features. Confirmation was therefore required to decide whether the holes should remain non-plated, be resized, or be converted to a plated via with an enlarged pad. Leaving the geometry unchanged would have forced the CAM team to choose one interpretation, with the attendant possibility of either an open circuit or an unintended non-plated hole in the finished board.
Solder-Mask Openings Missing from SMD Pads
A set of pads that carried surface-mount footprints lacked corresponding solder-mask openings. The design is electrically and mechanically anomalous: an SMD pad that remains covered by mask cannot accept solder paste or form a reliable joint. Engineering therefore added openings sized to the copper pads and included the modified artwork in the production draft for review. Because the order specified green mask on both sides and via tenting, the added openings affect only the discrete SMD sites; they do not alter the tenting of vias. The potential consequence of leaving the pads covered is simply non-solderable components, which would render the board unusable for its intended assembly.


Figure 4&5: A set of pads that carried surface-mount footprints lacked corresponding solder-mask openings
The same production draft also incorporated the copper-avoidance edits, the proposed non-copper treatment of equal-size holes, and the panelization changes. Confirmation of the draft was therefore a single checkpoint for several interdependent modifications rather than an isolated artwork review.
Legend Features Too Small to Resolve
White legend text on both sides was smaller than the practical resolution of the silkscreen process. At that scale the characters merge into solid blobs. Engineering recommended deleting the text while retaining the surrounding frames so that the location of the legend remained visible. The change does not affect electrical function, yet it removes information that a designer or assembler might rely upon. Because the order already requested the addition of a production serial number inside each single board, the remaining frames and the new serial number together become the only legend content. Confirmation was needed to ensure that the deleted text was not essential reference data.

Figure 6: Some legend texts are too small

Figure 7: Deleting the text while retaining the surrounding frames
Adding Process-Edge Copper Pour and Bridge Connections
When the factory prepared its panelization drawing for the customer-self-panelized 2×5 array, PCB edge rails were added and copper was poured across those edges. The forming method retained the bridge connections already present in the customer's routing data. Adding process-edge copper increases panel rigidity and provides a more stable surface for mechanical routing, but it also enlarges the total copper area that must remain balanced with the internal layers of this 1.0 mm, 1 oz HDI construction. Because the original order specified no process edges, the addition of both the edges and the poured copper constituted a manufacturing adjustment rather than a direct reproduction of the supplied data. The engineering team therefore requested confirmation that the revised panel geometry and bridge configuration were acceptable before finalizing the production tooling. The available records do not establish whether this panelization proposal was approved.

Figure 8: Process edges were added and copper was poured across those edges
Summary of Required Confirmations and Remaining Uncertainty
Across the EQ set the engineering actions proposed were:
- Adopt the gm2 routing layer as the single-board outline.
- Remove copper that violated the edge clearance.
- Add process-edge copper and retain bridge connections for routing.
- Treat equal-size hole/pad features as non-copper.
- Add solder-mask openings to SMD pads that lacked them.
- Delete undersized legend text while keeping frames, and insert the requested production serial number.
Each item was presented for confirmation; the supplied records contain no replies. Consequently it is not established whether any of the adjustments were accepted, modified, or rejected, nor whether the board was released to fabrication. The production draft served as the consolidated vehicle for those decisions. Until confirmation is received, the tooling remains provisional.
FAQs
Q1: Why was the gm2 routing layer used for the outline?
A1: No dedicated single-board outline was supplied. The gm2 layer already contained the routing path, so it provided a consistent geometric reference for both the individual profile and the panel bridges without inventing new data.
Q2: What risk does copper at the routed edge create?
A2: After mechanical routing, residual copper can remain exposed at the board edge. That exposure can produce intermittent shorts against a chassis or handling fixtures and can compromise solder-mask adhesion along the perimeter.
Q3: Why treat a hole the same size as its pad as non-copper?
A3: An equal-size hole leaves no annular ring. Plating it would produce a barrel with no land, increasing the chance of breakout. Clearing the copper removes that risk but also prevents the feature from functioning as a plated connection.
Q4: What happens if SMD pads remain covered by solder mask?
A4: The pads cannot accept solder paste or form a metallurgical joint. The components associated with those pads become unsolderable, rendering the board unusable for its intended assembly.
Q5: Was the board released for production?
A5: The available records contain only the factory EQs and the request to confirm the production draft. No customer responses or release statements are present, so fabrication status is not established.